There is a simple way to make something in a photograph really pop using Photoshop. Let's take a look at one way to do selective color editing in a photo.
In this example of the car, lets take a look at just editing the red in the car. The first thing you'll want to do is make a rough selection around the car.
Then, go to Image > Adjustments > Selective Color.
Since the car is red lets make sure you have "Reds" selected in the drop-down menu for Colors.
Since Cyan is the opposite of Red, notice the changes in color of the selected red car when I adjust the Cyan slider. Because there is very little red color data around the car it's easy for me to make a rough selection of the car and do this editing without damaging the the ground around the car.
If the car was parked on say a red brick street, I'd need to take much more care in making my selection.
So, the next time you want to quickly edit a color area in your image, consider using the Selective Color panel found under Adjustments.
propeller
Tampilkan postingan dengan label Photoshop. Tampilkan semua postingan
Tampilkan postingan dengan label Photoshop. Tampilkan semua postingan
Selasa, 12 Februari 2013
Senin, 28 Januari 2013
Photoshop CS6 - Content Aware Patch
There's a new tool that fixes Content Aware problems.
Have you ever had tried using Content Aware Fill and got something odd in your "fix"? This is appropriately named in the Photoshop world as "Content Aware Fail".
There's a new option in the Patch tool that uses Content Aware Fill techniques.
Take a look at this great new feature in my latest video.
http://screencast.com/t/wgwHp5ilVGr
Senin, 21 Januari 2013
Photoshop - What is the difference between fill and opacity?
When working with layers, I've often wondered what the difference was between Fill and Opacity.
Often I just experiment with one or the other until I get the look I want and, they seemed to have the same effect on my image.
I finally decided to delve into the differences to try and understand them more.
This is what I learned.
--> The difference is that opacity affects all of the layer including layer effects.
Fill only affects the layer content, but not layer effects.
Here is an example of the difference.
The photo below has some text of which I used a drop shadow and a bevel. I didn't adjust either the opacity or fill.
Interesting....With this in mind, I liked the look of the image coming through the text.
So, in my final image, I changed the fill to 0%. I then got the really cool effect of the text and photo below.
Wow, who knew that the changing the fill slider could create such a KEWL effect.
Often I just experiment with one or the other until I get the look I want and, they seemed to have the same effect on my image.
I finally decided to delve into the differences to try and understand them more.
This is what I learned.
--> The difference is that opacity affects all of the layer including layer effects.
Fill only affects the layer content, but not layer effects.
Here is an example of the difference.
The photo below has some text of which I used a drop shadow and a bevel. I didn't adjust either the opacity or fill.
The photo below I changed the opacity to around 50%. Everything on the text layer becomes 50% transparent including the text, shadow and the bevel.
The photo below I put the opacity back and changed the fill to 50%. The text started to become transparent but the shadow and bevel were NOT effected.
Interesting....With this in mind, I liked the look of the image coming through the text.
So, in my final image, I changed the fill to 0%. I then got the really cool effect of the text and photo below.
Wow, who knew that the changing the fill slider could create such a KEWL effect.
Senin, 24 Desember 2012
Photoshop's Refine Edge Tool for better selections
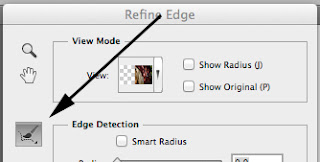 Some selections are much more difficult than others. To make a laborious selection involving texture or around hair consider using the Refine Edge brush tool.
Start by making a rough selection with any of the selection tools.
Then go to Select > Refine Edge. Here you will see the Refine Edge brush as shown on the left.
The refine edge tool will improve the quality of your selection and allow you to extract objects to make your final results look much more realistic.
Using the Refine Edge brush carefully brush around the edge of your selection keeping the tiny cross-hair in the middle of the brush off the subject. Photoshop will use this information to fine tune where the edges should be.
On my example on the left I used the lasso tool to make a selection around my subject then deleted the background. The scenic layer below shows through but the edges are harsh and the image looks obviously copied and pasted.
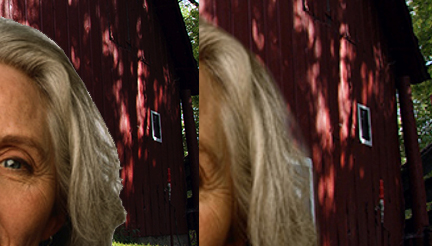 I included the Refine Edge brush on the image on the right to improve my selection before deleting the original background. I was able to brush over soft areas like the hair to make a much better selection. The results are a much more realistic looking scene.
 With a little experimenting with the tool you'll get a near perfect selection.
Want to see how I did this? Take a look at the video link below.
http://screencast.com/t/0SyHXNOtXGE
Senin, 03 Desember 2012
Photoshop CS6 new color adjustment layer
There's a new adjustment layer in Photoshop. It's called the color lookup adjustment.
Just go to the adjustment layer icon in the layers palette, and select the new color lookup adjustment. Like other adjustment layers, the beauty of this tool is that it doesn't harm any pixels and, you can always go back and edit, adjust, change the opacity of the effect, or delete the adjustment layer.
The color lookup adjustment layer is a combination of adjustments that remaps all of the colors into a new set of colors. These colors can give your photo a unique feel.
You'll find several special effects to choose from. In my example I'm using the the Crisp Warm look found in the 3DLUT (Look Up Table) drop-down menu. Depending on the feel you want, try each special effect out.
If there aren't enough options here, try the Abstract and Device Link effects too.
Again, since you’re using an adjustment layer, the change you apply to the image isn't permanent, which means you can try as many lookup tables as you want, compare the results and settle on the one you like best.
In my example below, I used the Crisp Warm effect but took the opacity back to 63% to get my photo looking just right.
You'll also notice that it comes with its own mask. Try applying a special effect and mask part of the image to the original state. You'll only be limited by your imagination.
*The Mac system comes with an additional row of abstract effects not found on Windows.
This photo I took was of my husband's farmstead in NW Kansas. Copies of this and other of my photographs can be found at http://tinyurl.com/8gzenmg
Senin, 19 November 2012
Photoshop CS 6 - Changing the Dark Interface
The first thing you'll notice on the new Photoshop CS 6 is the dark interface around the menu and tools. I didn't like it at first but now I'm starting to get used to it.
Photoshops reasoning is to keep the tools in the background so that you can focus on the image.
If you don't like this new color you can change it in the Preferences.
To do this go to Photoshop's preferences - Interface
Here you will see 4 shades to select from. You can select anything from a light gray to black.
But, if you're like me, you might like the new darker interface. I've decided on the black.
Want to change the canvas color? This too can be customized by simply right clicking and selecting one of Photoshop's shades or even customizing your own canvas color.
Senin, 12 November 2012
Photoshop CS 6 - Where are the artistic filters?
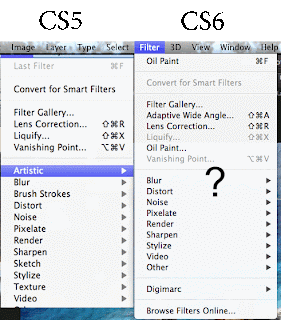 One of my favorite filters in Photoshop are the artistic filters. You can image my panic when opening Photoshop CS 6 and I didn't see Artistic under the Filters menu!
Photoshop hasn't gotten rid of these wonderful filters. You can still find them in the Filter Gallery.
Just go to Filter Gallery and all those wonderful filters like water color, dry brush and all the others are still there.
Photoshop has added a new filter to play with. (As if there weren't enough). This new filter is called Oil Paint. You'll find it just above the usual list of filters under the Filter menu.
Below you'll see an example of some testing I did with this new filter. The jury is still out on it becoming my new favorite yet. However, give it a try, you may love the results.
Enjoy!
Leona's photographs
http://tinyurl.com/8gzenmg
Selasa, 06 November 2012
Photoshop CS 6 Golden Spiral Cropping Tool
There are some new features in the cropping tool in Photoshop. Photoshop had the nice "Rule of Thirds" grid for cropping in the last version that was really handy. A new addition is the Golden Spiral Cropping tool.
The Golden Spiral grid is designed to lead the eye to the center of an object or area in a photograph. Let's take a look at how it works.
In this photograph I want to draw the eye to the hat.
In the View drop down box I selected the new "Golden Spiral" grid. As I adjusted the size of the crop I moved the center of the spiral to the center of the hat. (The spiral grid is a light gray so I've enhanced the line so you can see it easier.)
You can see my bounding box for my crop.
By the way, you now move the picture to adjust the crop and it takes a little getting used to.
I cropped out the part of the picture I wanted making sure the spiral focused on the hat. Below is my results. A new photograph that really draws the eye right to the hat on the bale.
Pretty neat Photoshop!
I was recently asked how to rotate the spiral crop. Here's how to do that.
Simply right click after making a rough selection. You'll then have a menu option to rotate the crop.
Leona's photographs
http://tinyurl.com/8gzenmg
Senin, 15 Oktober 2012
Photoshop - Create your own custom brushes
Did you know you can create your own custom brush in Photoshop? This brush could be of any shape or even a photo of something allowing you to let your creative juices flow.
How about creating a brush with your logo or signature? Then, with just a click of the mouse you could digitally sign any of your copyrighted work or even add your logo to anything you've created.
Here are the steps to do this.
Want to see how I made an awesome brush and signature brush? Check out my video below.
Enjoy!
http://screencast.com/t/FMB6Y7U8j3b
How about creating a brush with your logo or signature? Then, with just a click of the mouse you could digitally sign any of your copyrighted work or even add your logo to anything you've created.
Here are the steps to do this.
- Open a shape or image that you want to become a brush (larger images better so that your image doesn't pixelate when increasing your brush size. You can always make your brush size smaller)
- Edit > Define Brush Set
- Give your brush a descriptive name
- Open your brush pallet then scroll to the bottom of the brush selections
- Your new custom brush will be the last option available
Want to see how I made an awesome brush and signature brush? Check out my video below.
Enjoy!
http://screencast.com/t/FMB6Y7U8j3b
Senin, 08 Oktober 2012
Photoshop New Auto Save feature in CS 6
Here's another reason to love the new Photoshop CS 6.
Have you ever had your computer crash while working in Photoshop or have Photoshop lockup on you in the middle of a project?
There is a new feature in CS 6 to help save the day.
Open up the Preferences in Photoshop and take a look at "File Handling". Here you will see a new feature to automatically save and recover your work. I have mine set for every 10 minutes but you can set it for 5 minutes. I don't see a reason to have it wait to save for any longer than that.
If your computer happens to crash just reopen Photoshop. Photoshop will open a recovered file of the last saved state with the word "Recovered" in the file name. The original file doesn't get touched.
Great save Photoshop!
Senin, 01 Oktober 2012
PS CS 6 updates
If you're a Photoshop CS6 user you'll want to make sure you have the latest updates!
Simply open Photoshop and go to Help > Updates
An explanation of these updates are explained here.
http://adobe.ly/Rt7ckr
Now you'll always have the latest and greatest version of Photoshop.
Happy Photoshopping!
Simply open Photoshop and go to Help > Updates
An explanation of these updates are explained here.
http://adobe.ly/Rt7ckr
Now you'll always have the latest and greatest version of Photoshop.
Happy Photoshopping!
Senin, 30 Juli 2012
Understanding Photoshops Image Size
I've long wondered why Photoshop displays a much larger size of an image than it really is. For example, I opened this barn photo which is in a .jpg format and is just over 2 MB in size.
However, Photoshop is telling me that the photograph is just over 6 MB under the Image Size. I didn't understand why Photoshop displays a much larger size for the image than it actually is.
I learned that Photoshop is showing me how large the image would be if I saved it again in an uncompressed native .psd file. Photoshop adds a lot of additional information/overhead in its native format that I wouldn't need when saving it as a .jpg file.
Now, finally this is making a little more sense when I see such a variation in file size! I hope this helps you too.
Jumat, 20 Juli 2012
What is Metadata?
Lets take a simple look at what metadata is and where you can find it.
EXIF data (Exchangeable Image File) is the metadata that comes from your camera and is attached to your image file.
Where Can I See the EXIF Data?
Camera: There are a number of places to view EXIF data, starting with right on your own camera. In general, when previewing your images on your camera, pressing the “Info” button will lead to the EXIF data for the photo you are previewing. Each camera may have a slightly different method for viewing the EXIF data, so if you are having trouble the information will be available in your camera’s user manual under EXIF.
On Your Computer: For JPEG and TIFF images, you can right click on the image icon on your hard drive, and scroll to “Properties” (PC) or “Get Info” (Mac). You may have to explore the dialog box which pops up when you select either of these options. For example, in Windows you would click on the Summary Tab, then click on the “Advanced” button.
In Photoshop – File - Info - Camera data (shown above) note I can see what kind of camera took the photo, and even if the flash fired.
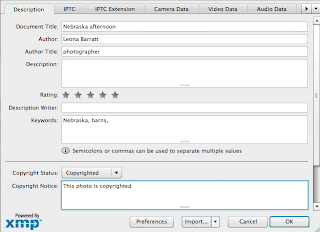 Adding your own copyright metadata
 Go to File - Info - Description (see photo at left)
You can add your name, keywords and copyright information here.
What if you decide you want to remove metadata from your photograph. Let's take a look how to do this.
Photoshop - Removing metadata
File - Save for web and devices - Metadata - none
Or, copy and paste the image into a new document window.
I hope this short tutorial makes metadata a little easy to understand. Now you'll be able to add copyright information right inside any of your photographs.
Sabtu, 21 April 2012
Photoshop Oil Paint Filter effects
I love turning photographs into "paintings".
Check out my Art History Brush to create a nice faux painting of your favorite photographs.
http://leonaruth.blogspot.com/2009/10/photoshop-art-history-brush-tutorial.html
There are a lot of reasons to be excited about the new Photoshop CS 6 but here is another reason.
Check out this new Oil Paint Filter.
http://www.video2brain.com/en/videos-12715.htm
Want to download Photoshop CS6 Beta for FREE?
http://leonaruth.blogspot.com/2012/03/free-beta-version-of-adobe-photoshop-6.html
Enjoy!
Senin, 16 April 2012
Free Fonts
Nothing like something cool for free so I wanted to share with you a great site for some quality FREE fonts.
PCWorld provided a list of free fonts.
What makes this site better than the rest is that it also provides
http://www.pcworld.com/downloads/1451/topic.html?osFilter=&licenseFilter=2&catId=1451&page=1&order=4#downloadsGrid
PCWorld provided a list of free fonts.
What makes this site better than the rest is that it also provides
- user ratings
- reviews
- numerous font options to select from
http://www.pcworld.com/downloads/1451/topic.html?osFilter=&licenseFilter=2&catId=1451&page=1&order=4#downloadsGrid
Senin, 09 Mei 2011
Photoshop - Neat Lens Flare Trick
 Want to master the Lens Flare tool in Photoshop?
Here is all you need to do.
Go to Filter > Render > Select Lens Flare.
Now, before you click OK, in the preview window you can move exactly where the lens flare should be.
Then click OK.
Want to take it to the next level?
For those who understand a little about Blending Modes take a look at how you can later edit where your lens flare appears on your photograph.
Watch my video on how it's done.
Cheers!
Senin, 25 April 2011
Photoshop - Fast Easy Border
Want to create a nice photo in just a couple of steps?
Here is all you need to do.
Watch my movie on how I did this.
P.S. That's me in the middle having fun on the family farm in Nebraska a LONG time ago. ;-)
Don't forget to have some fun today.
Here is all you need to do.
- Select a background color that you want your border to be.
- Select the crop tool and select the entire photograph.
- Next, drag the edges of the crop OUTSIDE the selected area.
- Then, confirm your crop.
Watch my movie on how I did this.
P.S. That's me in the middle having fun on the family farm in Nebraska a LONG time ago. ;-)
Don't forget to have some fun today.
Selasa, 19 April 2011
Photoshop - Best way to straighten a crooked photo
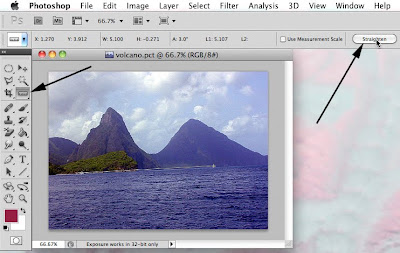 I'll admit that I rarely hold the camera straight when taking a photograph. It's especially true when I'm in a hurry. Our anniversary trip to St. Lucia shows my crooked photograph problem clearly.
I used to select the photograph then use Edit > Transform > Rotate and try to rotate by eye to get my image straight with the horizon. However, it was mostly a guessing game.
Here is a much better and faster way.
Select the ruler tool hidden under the eyedropper.
In the Options bar select "Straighten".
That's it. Photoshop magically straightens and crops the photo for me. No more crooked photographs!
Click here to watch my video on how I did this.
Cheers!
Selasa, 30 Maret 2010
Mastering Text in Photoshop - Part 1
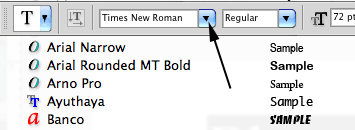
We've been blessed in the last few versions of Photoshop (CS 2 and beyond) with the font preview as we're selecting fonts.
If forever reason you can't see the preview of what your font looks go to the Preferences and select "Type".
make sure that "Font Preview" is checked.
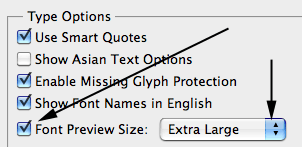 You'll also notice that there is a drop down menu next to "Font Preview".
Sometimes the preview you get is helpful but a little hard to see exactly what you are getting. Here is a quick tip. Change the default preview size of medium to Large or even Extra Large.
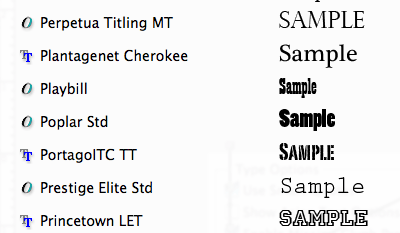
The larger preview of your font makes it much easier to determine what your type is going to look like. This saves a lot of time of changing the font, not liking what it ended up looking like, then going back and trying again.
Now, for all my Photoshop friends. Stay safe.
Kamis, 12 November 2009
FREE color designer
I don't know about you but I'm so far from being a graphic designer that you could even call me color blind. However, knowing where to get help is all you'll need.
I'm going to share with you a really neat site that will generate colors for you. This Palette Generator will allow you to design colors on a website by looking at a favorite photograph.
It even includes a downloadable Adobe Swatch file (ASE) for Photoshop.
Besides web design, you could also use it for scrapbooking or find complementary colors to paint a room around your favorite sofa!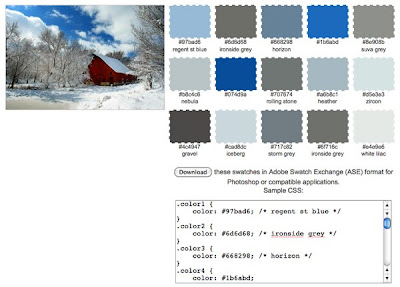
In my example I uploaded a photo of the farm I was raised on. If I was into scrapbooking I'd know exactly what colors what go perfectly with my photo.
Here is the link http://bighugelabs.com/colors.php
Enjoy!
I'm going to share with you a really neat site that will generate colors for you. This Palette Generator will allow you to design colors on a website by looking at a favorite photograph.
It even includes a downloadable Adobe Swatch file (ASE) for Photoshop.
Besides web design, you could also use it for scrapbooking or find complementary colors to paint a room around your favorite sofa!

In my example I uploaded a photo of the farm I was raised on. If I was into scrapbooking I'd know exactly what colors what go perfectly with my photo.
Here is the link http://bighugelabs.com/colors.php
Enjoy!
Langganan:
Komentar (Atom)


