propeller

Rabu, 30 Desember 2009

Photoshop - Removing Blue Eye

Photoshop has a great tool for removing red eye. Red eye occurs when the light of the flash reflects from the retina. The more open the eye, the more red eye effect. Just select the red eye tool and click on the red part of the eye and presto! The red eye is gone and replaced with a natural dark color.
When you take photos of animals, the red eye effect can be quite different. Animals have a reflective layer in the back of their eyes behind the retina called the tapetum. This layer enhances their night vision. The color of the tapetum gives you blue, green, yellow, or white eye effect. The red eye tool does not work with blue eye.
Removing blue eye takes some additional work.
Thanks to Shari, I have a good example of blue eye.
Here these adorable little dogs, Fritz & Schatzi, have that blue eye reflection going on. Attempting to use the red eye tool just does weird things like darkening the doggies fur on its head.
Here is what we need to do.
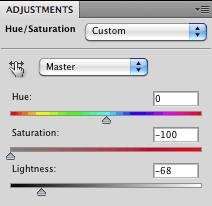
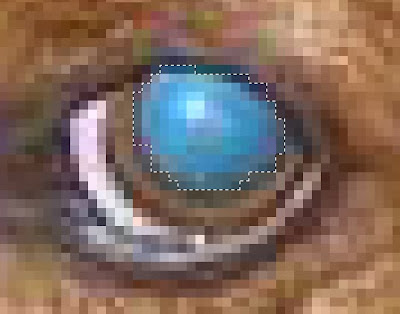
  • Zoom way in and select the blue part of the eye. Make sure you have all of the blue selected in both eyes.
  • Add a new adjustment layer of Hue/Saturation by selected the adjustment layer icon in the bottom of the layers palette.
  • Slide the Saturation left to remove all color.
  • Slide the lightness back to add a nice dark pupil.
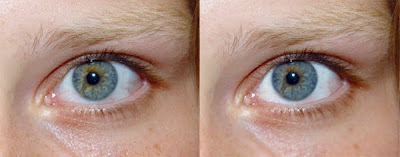
And there you have it. No more blue eyes.
I did the same for both dogs since the dog on the right had a little bit of blue showing too.
The final touch was to adjust the levels, add a little more saturation to the entire photograph along with a little more contrast just to make the image "pop".
These sweet little dogs no longer have blue eyes and the results are the following image.
Looks the the perfect presents to find under the tree to me!


Have a problem photo? Send it to me at lbarratt1@unl.edu and you might see it on an upcoming blog.

Minggu, 27 Desember 2009

PCMAGS Top FREE Apps for your phone

I just got a DROID and really love it so far. It took some getting used to before I was comfortable with interacting and navigation. But now that I've gotten better at that, I'm looking for some fun features to add to my new phone.

You may be getting a new phone for the holidays too. If so, you'll want the best Free applications out there.

Fortunately PC Magazine has done the footwork already for us. They've gone through thousands of applications to find the best Free applications. They've even sorted the list for each phone.
Make sure to scroll to the bottom of the page for these lists.
http://www.pcmag.com/article2/0,2817,2356415,00.asp
Enjoy!

Rabu, 23 Desember 2009

Holiday Cheer

I love a good prank. As long as nobody get's offended and it's done in good taste.
Here is a good example.
Everyone has seen the Salvation Army bell ringers. Most of the time they get ignored. But they don't get ignored this day.
These helpful pranksters do their part to help a bell ringer get noticed!

Happy Holidays!

Minggu, 20 Desember 2009

Photoshop - Retouching eyes

Editing eyes are the hardest and most important part of editing a photograph. You don't want to over do and make the eyes look fake. You do want to take out some redness and make the eyes the focal part of a photograph.
The photo below shows you what I did in a few simple steps to make the eyes stand out without making them look touched up.

Here are the steps I did to enhance the eye in the photograph.
Remember to always copy your original photo to a new layer by dragging and dropping the background layer onto the new layer icon. You always want to have the original document to go back to if needed.
  • First I cloned out a few of the larger red spots in the white area of the eye but not all of them.
  • I selected the white part of the eye with the magic wand tool and under Hue/Saturation I removed some of the red. I don't want to remove all of it or it starts to look fake.
  • Under Brightness and Contrast I added just a little more brightness.
  • Here's a great eyelash tip! I took the burn tool, set the option to Shadows, selected a very small (size of an eyelash) soft edged brush and lightly went over all the eyelashes.
  • I also used the same settings and dodge tool to go around the outside iris to give it a little more definition.
  • The last thing I did was to select a blue foreground color similar to the natural eye color.
  • I selected a small soft edged brush and changed the option for the brush to Normal with Opacity set to about 9%. This gave the eye just a little more color.
These subtle edits can make all the difference in the world to a portrait. People will wonder what you did to make it look so good without having to give away your secrets.
Give it a try! :-)

Selasa, 15 Desember 2009

Keep It or Toss It?

How long can that bottle of ketchup stay in your fridge before it goes bad?
I don't really know but if you want an expert opinion on this and any other foods you have at home here is a great site.
http://www.stilltasty.com/

Rabu, 09 Desember 2009

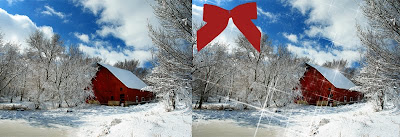
Free Holiday Brushes for Photoshop

Want to decorate that favorite photo and really make it your own?
Here is a site offering dozens of free winter and holiday brushes that you can load into your Photoshop.
There are snowflakes, sparkles, ornaments, frost and dozens more available.
I only tried a couple of them to get the following results.Not enough brushes for you? Here is a site where there are 1,000's more free brushes you can try.
Need to know how to load these brushes into Photoshop? Check a previous blog post on loading brushes into Photoshop.
Happy Photoshopping!

Rabu, 02 Desember 2009

Just plain fun

Here's something I haven't been able to duplicate in Photoshop very well. It's called drizzle art.

Jackson Pollock was one of the most important artists of the 20th century. You won't recognize the name but I bet you've seen his amazing drip paintings.

I wasn't really a fan until I could try it myself. This site gives you that opportunity and the best part is, it's without all the mess!

You can try creating a work of art in Pollock’s style. You start with a blank canvas. Use your mouse to drip paint on the canvas. Change color by clicking the mouse and use the spacebar to clear and start over.

Go to the site below and click on the LARGE black and white enter graphic.

Once in a while you need a break like this for just plain fun. Enjoy!
http://jacksonpollock.org/

Selasa, 01 Desember 2009

Photoshop - How to quickly copy layer styles

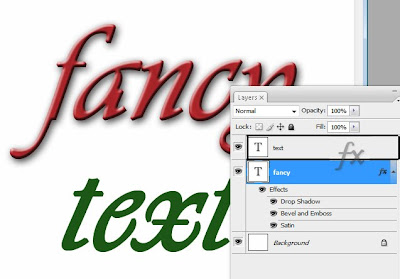
Ever want to duplicate a neat layer style to another layer? Well, you don't have to write down all the steps you did and then repeat them on another layer.
In this example, I wanted to special effect I did to the word "fancy" to be duplicated on the layer containing the word "text". I have 3 layer styles that I edited to my liking.Do one of the following:
  • In the Layers palette, Alt-drag (Windows) or Option-drag (Mac OS) a single layer effect from one layer to another to duplicate the layer effect, or drag the Effects bar from one layer to another to duplicate the layer style.

  • Drag one or more layer effects from the Layers palette to the image to apply the resulting layer style to the highest layer in the Layers palette that contains pixels at the drop point.

Perfect!

My movie of the month


Jumat, 27 November 2009

Free flight status check

This is the time of year when family is traveling. Flights get delayed and you don't want to wait forever at the airport.
Here's a simple and free site to check their flight status.
http://flightaware.com/live/

Selasa, 24 November 2009

Black Friday Preview

Looking for bargains? It's nice to know ahead of time what is going to be on sale and for how much.
Before you head out for great deals on Friday you can get a sneak peak of what's going to be on sale at the following sites.
It's nice when you can be way ahead of the game.
Enjoy!

BFAds.net
BlackFriday.info
TheBlackFriday.com

Photoshop - Best way to whiten teeth

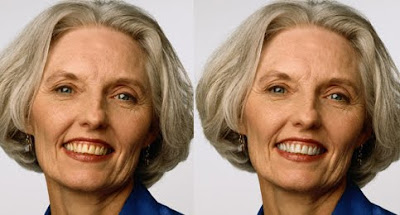
I used to whiten teeth when retouching photos by using the Dodge tool. It was fast but the results could look fake.
I found a much better way to whiten teeth and the teeth look great and natural.
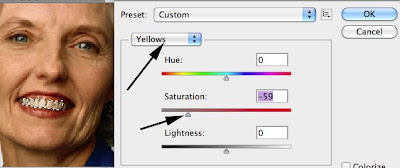
My trick? Just remove the yellow.
In my example I selected just the teeth. Then, under Hue and Saturation I took the yellow almost completely out of the photo.Here are my results below. No more fake looking smiles for me!

Sabtu, 21 November 2009

Photoshop - Instant slimming trick

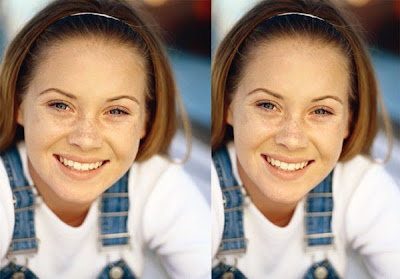
This pretty young lady doesn't need to lose any weight but sometimes you can impress others but discretely removing a few pounds. They'll be happy with the photo and not even know that you helped out.
Here's all you need to do.
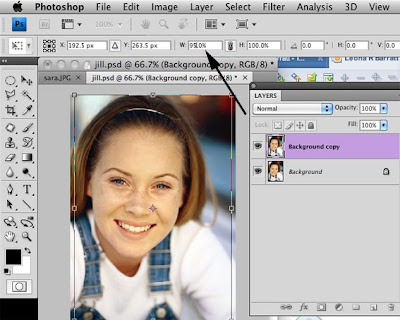
Copy your image to a new layer.
Under Edit select Free TransformChange the width just a little to say 95% as I did in my example. (any more and it gets obvious and distorted)
When you're happy with the results click Return.
You may need to do a little cropping and then you're ready to save your finished results. Here are the results side by side below. The left is before and the right after.
It's simple, discrete and the best part, it's easy.

Kamis, 19 November 2009

Photoshop - sharpening tools tutorial

Photoshop comes with too many ways to sharpen a photo. It gets to be confusing. You have
  • sharpen
  • sharpen edges
  • sharpen more
  • smart sharpen
  • unsharp mask
Sharpen and sharpen more seems to just add more noise to my photographs.
Let's focus on the one I use almost exclusively.
My favortie is unsharp mask. It seems to be the most useful sharpening tool.The Unsharp Mask searches through your image looking for where colors change, and sharpens those areas. The Unsharp Mask is superior to any other sharpening because it makes decisions based on adjacent pixels, not random color changes, so it usually can find and sharpen just the true edges of color areas
It is the it creates a halo around high contrast area to emphasize edges.
Let's take a look at what the radius setting does.
In my example you can see that the more I increase the Radius the more it adds both a white edge and black edge to areas of contrast.

The amount changes the amount of contrast between pixels. The more the amount the more you will notice a change in the picture. If you set this too high then the halos around edges will be too noticeable and the picture will look terrible. The amount that you need is determined by the subject matter and the resolution of the image. If the subject matter contains something like trees or people then I’ve noticed that a lower amount is fine. For buildings and objects with sharp edges, a higher amount works. For high resolution images you’ll need to increase the amount more. You’ll need to experiment with it.

The Radius is the size of the halo around the edges. One side of the edge will have a lighter color and the other side of the edge will have a darker color. The number that you are changing is the number of pixels surrounding the high contrasting areas. High resolution images will need a higher radius. Low resolution images will need a lower radius. Also I’ve noticed that the radius and amount can be inversely proportional, meaning that higher radius can have a lower amount and a lower amount can have a higher radius. Once again, you’ll have to experiment.

Finally, the Threshold determines what exactly you want an edge to be. Photoshop thinks that colors that are touching and are very different from each other are edges. If your threshold is set to 0 then everything will get sharpened (including noise). This option allows you to choose what should get sharpened. A threshold of over zero will only sharpen areas with high contrast and won’t touch areas with low contrast. This is helpful because you don’t want stuff like noise getting sharpened along with real edges. The higher the setting the less areas the sharpening will be applied to.


Images can easily be over-sharpened. When you take it too far, a "ghosting" begins to appear around the edges, detracting from the overall appearance. Be careful not to over sharpen your images.

In no time at all, you'll be sharpening images perfectly.

Senin, 16 November 2009

Fixing digital camera shutter lag

I have a great camera that I use for my professional photography. However, some times I want to toss a small camera into my pocket for every day use. The problem with a less expensive camera is the shutter lag.

Shutter lag is that annoying delay between the time you press the button and the time the camera actually takes the picture. While it seldom takes much longer than a second, it can mean the difference between a great, crisp image and a blurry picture of something I didn't even want in the picture.

The easiest fix for reducing shutter lag in a digital camera is to use the prefocus feature.

Most cameras allow you to press the button down halfway in preparation for a shot. This causes the camera to set the focus and lighting sensors before you actually take the shot. When you do press the button, the shot will be taken almost instantaneously because the camera has already gone through many of the processes required to take a photo. Give this a try next time and you won't miss that perfect shot.

Now for a tip on car repairs.

You probably know how much you should pay to get your oil changed. But, when it comes to repairs, things aren’t so easy.

That’s where RepairPal can help. It will provide you with estimates for car maintenance and repairs. You’ll know if a mechanic is giving you a good price!

I was able to see common problems with my year and make, and also how much I should pay for the parts and labor on my car in my area. In my example, I checked what brake pads would cost.

This is so much easier than calling around to multiple places. Enjoy!

repairpal.com

Kamis, 12 November 2009

FREE color designer

I don't know about you but I'm so far from being a graphic designer that you could even call me color blind. However, knowing where to get help is all you'll need.
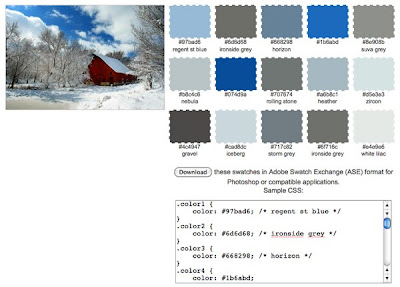
I'm going to share with you a really neat site that will generate colors for you. This Palette Generator will allow you to design colors on a website by looking at a favorite photograph.
It even includes a downloadable Adobe Swatch file (ASE) for Photoshop.
Besides web design, you could also use it for scrapbooking or find complementary colors to paint a room around your favorite sofa!
In my example I uploaded a photo of the farm I was raised on. If I was into scrapbooking I'd know exactly what colors what go perfectly with my photo.
Here is the link http://bighugelabs.com/colors.php
Enjoy!

Sabtu, 07 November 2009

Photoshop Layer Selection with a click

Photoshop Quick Tip
To quickly select a layer just click in the middle of the layer icon.This will immediately bring up the Layer Styles palette allowing you to add special layer affects such as drop shadow and bevel and emboss.

Senin, 02 November 2009

Free easy image resizing software

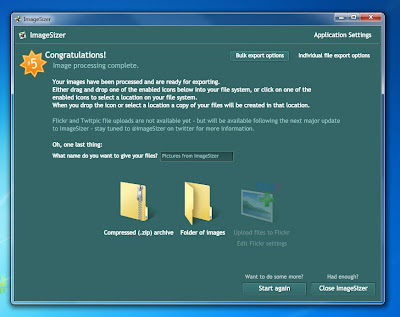
Want a free program to resize an image or, a folder full of images for you all in a couple short and easy steps?
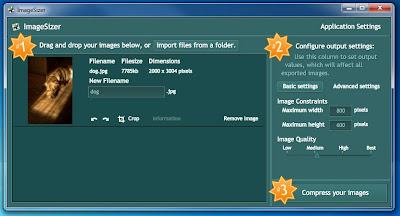
Try ImageSizer. After installing it all you need to do is to drag an image, or in my example above, a folder full images into the work area (#1)
Then select the size (make sure all your photos are portrait or landscape so you don't distort them) and compression settings you want. (#2)
Then click compress (#3)All you need to do after that is to drag your finished folder onto your desktop. You can even choose the option of a .zip file or to upload your images directly to Flickr!
This simple drag and drop application rocks! It's a great alternative if you don't have Photoshop.
Check it out at http://www.dataproductservices.com/isa
How neat is that? And of course the best part, IT'S FREE!

Enjoy!

Jumat, 30 Oktober 2009

Fabulous Photoshop Tip in less than 1 minute

Draw a zoom area
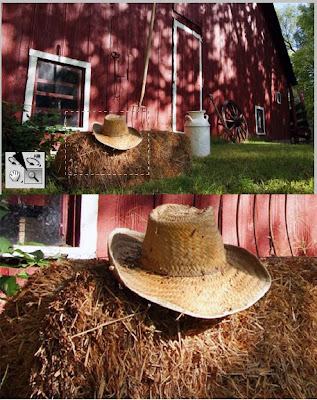
I found a neat trick to control my zoom when using the magnifying glass for zooming.
Instead of just clicking on the zoom tool enough times to get into the area of the photo you want to work on, here is a neat trick.
Use the magnifying glass to drag and select the area you want to zoom into.
In the example below I drug a box shape around the hat on the straw. Next, I'm instantly zoomed right into that specific area.
How neat is that?!

Kamis, 29 Oktober 2009

Send text messages for Free

My son loves getting text messages. I'm not really into it and don't want to pay for it either.
My solution is to send him text messages for free.
WataCrackaz. It is an add-on for Firefox. Once you install it, you'll get an extra toolbar as shown below and you can send text messages directly from Firefox!
I send him text messages right from my roomy keyboard using Firefox.
I don’t need to mess with your phone’s cramped keyboard. And I can send messages to anyone without paying a dime. Of course, the recipient may be subject to charges for incoming texts.


https://addons.mozilla.org/en-US/firefox/addon/1709

Selasa, 27 Oktober 2009

Really cool Photoshop Motion Blur effects

Want to create Really cool starburst diffusion effects?


Let's take a look at how I did this using motion blur. Follow the steps as follows:


Open an image that has a lot of high lights or sunlight.

(In this image I adjusted levels.)

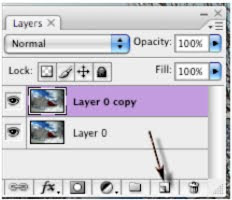
Create 2 copies of the image in the layers palette. (Drag the layer down to the blank layer icon in the layer palette 2 times.)

Select top layer - Filter blur motion blur 45 distance maximum

Select 2nd layer – Filter blur motion blur -45 distance maximum.

At this point you'll have something that looks like the middle photo.

Select top layer. In the Blend Mode select Screen

Merge top layer down (Layer - merge down)

Select top and again change Blend Mode to Screen.


Final touch

Image adjustment Exposure - change the gamma settings to get the overall lighting. I made mine darker since Screen Mode tends to over lighten.

Try this procedure on any photo that has some nice highlights or sunshine in it. You'll be surprised what professional looking star burst effects you can get.

Enjoy!


Sabtu, 24 Oktober 2009

Is your computer ready for Windows 7?

The Windows 7 Compatibility Center helps you easily check the compatibility of thousands of
devices and software programs for 32-bit or 64-bit versions of Windows 7. Usually, you won’t
need to do anything to ensure compatibility. If you do, the site goes beyond just telling you
what will or will not work. It also provides links to drivers and software updates to help get
your PC running with the latest software.

The Windows 7 Upgrade Advisor scans your PC to see if it’s ready for Windows 7. It checks to see if your PC meets the system requirements, lets you know if your processor is capable of running 64-bit versions of Windows 7 and gives guidance on your upgrade options. It also tells you about any known compatibility issues with the most commonly installed software programs and devices connected to your PC. If an issue can be resolved, it suggests next steps for you to take before installing Windows 7.

If you'd like to download it and test your computer click here to go to Microsoft's Upgrade Advisor site.

Rabu, 21 Oktober 2009

Photoshop Art History Brush Tutorial

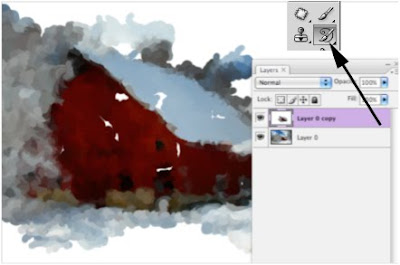
I've used the Artistic filters in Photoshop to create painting effects. However, the Art History Brush allows me to control what part of the painting I want to restore and allows for almost unlimited special effects.
The art history brush tool lets you paint with stylized strokes, using the source data from a specified history state or snapshot. By experimenting with different paint style, size, and tolerance options, you can simulate the texture of painting with different colors and artistic styles.

Like the history brush, the art history brush uses a specified history state as the source data. The history brush, however, paints by recreating the specified source data, while the art history brush uses that data along with the options you set to create different colors and artistic styles.

Open the photo that you want to make look like a painting

Duplicate the background layer by dragging the layer to the new layer icon (always work on a copy of an image)

Change foreground color to White

Edit – Fill – Normal – Foreground color (Fills the new layer with white)

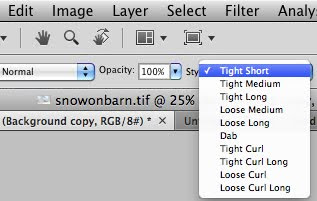
Select the Art History Brush (has a curl around brush) and try various brush styles and sizes.

Depending on the resolution of your image here is my results when using the option palette setting “Tight Short” with a solid brush size of 9.


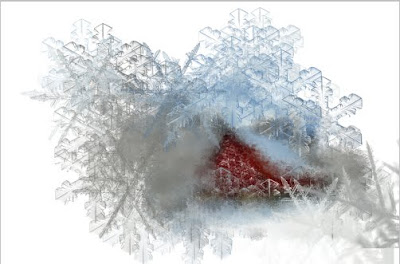
Want some real fun? Try various brush shapes when using the Art History Brush. Here I used a snowflake shaped brush and changed the size of the brush as I painted back in time.
Now there's an afternoon of fun with Photoshop. Enjoy!


Sabtu, 17 Oktober 2009

Fabulous Photoshop Tip in less than 1 minute

Selection Shortcuts
Want to select everything in Photoshop on the fly?
Try CTRL A to select all
CTRL D to deselect everything.

Rabu, 14 Oktober 2009

Fabulous Photoshop Tip in less than 1 minute

Common shortcuts
Did you know that Photoshop uses some of the same shortcuts you use in Word?
Try CTRL X to cut a selected item
CTRL C to copy a selection
CTRL V to paste a selection
You'll find yourself zipping around Photoshop like a Pro!

Minggu, 11 Oktober 2009

Fabulous Photoshop Tip in less than 1 minute

Access to favorite tools fast
I use levels on 90% of my photos. Want to learn a short cut to my favorite Photoshop tools?
Try "CTRL L" to access Levels.
"CTRL U" = Saturation
"CTRL B" = Color Balance

Jumat, 09 Oktober 2009

Photoshop's History Brush

The History Brush is one of the most versatile retouching tools in Photoshop. It can be used to restore a modified, retouched photo to an earlier state. Not only can you brush your picture back to the last saved state of the photo but you can brush your image back to any history state listed in your History Palette. The History Brush can make past and present mingle beautifully.
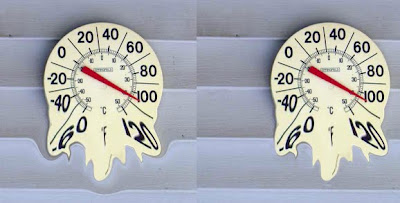
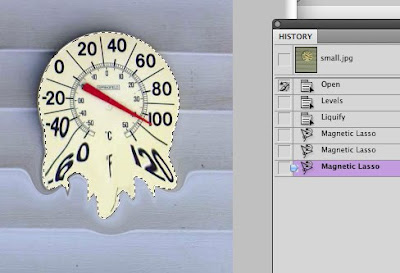
Here is a photograph of a thermometer that I've used the liquefy filter on. It did a good job of "melting" the thermometer but unfortunately, it also distorted the background.
The picture on the right shows where I painted back the wall around the thermometer with the history brush to restore the wall to its original state. I changed the size of the history brush to get into the smaller areas as I was working.

In order not to accidentally paint the thermometer back you could select the thermometer as I did with the magnetic lasso tool, then select Inverse. Now with only the background selected I won't accidentally brush back the changes I made to the thermometer.

If you want to get really tricky, you'll notice
that the second state in the History palette shows that I did Levels to correct the contrast. In order not to paint back in time too far, you should click on the Levels state of the History palette to select it. Then, use the History Brush to paint from that point forward. That way I don't undo the correction to contrast too when painting back in time with the History Brush.
Want to try something really neat? Take a photograph, convert it to Black and
White. Then paint part of it back to color.

(Tip: Use a soft edged brush and change the size of the brush as needed)
Coming up soon. The Art History Brush. We'll take a look at how you can make beautiful art by painting back in time!

Selasa, 06 Oktober 2009

Fabulous Photoshop Tip in less than 1 minute

Change the brush size on the fly
Want to change the size of your brush with out having to go up to the Option Palette? Just use the right and left bracket keys to quickly change the size of your brush.
The bracket keys also work on the pencil, eraser tools, clone stamp and a few others.
Want to change the softness of your brush? Hold down the shift and left bracket to soften the edges.
Bonus tip: Always use a soft edged brush when working in Photoshop to get better results.

Jumat, 02 Oktober 2009

Fabulous Photoshop Tip in less than 1 minute

Hide all toolbars and panels with one mouse click
With all the panels and toolbars in Photoshop sometimes it's hard to find enough space to see my image.
Use the "tab" key to quickly hide all toolbars. Now your image floats all by itself without all the clutter!
Hit "tab" again to bring them all back.
Shift tab hides the panels on the right side only. The next time you're in Photoshop, give it a try!

Selasa, 29 September 2009

Fabulous Photoshop Tip in less than 1 minute

Navigating around when zoomed in
When editing images in Photoshop I often zoom in to make perfect selections. However, navigating around using the slide bars on the side of the image is cumbersome.
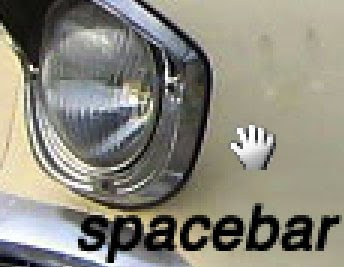
The next time you are zoomed into a photograph try this. Hold down the space bar and you'll get the hand tool to allow you to temporarily move wherever you need to go.
After I found this little jewel, I use it all the time now.

Senin, 28 September 2009

Watch your favorite shows for free

Have you ever missed a favorite show? I know I have. There's an easy solution and it's FREE!
My husband was a chef so we watch a fun show called "Hell's Kitchen". I missed an episode so we grabbed the laptop, plugged it into the television and watched the missing episode from the Internet.
Where do you find all these shows? You'll find them on Hulu.
Hulu has tons of clips, full-length shows and feature films.
It's also provides a search to find that particular movie or show.
I haven't tried it yet but now you can use the free Hulu Desktop. This takes Hulu out of the browser. It also gives you a new and slick interface. It’s much easier to find what you want.
You can control it with your keyboard or a remote. This is great if your computer is hooked up to your television. You can just sit back and enjoy. What a great idea if there's "nothing" on t.v. tonight!
If you have never watched TV on your computer, you need to check it out.
http://www.hulu.com

Jumat, 25 September 2009

Great FREE photographs by Life Magazine

Here's yet another site for great free photographs for personal use.
Who can take better photographs than Life Magazine?
Google has digitized 1,800 issues of Life Magazine. That's every edition published between 1936 and 1972. You can flip through any of the magazines free.
They have it broken down to decades but it's also searchable.
Check it out!
http://images.google.com/hosted/life/

Selasa, 22 September 2009

FREE motivational poster creator

I LOVE Photoshop. However, some days I'm in a big hurry and need to create something fun in a matter of seconds.
That is where Despair Inc. comes in handy.
There are several sites that let you create your own motivational posters and this is one of them. They even include a tutorial but I don't see why one is needed. Just upload your photo, select your title and inspiring message, and you get the fun like I've added below.
So what's the catch? They'd like you to order a full poster size instead of the small .jpg file that you can download for free. That part is up to you. I'm happy with my .jpg file. :-)
Enjoy!
http://diy.despair.com/motivator.php

Rabu, 16 September 2009

FREE Office documents file recovery software

I think it’s happened to all of us at one time. We’ve accidentally deleted files from our hard drive or memory card. For me it's usually photos.

In the past I went to a local photography store and $50 later they restored the images for me.

There are programs you can buy to recover deleted files for you but, why buy them when you can get this software for FREE.

I use in the past called Recuva. It has saved my life more than once. It’s free and I was able to recover the photos myself.

But what about Office files like Word, Excel or PowerPoint?
OfficeRecovery to the rescue! It will recover files that have been removed from the recycle bin and save them to a location that you specify.

Isn't it nice not to worry about deleted files any more? Enjoy!

Kamis, 10 September 2009

Share large files without the grief

I finally found a site that allows me to share large files and is SO SIMPLE to use.
It's called S4VE.AS (pronounced "save as") and it's FREE!
It's an ultra easy way to send very large files.
So often when I send a large file it gets rejected by email programs.
I usually have several files so I zip them into one huge file and then use this site. After uploading you are given a short link that you can share with anyone. All they need to do is visit the link within 24 hours and click on the download button. It even gives you the day/time that the link will expire.
You can even view how many clicks you've had on your link after posting.
How neat is that?
Give it a try. I know I'm going to enjoy using this neat feature.
http://s4ve.as/

Jumat, 04 September 2009

Forget your money?

Did you forget about some money you had somewhere? Believe it or not, it happens.
You could have unclaimed property. That could include utility deposits and insurance benefits.
Check out the following site.
http://www.unclaimed.org/
It allows you to search by last name or business name.
If you don't find money for yourself you could make a friends day!

Kamis, 03 September 2009

FREE batch photo resizing software

I have a Nikon D5000 I use professionally. It's not the kind of camera I want to haul around for everyday use so I purchased a Sony Cyber-shot that I can slip into a pocket or my purse. However, this little camera takes up to 12 MB shots!
If I'm in a hurry and don't change my settings, I have some really large files!
Most of the time, I don't need my files to be high resolution since they are intended for viewing on a computer screen and not for print.
The good news is you don't need an expensive program like Photoshop to resize images. I've found a free program that will even resize batches of files in a few seconds.
It's called Photosizer.

Check it out at http://www.fotosizer.com/

Jumat, 28 Agustus 2009

Flu Tracker

We're heading into flu season. And, this year, we have to worry about the H1N1 flu, also known as swine flu.
Here's a site that shows where there are confirmed cases.
Zoom in to see your area in the map.
http://flutracker.rhizalabs.com/

Selasa, 25 Agustus 2009

Which search engine is best?

I've been using Google for years. Lately, I've experimented with Microsoft's search engine called Bing. I do like the nice photo they post each day but, that doesn't make it better. I like the image search better than Google. I was looking for a photo of a lawn and typed in the word grass. Bing was smart enough to list suggestions on the left side of the screen for me. I was then able to find the lawn photo that I really wanted.
Google has long been tops in Internet search but now Microsoft competes with Bing.
Want to compare Google to the new Bing and decide for yourself? Check out the following site. Just type in something like almonds and compare search results.
http://bingle.pwnij.com/

Jumat, 21 Agustus 2009

FREE online photo editor with special effects

Sometimes you don't have Photoshop right at your fingertips. You might be on vacation or away from your personal computer. There are a lot of online photo editing packages any more.
Here's one of these free and yet fun programs for you to try.
It's called Picnik.
It allows you to upload photos from your computer or from website that you have accounts with like Facebook or Myspace. You can add a lot of special effects or edit problem photos right online.
I uploaded a photo of a whale and tried a couple of the special effects of fading and a soft focus in the middle of the 2nd photo. There were dozens of other effects that I didn't get to.
Some of the features require you to create an account but I did all of this without having to register or do anything except upload a photo.
When I was done editing and adding special effects I found I could select a frame, add text and clipart as shown below.

This program is as fun as a picnic ... try it!
http://www.picnik.com/

Senin, 17 Agustus 2009

FREE audio and video converter software

I like working with audio and video files. However, audio and video comes in a variety of formats. It seems like every service and player has its own. I find it almost impossible to move them between different programs and hardware.
This is a serious pain. Your iPod may not play videos formatted for your PC. You need a special program to play Flash videos.

The number incompatible combinations is mind numbing.

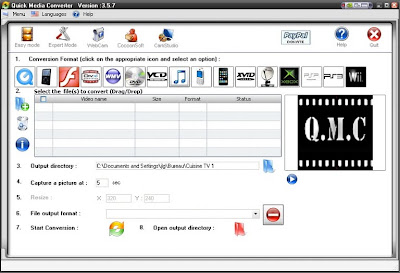
Quick Media Converter has a simple interface and can handle almost any format you throw at it.

Just click a picture and point to a file and it converts it to the compatible format.

Check it out on PCWorld's website. Converting media files to another format just became much easier!