propeller

Senin, 29 Agustus 2011

Manage duplicate photographs with Free software!

If you're like me, you have hundreds or even thousands of photographs on your computer. I have some of my favorites in numerous spots taking up valuable hard disk space!
Here is where VisiPics comes in to clean things up.
It scans your entire photo collection looking for duplicate photographs. It doesn't looks for duplicate file names, it looks at the actual file information even at different resolutions or file types.
The results are photographs displayed side-by-side with all the relevant information for each. Just click on the duplicates that you wish to remove. After you've selected all the duplicates just click the REMOVE button. When clicking on an image the images information, size, file type display in the lower menu.
I usually just save the original Photoshop .psd file and remove duplicate .jpg files so that I have original resolution and quality. I can always save a .jpg file out from my Photoshop document.
What an easy way to remove unneeded duplicate files and clean up your computer.
VISIPICS

Senin, 22 Agustus 2011

Photoshop - Close all open tabs tips

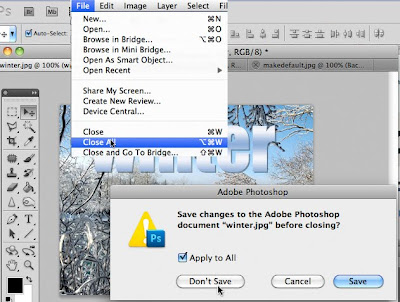
I don't know about you but I find it annoying when I'm closing out of Photoshop and have several windows/tabs open that I need to answer the question "Save changes before closing?" time after time.
If there is nothing that I need to save here is a quick trick to save you from clicking "No" for all open images.

The next time you have numerous tabs open and are sure you don't have anything you need to save do this.

Select File > Close All. Select the box that says "Apply to All" then click "Don't Save". This of course works for saving all images too.

But be VERY CAREFUL that there are no open images that you really do want to save.

Selasa, 16 Agustus 2011

Photoshop - Great Layers Tips

Do you ever use the same layer style over and over again because you really like it?
Here is a neat trick you can do now in CS5.
In this example I've set a Drop Shadow with a Gradient Overlay set just the way I like. To have these settings come up by default just click the Make Default button in the bottom of the Layer Style palette.
The next time you click on Layer Style your settings will be in place.

You could also save a style you've created by clicking the "New Style" button. Later you can always retrieve it later by clicking "Styles" link and you'll see your newly created style listed. Just click your style to apply it to your object or text on your layer.

You can save as many styles as you like. By saving styles you can keep a consistent look to what you are creating or a look that you prefer.

What a nice way to save time and be consistent!

Now for my bonus tip.
Here is a site with great graphs to let you can see how the temperature changes throughout the day. Having a picnic at 4:00 p.m.? There are also time-based graphs for cloud cover and precipitation.
Just enter your location and all the weather information you need and more will be provided for the day in easy to read graphs.
http://weatherspark.com

Senin, 08 Agustus 2011

Photoshop - Brush size outline is gone!

Have you ever selected your Photoshop brush, only to find that your cursor displays as a crosshair and you can’t see the brush outline?
I've spent a lot of time trying to figure out how this happens and finally learned what I had done. I had the CAPS LOCK on!

This can be very useful when you need to do detail work, but if you don't realize you have Caps Lock on it can lead to cursor frustration! You can imagine the frustration of my brush size only appearing as a cross hair when I know I've set it to Normal!

You can change how your working tool displays by going to Preferences and selecting Cursor.

If your preferences are set to Normal (or Brush Tip) cursors, Caps Lock will temporarily switch to Precise cursors. If your preferences are already set to Precise, Caps Lock will temporarily switch to Normal. Turning off Caps Locks takes you back to your chosen cursor style.

Now I can control what I see by purposely pressing the Caps Lock to toggle between Normal and Precise cursors.

Senin, 01 Agustus 2011

Hidden Actions for Special Effects

Actions are powerful tools in Photoshop. An Action is a recording of numerous Photoshop steps playable with one mouse click. If you are new to Actions, check out this introduction.

Did you know there are more Actions that came with Photoshop that aren't listed in the Actions Panel?
These Actions are found in the upper right hand corner of the Actions panel. Click the icon for the fly-out menu (shown at left) to see numerous special effects that you can apply to your photos or text.

In this example I loaded an Action called Frames and used "Photo Corners" to create this neat effect.


 Want some Free Actions that you can load and play in Photoshop? Check my previous blog post about where to get them.
Want to watch how I did this? Check my video below.
Unable to display content. Adobe Flash is required.