propeller

Senin, 30 Desember 2013

Photoshop Touch - Take Photoshop with you


I find myself taking photos with my phone and sending them to myself to edit in Photoshop later. Sure there are apps (even free apps) that let me do some basic editing on my pictures but it's not the same as working with Photoshop.

I might have just found an easier way to edit with my beloved Photoshop software.
Photoshop touch is an app that gives you many of the features that the full Photoshop does. I can even play with layers if I want to.


Photoshop touch has an app for both the smart phone and tablet. There are versions for both Android and iPhone/iPad.

Adobe is asking $5 for the phone version and $10 for the tablet version. Considering how much I use and love Photoshop, it's a bargain for me.

Enjoy!


http://www.adobe.com/products/photoshop-touch.html

Kamis, 12 Desember 2013

Free Fonts for the Holidays

Just in time for the holidays, here are some great holiday themed fonts.
If you haven't finished your Christmas letter or are making invitations for an event, this is just what you needed to add a little polish.
Enjoy!

Rabu, 27 November 2013

Iris Blur - Creating a shallow depth of field

Higher end cameras can allow you to create amazing effects like a shallow depth of field. Depth of field (DOF) is the distance between the nearest and farthest objects in a scene that appear acceptably sharp in an image.
This effect can be easily done by adjusting the aperture settings on a SLR camera.
However, millions of photographs are taken with cell phones now and the tools you have with a professional camera don't allow these kind of adjustments.
Photoshop allows you to recreate a shallow depth of field with tools like the Iris Blur as shown in my example.
The Iris Blur allows to to set your own DOF with easy to use handles to customize the range and focus of blur to suit your own needs.
It even offers a great "bokeh" effect. With the bokeh effect you can emphasize certain points of light in the image to make the image even more stunning.
To experiment with creating a faux DOF here is all you need to do.
In Photoshop go to Filter > Blur > Iris Blur
Use the dots provided to adjust where you want the blur to begin and where the blur should should be in full effect.
Note: You can even fine tune the inner blur by using the alt/opt key to move the dots independently!
Use the provided Bokeh effects to add emphasis on any background light.
With these fine tools in Photoshop, you can now create your own custom Depth of Field without a high end camera!

Rabu, 16 Oktober 2013

Free Reflection Actions

Creating an amazing reflection can be done using Photoshop's tools. However, this can take some time and you have to know all the steps to create this effect.
Wouldn't it be nice if Photoshop would just do it for you?
Well Photoshop does have some built in Actions available. You'll find them in the Window menu listed as "Actions". Some of them are handy but most aren't that useful. An Action is basically like a macro running a series of steps in order for you.
If you want to create a nice reflection I have a great free Action that will work well for you!
http://www.panosfx.com/free-photoshop-actions/reflections
Here is an example of running one of these actions.

Don't know how to load an Action or want to learn more about them? Check my previous blog for more information.
http://leonaruth.blogspot.com/2010/03/what-is-action-in-photoshop.html

Senin, 30 September 2013

Fast faux painting effects in Photoshop

Want to quickly turn a photograph into a chalk art or painting?
You'll want to play with the cutout filter in Photoshop.
Before, the cutout filter was easy to find under the Filter menu. However, you may have noticed that in CS 6 some of the filters seem to be missing!
No worries. You can still find your favorite filters in the "Filter Gallery" under the Filter menu.
Then experiment with "Cutout" to create a great look to your photo like the one below. Try changing the number of levels of color until you get the look you want.
(click on the photo for a larger view)
Enjoy!

Selasa, 17 September 2013

Photoshop - How to create transparency on a photograph

Ever get tired of the rectangle shapes of images? It's not too difficult to create an image that appears to be of any shape you want.
Check my video on how easy this can be done!
http://www.screencast.com/t/2QF9FEvvqo1

Senin, 26 Agustus 2013

Photoshop - Golden Ratio Crop

Let's take a look at the Golden Ratio Crop tool.
The purpose of this cropping tool is to draw your eye to a natural point of focus. The grid on the Golden Ratio crop is setup specifically for this.
In my example, I wanted the eye to be drawn to the entrance of this building. So, I used the Golden Ratio cropping tool and selected the intersection of the overlaying lines provided to make a natural point in the photo for the eye to be drawn too. You can see the intersection of the lines is right on top of the double doors.
Want to see my movie of how I did this.
Check it out here.

Selasa, 13 Agustus 2013

Layer Groups - Shortcuts

Try using the following keyboard shortcuts whenever you have several Layer Groups and Nested Groups to work more efficiently:
  • Command/Control click on top level Layer Group arrows to open/close all top level Layer Groups
  • Alt click on Layer Group arrows to open/close all Nested Layer Groups
  • Command/Control – Alt click on on top level Layer Group arrows to open/close all top level Layer Groups and all Nested Layer Groups.

Senin, 15 Juli 2013

Photoshop - Hidden Reset Key

Have you ever opened a dialogue box in Photoshop to make some changes with the sliders and then decided it just isn't working the way you want?
I can't count the number of times this happens to me. What I usually end up doing is either closing the dialogue adjustment box and starting over or, moving the sliders back to their original position and starting again.
Here is a quick trick to save you tons of time. The next time you have any dialogue box open and you aren't please with the adjustments, hold down the alt/opt key. Instead of a cancel key that takes you out of the box entirely making you open it up again you get a RESET key!
Clicking the RESET key will allow you to quickly start your adjustments over again and save you more time to do the editing you want to do in Photoshop!

Senin, 01 Juli 2013

Can't open a RAW file? - Free Raw Photo Editor

If you have a DSLR camera you really should be taking your photos in a RAW format. To learn more about RAW photos check Adobe's link here.
Many don't want to use the RAW format knowing how easy it is to open a .jpg file and opening a RAW file can sometimes be a challenge.
RAW photos are bigger, clearer and more detailed than regular digital image files. They're sometimes called "digital negatives" because they contain the unprocessed data from the image sensor of a camera. I explain why you should consider using the RAW format in this previous blog.
Photoshop does a great job of working with raw photographs. But, if you are having problems opening RAW files in Photoshop you may just need to update your plugin.

How do you make sure your software is up to date?
To check your version of the RAW plugin go to the Photoshop menu > Photoshop > About Plug-in > Camera Raw

Here you can see what version you currently have.
To update your plug-in on the Mac just click the Adobe icon in the top menu bar and click on update.
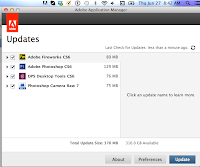
Or, you can go directly to Adobe's site to find the latest plug-ins for camera raw.
http://www.adobe.com/support/downloads/new.jsp

check that RawTherapee supports your camera's files before downloading. Also, this program may prompt you for a donation during the installation proces - See more at: http://www.komando.com/downloads/category.aspx?id=7365&utm_medium=nl&utm_source=asd&utm_content=2013-06-26-article_2_0-title&page=2#sthash.vNsPLTyq.dpuf
Double-check that RawTherapee supports your camera's files before downloading. Also, this program may prompt you for a donation during the installation process.
As always, it isn't necessary to use the software.
- See more at: http://www.komando.com/downloads/category.aspx?id=7365&utm_medium=nl&utm_source=asd&utm_content=2013-06-26-article_2_0-title&page=2#sthash.vNsPLTyq.dpuf
What do you do if you don't have Photoshop and need to open a RAW file? You might like to try RawTherapee.
RawTherapee is a cross-platform raw image processing program
converter which offers a strong feature set for processing RAW digital camera photos.

http://rawtherapee.com/downloads
Check that RawTherapee supports your camera's files first. Also, it might prompt you for a donation during the download. However, it isn't necessary to use the software.
So, if you ever have a problem opening a RAW file try updating your software or using a free program like RawTherapee.

Senin, 17 Juni 2013

Free Beautiful Desktop Backgrounds

In our busy world it's hard to find the time to grab the camera and Photoshop my photos.
Want some awesome and FREE desktop backgrounds that are ready to go?
Select from numerous themes such as nature, animals, art and more at http://windows.microsoft.com/en-us/windows/wallpaper
Enjoy!

Senin, 03 Juni 2013

Free and easy way to share large files

Sharing high quality digital photographs can sometimes be a challenge. Many email systems limit the size of attachments that can be sent. When I work with high resolution images and want to email them, it's a hassle to have to send one file at a time. Here is how to get around that problem.

There are several sites that allow you to share large files for free. When I work with high-resolution images I start by zipping/compression the images into one large file. Then, I upload this file to one of these sites. After uploading the file you are given a link that you can easily email to anyone allowing them to download your file. The link is typically good for several days.

My favorite site for doing this is WikiSend. You can upload up to a 100-megabye file and even set a password if you desire.

A couple other options are Senduit and Dropbox.
Using one of these options will eliminate any more hassles when trying to share large files.

Senin, 27 Mei 2013

Make Photoshop better with even more Free Fonts

Last week I provided a video on how fonts and typography all got started.
Your bonus for this week is even more free fonts.
Enjoy!
http://www.google.com/fonts

Senin, 20 Mei 2013

The History of typography and explanation of font terminology - And some Free Fonts for you!

Photoshop allows you to be very creative using a variety of fonts for text. But, how did these fonts all get started and what does, serif, modern, and old style mean?

Enjoy this fascinating 5 minute video that explain how these fonts all got started and what these terms mean.


Nothing is better than free so, enjoy some fonts for free!
http://leonaruth.blogspot.com/2008/11/fun-and-free-fonts-ive-never-been.html

Senin, 13 Mei 2013

Quick Photoshop tips to save you time

I wanted to share a few Photoshop tips to help make you more productive. Hopefully there is at least one here that you didn't know about.
Enjoy!

  • Hitting Tab hides all of your palettes. Hitting Tab again brings them back.
  • Shift+Tab hides all the pallets except your toolbar.
  • Hitting the "D" key resets your color pallets to Black foreground, White Background.
  • The "X" key will toggle your foreground and background colors.
  • Use CMD+Delete to fill your layer or selection with the current background color.
  • Option+Delete fills your layer or selection with the foreground color.
  • Change your paintbrush circle into a crosshair for precise control by pressing the Caps Lock key. 
  • Zoom back to 100% by double clicking the magnifier icon 
  • When zoomed in pressing the space bar will temporarily switch you to the hand tool for panning
  • Ctrl-D to quickly Deselect a selection
  • The square bracket keys [ and ] are used to increase or decrease brush size. By adding the Shift key, you can adjust brush hardness. 
  • CMD + Shift - Do this a lot :-)

Selasa, 07 Mei 2013

What's the deal with this Adobe Cloud?

There's a new way to purchase Adobe software. Now you will "lease" Photoshop.

When you buy a car it's your to use as long as you want. It requires a large initial investment.
When you lease a car, the monthly payments are relatively small and it's easy to upgrade when a newer version comes out.
The lease or subscription in this case, option might sound good. Your lease license gives you the right to run the software for a specific time and the right to the latest version that is available. So, updates will be no additional cost. But, if you let the subscription lapse, you no longer have the right to own the subscription or in my example, your car is taken away.
With a subscription you will get access to some of Adobe's online services which include, file storage online, ability to host websites, and a few others (whether you want them or not).

Is Adobe Creative Cloud a good thing? Here are some things to consider.
  • How often to you need to upgrade?
  • Is it important to have access to the latest technology?
  • Are the additional applications or services found on the cloud important to you?
As for me, the jury is still out on this new option but as I gather more information, I'll share my thoughts in a later post. However, my initial reaction is I prefer to be able to buy something up front and have the right to use it until I am compelled by features or changes in the platform to update it.
However, here is the worst part. Starting in June, new versions of Adobe's CS software will be available only online, and only as part of a Creative Cloud subscription. No more admiring my Photoshop box on my office shelf.

For now, check out these sites for more information:

http://www.adobe.com/products/creativecloud.html

http://venturebeat.com/2013/05/06/rip-cs/

http://www.theverge.com/2013/5/6/4305300/adobe-announces-creative-suite-update-and-rebranding-focus-on-cloud

Senin, 29 April 2013

Photoshop - More tricks with the Color Lookup adjustment layer

Last week I showed you how to create a warm golden glow to a photograph.
Last weeks post.
This week we're going to take it one step further.
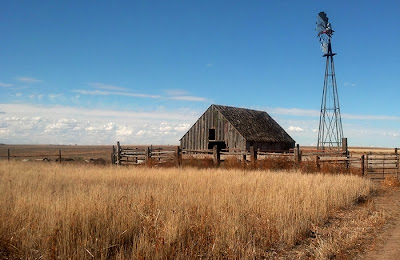
I wanted to create a unique feeling to this barn photograph. I wanted a warm golden glow that you would get from the evening sun but I didn't want that effect applied to the sky.
When you add a Color Lookup adjustment layer Photoshop gives you a mask. (What is a mask?)
This mask allows you to paint out the part of the photo that you want to remove that effect from.
In my example below I first applied an adjustment layer to add the Color Lookup adjustment layer with the "Crisp Warm" effect. I didn't want to loose the blues in the sky so I painted that effect out of the sky area.
Then, I took it one step further. I added another adjustment layer with the "Color Lookup" but this time used the "Crisp Winter" effect. This added some wonderful blues to the photograph. Again, I didn't want to have this effect on the foreground and only the sky so I painted out the barn and ground leaving the blues to take over the sky area.
My results are below. A warm golden field of wheat with a cool crisp blue sky.

Senin, 15 April 2013

Photoshop - Creating a mood with the Color Lookup adjustment layer

I love adjustment layers. If you've never used an adjustment layer you need to start. Adjustment layers allow you to edit a photograph without damaging any of the original image. Also, you can easily go back at any time to change the opacity/effect of that adjustment or remove it completely.
For more on adjustment layers see my previous post here.
I've recently discovered a new adjustment layer that I've never used before. It's the "Color Lookup" adjustment layer.
The color lookup adjustment layer allows you to quickly create a new feel to your photo by remapping the colors in the image.
On a recent trip to NW Kansas we stopped by the farmstead where my husband was raised. Without my Nikon I grabbed a quick photo with my cell phone of the barn he played in as a child.
We weren't able to wait for the "golden hour" (just before sunset) to get the warm glowing effects from the late day sun. However, I was able to create that effect using the color lookup adjustment layer.
I opened the photo and added a new adjustment layer selecting the color lookup option. There are several options to select from in the drop-down menus provided.  In my example I selected the "Crisp Warm" look. Instantly I got the look I wanted shown below.

The best part of being an adjustment layer is that I can change the opacity of this effect right on the layer until it looks just right. Again, since it's an adjustment layer, no pixels are harmed!
You'll find a lot of other great effects like "Crip Cool" for winter scenes and many more.
What a nice feature to quickly change the mood of a photograph. Enjoy!


Selasa, 09 April 2013

Photoshop - Creating perfect skin

I've been asked many a time on how to make skin look flawless. So, back by popular demand is my tutorial on creating perfect skin in Photoshop.
Here is the link to my instructions on how to do this.
Cheers!
perfect skin in Photoshop

Senin, 01 April 2013

Free online photo tools

Away from your computer and just want to do some quick editing?
Quick Picture Tools is the answer.
There are a dozen different options available allowing you to add text, borders, special effects, and more.
The best part I like about this site is the fact that you don't need to create an account to access the tools.
Simply upload then save your picture as I did on the left.
Enjoy!
http://www.quickpicturetools.com/en/

Selasa, 26 Maret 2013

How to count pixels of a specific color

I was recently asked how can I count the number of pixels of a specific color in a photograph.  I found this to be a little tricky but doable.
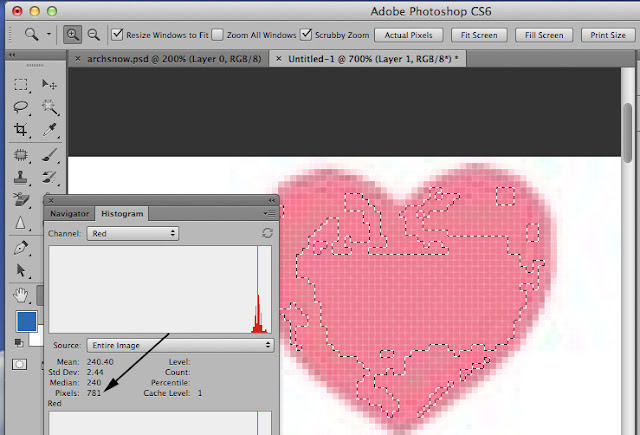
  • The solution is to zoom into the area of the color you want to select. 
  • Use the Magic Wand tool and set the tolerance to 1.
  • Select Similar
  • Open the Histogram panel
Here you will see the information about the total number of pixels that have been selected. In this case there are 781.

Need a little more help? Here is my video on how I did this.
Enjoy!

http://screencast.com/t/ZwvrurauX6v

Senin, 11 Maret 2013

Photoshop - Vibrance vs. Saturation

 
Let's take a look at the difference between vibrance and saturation using one of my favorite photographs of my adopted son all ready for prom.
Both tools are made to add more color to a photograph which can really make it pop. Unless of course you overdo and suddenly the photograph doesn't even look real any more.
The main difference between vibrance and saturation is that vibrance works to AVOID skin tones which are typically yellow and orange.
See how vibrance added more blue and green but didn't blow out the skin tones? Vibrance is usually the safest bet but when it comes to adding color to a photograph when you have people in it.
In photographs with people or a lot of yellow, you'll want to use vibrance to keep the skin tones looking natural and keep the yellow in check.

Here is another one of my examples about vibrance.
http://leonaruth.blogspot.com/2011/06/photoshop-magic-of-vibrance.html

Senin, 04 Maret 2013

Adobe's new cloud-based photo sharing site - Revel

Adobe has recently announced it's newcloud-based application Revel. It lets users upload photos from their devices and then syncs the images across all other devices. Revel is a free download for your It comes with editing features worthy of the Adobe brand, and pre-set filters to create effects, as well as some of the editing tools you’d find in full-fledged photo editing software.
However, Revel only works on iPhone, iPad, and Mac and I'm an Android user.  With no plans on the table for Android users Adobe offers "Revel Importer" which will let me import photos into my Revel library.

I decided to sign up for Revel and received the following email message from Adobe.

For the next 30 days you can import as many photos as you want — so start importing all your photos right away!
After that, you’ll be able to import up to 50 photos every month.
If you take a lot of photos, you can buy a Revel Premium subscription as an in-app purchase and import as many photos as you want every month!


So, is Revel worth the $5.99 per month? I think that serious photographers will want to upload more than 50 photos a month.

I'm not convinced yet when there are other free sites where I can share my photos.  Especially since there is no full version for my Android. However, I will be watching Revel closely to see what new innovations appear as this new cloud sharing site develops. I believe it is something we might want to keep an eye on.

Check out Revel at http://www.adobe.com/products/revel.html

Other top photo sharing sites
http://www.pcworld.com/article/246129/best_bets_for_photo_sharing_sites.html

Senin, 18 Februari 2013

Free AWESOME photo editor for your phone

Tired of sharing ugly photos from your phone?

Snapseed is a free easy to use photo editor with dozens of cool options. You can auto-correct problems, crop,  or add filters like Grunge, Drama or even borders then share your fixed/enhanced photo directly to Facebook, Twitter or just email it right from the app.

This easy to user interface includes clear instructions on how to swipe and apply various effects on your photos when selecting an adjustment feature.


If you like it for your phone there is even a desktop version. However, being a Photoshop fan, I'll probably be just using it on my Droid. However, it is now my favorite photo editing device for my smartphone.

http://www.snapseed.com/

Rabu, 13 Februari 2013

Free Valentine themes for your phones's photos

With Valentine Camera, you can add romantic and lovely frames while shooting, or customize your photos in album.
Share your romantic photos your friends via Facebook, twitter, or email.
The app includes 40 beautiful frames.

https://play.google.com/store/apps/details?id=com.dl.cam.valentine

Selasa, 12 Februari 2013

Photoshop - Selective color editing

There is a simple way to make something in a photograph really pop using Photoshop. Let's take a look at one way to do selective color editing in a photo.
In this example of the car, lets take a look at just editing the red in the car. The first thing you'll want to do is make a rough selection around the car.
Then, go to Image > Adjustments > Selective Color.
Since the car is red lets make sure you have "Reds" selected in the drop-down menu for Colors.


Since Cyan is the opposite of Red, notice the changes in color of the selected red car when I adjust the Cyan slider. Because there is very little red color data around the car it's easy for me to make a rough selection of the car and do this editing without damaging the the ground around the car.
If the car was parked on say a red brick street, I'd need to take much  more care in making my selection.
So, the next time you want to quickly edit a color area in  your image, consider using the Selective Color panel found under Adjustments.

Senin, 04 Februari 2013

Photoshop CS6 Where is font preview size?

Would you believe there was a time in Photoshop when you didn't get a font preview? Having a preview of the fonts are really handy.
In older version of Photoshop you could go to the Preferences and change the size of the previews. However, you won't find that option in the Preferences anymore in CS6.
Now, to change the size of your font preview you need to go to Type >  Font Preview Size.

Senin, 28 Januari 2013

Photoshop CS6 - Content Aware Patch

There's a new tool that fixes Content Aware problems.
Have you ever had tried using Content Aware Fill and got something odd in your "fix"? This is appropriately named in the Photoshop world as "Content Aware Fail".
There's a new option in the Patch tool that uses Content Aware Fill techniques.
Take a look at this great new feature in my latest video.

http://screencast.com/t/wgwHp5ilVGr


Senin, 21 Januari 2013

Photoshop - What is the difference between fill and opacity?

When working with layers, I've often wondered what the difference was between Fill and Opacity.
Often I just experiment with one or the other until I get the look I want and, they seemed to have the same effect on my image.
I finally decided to delve into the differences to try and understand them more.
This is what I learned.
--> The difference is that opacity affects all of the layer including layer effects
Fill only affects the layer content, but not layer effects.
Here is an example of the difference.
The photo below has some text of which I used a drop shadow and a bevel. I didn't adjust either the opacity or fill.

The photo below I changed the opacity to around 50%. Everything on the text layer becomes 50% transparent including the text, shadow and the bevel.
The photo below I put the opacity back and changed the fill to 50%. The text started to become transparent but the shadow and bevel were NOT effected.


Interesting....With this in mind, I liked the look of the image coming through the text.
So, in my final image, I changed the fill to 0%. I then got the really cool effect of the text and photo below.
Wow, who knew that the changing the fill slider could create such a KEWL effect.

Senin, 14 Januari 2013

Photoshop - How to open a .jpg file in camera raw

Last week we talked about the basics of what a raw image from your camera is.

Raw images will automatically open in Photoshop's camera raw editor. However, once the file has been saved as a .jpg it's difficult to navigate back to the option of opening in camera raw. Here is all you need to do to open the image in camera raw.

Navigate to your photograph and right click on the image icon. When you see the options to open the file select Adobe Bridge. With the file now open in Adobe Bridge you can right click on the image and select open in camera raw.

To learn more about camera raw see my previous post on what camera raw is.

Senin, 07 Januari 2013

Photoshop - what is camera raw?

What's the deal with raw images?

Images coming directly from your camera are usually in a raw format. Each camera manufacturer creates its own variation of a raw file. Photoshop will open these raw images in "Camera Raw".

There are two components of Camera Raw.
  • Capturing your images in a raw format
  • Processing your raw images using Adobe Capture Raw

What is the advantage of working with a raw image?
Amateur-level digital cameras store images in the JPEG or TIFF format, advanced amateur and pro models usually save images as raw data files, which has substantial advantages. The camera applies internal processing to photos captured as JPEG or TIFF, such as sharpening, setting the white balance, and making color adjustments.


When you shoot JPEG images with your camera, you’re locked into the processing done by your camera, but working with Camera Raw files gives you maximum control over images, such as controlling their white balance, tonal range, contrast, color saturation, and image sharpening.
What's nice about working in Adobe Camera Raw is that when you control these settings yourself you aren't damaging or changing the original image but just applying your own instructions on how the image should look. And, we can always undo what we have done.

If you have captured your photographs in camera raw, Photoshop will open it's camera raw processing window for you allowing you to make these and additional adjustments as you see fit. The image on the left shows some of the options you'll have.

Do you have to capture in the raw format? No, I've often just set my camera for .jpg. It's entirely up to you. I just wanted to try to clear up what this camera raw thing was all about and how it can give you more control over your photographs.

For an intermediate photographer and Photoshop user, I hope this helps make a little more sense of what camera raw is. If you want to get really serious give it a try.