PDF files are a good way to share documents with other people. All of the document formatting, fonts, etc. will retain its original look so that you don't have to worry about how it will look or work on other computers.
Adobe Acrobat has been the industry standard for creating PDFs but there are free alternatives.
PrimoPDF will let you create a PDF from say a Word or any other kind of file.
PriomPDF installs as a printer and you can use it from any program when you click Print. Just select PrimoPDF as a "printer" after clicking Print and your file will be saved as a PDF document.
http://www.primopdf.com/
Want to quickly convert a webpage to PDF? Then check out the following site.
http://pdfcrowd.com/
propeller
Selasa, 27 November 2012
Senin, 26 November 2012
When a photo is worth a 1,000 photos
If I had enough time I'd love to create a "hyperphoto".
A hyperphoto is constructed of 100's of photographs merged together into one high resolution photo.
This enormously vast image is something to admire. However, if you plan on trying this yourself you had better be retired because each photograph can take days to complete.
Below is an example of pushing Photoshop to its limits by taking 100's of photographs and merging them into one scene. Make sure you entire full screen mode before zooming in.
Click the link or image below to see what I mean.
I LOVE Photoshop but I can't image taking on a project like this.
Enjoy!
HYPERIMAGE
Senin, 19 November 2012
Photoshop CS 6 - Changing the Dark Interface
The first thing you'll notice on the new Photoshop CS 6 is the dark interface around the menu and tools. I didn't like it at first but now I'm starting to get used to it.
Photoshops reasoning is to keep the tools in the background so that you can focus on the image.
If you don't like this new color you can change it in the Preferences.
To do this go to Photoshop's preferences - Interface
Here you will see 4 shades to select from. You can select anything from a light gray to black.
But, if you're like me, you might like the new darker interface. I've decided on the black.
Want to change the canvas color? This too can be customized by simply right clicking and selecting one of Photoshop's shades or even customizing your own canvas color.
Senin, 12 November 2012
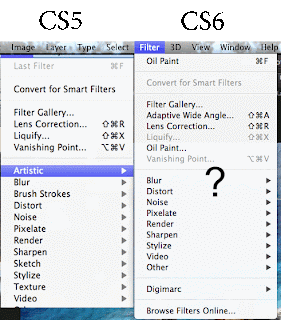
Photoshop CS 6 - Where are the artistic filters?
One of my favorite filters in Photoshop are the artistic filters. You can image my panic when opening Photoshop CS 6 and I didn't see Artistic under the Filters menu!
Photoshop hasn't gotten rid of these wonderful filters. You can still find them in the Filter Gallery.
Just go to Filter Gallery and all those wonderful filters like water color, dry brush and all the others are still there.
Photoshop has added a new filter to play with. (As if there weren't enough). This new filter is called Oil Paint. You'll find it just above the usual list of filters under the Filter menu.
Below you'll see an example of some testing I did with this new filter. The jury is still out on it becoming my new favorite yet. However, give it a try, you may love the results.
Enjoy!
Leona's photographs
http://tinyurl.com/8gzenmg
Selasa, 06 November 2012
Photoshop CS 6 Golden Spiral Cropping Tool
There are some new features in the cropping tool in Photoshop. Photoshop had the nice "Rule of Thirds" grid for cropping in the last version that was really handy. A new addition is the Golden Spiral Cropping tool.
The Golden Spiral grid is designed to lead the eye to the center of an object or area in a photograph. Let's take a look at how it works.
In this photograph I want to draw the eye to the hat.
In the View drop down box I selected the new "Golden Spiral" grid. As I adjusted the size of the crop I moved the center of the spiral to the center of the hat. (The spiral grid is a light gray so I've enhanced the line so you can see it easier.)
You can see my bounding box for my crop.
By the way, you now move the picture to adjust the crop and it takes a little getting used to.
I cropped out the part of the picture I wanted making sure the spiral focused on the hat. Below is my results. A new photograph that really draws the eye right to the hat on the bale.
Pretty neat Photoshop!
I was recently asked how to rotate the spiral crop. Here's how to do that.
Simply right click after making a rough selection. You'll then have a menu option to rotate the crop.
Leona's photographs
http://tinyurl.com/8gzenmg
Langganan:
Postingan (Atom)