propeller

Senin, 27 Februari 2012

How to put text on a curve

Have you ever wanted to have your text follow a curve or path?
It's really quite easy to do in Photoshop and I'm going to show you how.
There are a couple of ways to have your text follow a path.
One way is to create a path with Photoshop's Pen tool as seen in this photo. Select the pen tool from the Photoshop menu and click anchor points along the curve you want to post your text on. When you've finished creating your curve select the Text tool.

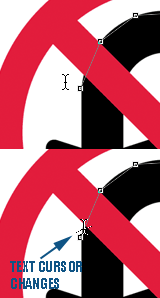
With the Text tool selected you'll notice that the cursor changes from a straight line to a curved line. Move your cursor to the beginning of your curve until the cursor changes to this curved line as shown in the animation. This is critical or your text won't stick to the curve.
Start typing your text and it will follow the curve you just created with the Pen tool. If your text runs off the curve because the curve is too short or the text font is too large you can edit the font size and color as desired until it fits your curve perfectly. If you want to perfect your curved text even more, open the Character panel from the Windows menu. Here you can edit the spacing of your words and letters by adjusting the kerning and tracking until your curved text is perfect!
Photoshop comes with numerous shapes that work just as well as a custom path you create too. Select the custom shape tool from the menu. Here you can select any shape you want or even select from the additional shapes loaded in the Custom Menu shapes. After you've added your shape you can use the text tool to follow the curves of the shape you just added.

Senin, 20 Februari 2012

Free photo organizer

Since I'm a Photoshop user, I have folders all over my computer with photographs. I'm always looking for a better way to stay organized.
You might want to try Windows Live Photo Gallery. It can import photos directly from your camera. Photos can be easily sorted by type or date.
There is also a tagging option so they are very easy to search.

It even comes with a tool to burn your photos directly to a CD.

It's simple and the best part about it is that of course, it's FREE!
You can download it directly at the following site:

http://explore.live.com/windows-live-essentials-photo-gallery-get-started

And of course for Mac users, there's nothing like iPhoto
Enjoy!
 

Kamis, 09 Februari 2012

                                                           Text Tutorial/  Posted 02/03/2012
                                                                                                                                                        C           Click on Image....                                                                                                                 
                          

Senin, 06 Februari 2012

Great Free Fonts to start off the New Year

I always love the word FREE. Today's site offers a bunch of really neat fonts to let you be even more creative in Photoshop.
http://designtutorials4u.com/great-selection-of-new-free-fonts-to-start-off-2012/

Need help installing fonts? Check the following video tutorials.
http://youtu.be/PLSb-XkR1nA
http://youtu.be/5-0P-OcvOvg

Enjoy and be Creative!

Sabtu, 04 Februari 2012

                                                           Article/ Posted 30/01/2012
                                                        One of the first things you might want to do when learning how to use Photoshop is to transform 
                                                        some of your old photographs making them into colorful new creations you might want to use 
                                                        these as gifts or just for your own creative amusement .There are hundreds of ways  using
                                                        some of the applications found in Photoshop.There are a few main tools that will help you to do
                                                        this so here I will try and introduce you to a few that I have included in these Photoshop tips
                                                        for beginners.                                                                                                      Read more...

Jumat, 03 Februari 2012

                                                             Article/  Posted 27/01/2012
                                                              No matter what level you are at with Photoshop, a vast amount of time is spent switching 
                                                              tools and going back and forth between menu items .There is however a way in which you can
                                                              to some extent streamline your workflow saving time which would be more productively spent 
                                                              on the project itself.                                                                   .                  Read more....
 Posted 01/02/2012      www.photoshopbeginners.blogspot.com/

Photoshop Beginners Article #1 The Workspace

Photoshop Beginners Article #3 Shortcuts

No matter what level you are at with Photoshop, a vast amount of time is spent switching tools and going back and forth between menu items .There is however a way in which you can to some extent streamline your workflow saving time which would be more productively spent on the project itself.
There are a quite a few keyboard commands that help you bypass the time-consuming mouse clicks when doing tool changes or making adjustments to properties. These commands will increase your efficiency and in some cases even allow you to do things you could not otherwise do (e.g., zooming while a dialog box is open). Photoshop makes great use of these shortcuts and although it is difficult to remember all of them with practice it is definately a good a habit to get in to.The list below gives you the main shortcuts used for PC (sorry Mac users) . Firstly you can access the complete list with Ctrl+Alt+Shift+K this will bring up the help dialog on keyboard shortcuts.Below is a list to get you started.
Ctrl + Shift + N (New Layer)
D (Black foreground white background)
X (Swap Black to background white to foreground)
Ctrl + N (New)
Ctrl + O (Open)
Crtl + S ( Save)
Ctrl + Shift + S (Save As)
Ctrl + C (Copy)
Ctrl + V (Paste)
Shift + F5 (Fill)
Ctrl + L (Levels)
Ctrl + M (Curves)
Ctrl + J (Duplicate Layer)
Ctrl + A (Select)
Ctrl + D (Deselect)
Ctrl + 0 (Fit on Screen)
G (Gradient Tool)
L (Lasso Tool)
P (Pen Tool)
M (Marquee Tool)
J ( Spot Healing Tool)
T (Type Tool)
O ( Dodge Tool)
I ( Eyedropper Tool)
S ( Clone Stamp Tool)
A (Path selection Tool)
E ( Erazer Tool)
C ( Crop Tool)
B (Brush Tool)
H (Hand Tool)
Z (Zoom Tool)
Alt + Ctrl + 0 (Browse in Bridge)
Alt + Shift +Ctrl + 0 (Open As)
Crtl + W (Close)
Alt + Crtl + W (Close All)
Photoshop also lets you edit and customise these commands in the help dialog it would be wise if this is your intention to use this option to refer to the link below.
http://help.adobe.com/en_US/photoshop/cs/using/WSfd1234e1c4b69f30ea53e41001031ab64-76b8a.html

Kamis, 02 Februari 2012

Photoshop Beginners Artcle #1 Workspace

     Adobe Photoshop CS5 is a software application used to enhance, manipulate, and even create images from scratch. It has become such a well known and popular product that the name 'Photoshop'  is often used a verb in conversation.It has been welcomed by graphic artists designers and amateurs and probably almost every poster, magazine, billboard and brochure you see nowadays has been made or edited in Phototshop.This article is designed to give the newcomer an overview of Photoshop and hopefully explain the workspace and some of the basic features of the program.  There are really three components in play in Photoshop CS5 you have Adobe Bridge , Adobe Camera Raw, and Photoshop itself.

Adobe Bridge
          
      You can access Adobe Bridge by clicking on the brown icon at the top of Photoshop in the applications menu, it can be accessed by all parts of Adobe Creative Suite 5 and is included in the stand-alone version of Photoshop CS5. It provides many features to manage and organise you digital images. As you open a new set of images in Bridge you may rank and rate them so you can concentrate on the best images and then even share them with others online.


Camera Raw

      Camera Raw can be accessed if you open an image in Mini Bridge also found on the applications menu, then right click on the image and choose open in Camera Raw. It allows you to correct and enhance your images with a very user friendly interface which implements a set of sliders, you can alter exposure, recover highlight and shadow details, there are sharpness and contrast options and you may optimise the colour and tone.


The Workspace:

      Photoshops workspace can be a little overwhelming at first sight to the Phototshop beginner but there are basically five main parts: The Application Bar, The Options Bar,The Tool Panel, The Document Window, and The Panel Dock, lets look at these individually.

The Application Bar
 

     The Application Bar which has been around since CS4 is located across the top of the screen. It is made up of the old menu bar, launch buttons for Adobe Bridge and Mini Bridge, a Zoom menu, a tool for viewing extras, and a tool to arrange your documents if you wanted for example to view more than one at a time. The Menu Bar allows you to do many things, manage and edit files, control layers, manipulate your images etc. You also have your workspace switchers, Essentials appears by default but you can change for example to Design, Photography, 3D, there is even a workspace entitled 'Whats new in CS5' to highlight the newest features.


 The Options Bar
      
      Underneath your Application bar you will find the Options Bar, this will give you options relating to whichever Tool you have selected at the time, for example if the Brush Tool is selected you have options like Opacity, Flow, and a drop down menu to select your brushes from

    
The Tool Panel
       
       When you open Photoshop the Tool Panel can be found to the left of the screen, Tools of a similar functionality are grouped together, the small triangle at the bottom of certain Tool icons is an indication of hidden tools , you may hover your mouse over the icon to view the Tools underneath. There are three groups of Tools, the first appear at the top and we can call these Selection Tools, next is the Retouching and Painting group, and then you have the Vector group, these groups are separated by a thin line on the Tool Panel, the last icons are to do with things like 3D object rotation, you also have the Hand tool here, and below you have your Foreground and Background colours by clicking on these you can access your colour picker, then at the very bottom you have the an option to edit in Quick Mask mode which can be used for example alongside the Brush Tool to paint a Mask onto a specific area of you work.
      

The Document Window
         This is where the file you are currently working on is found in the central area of the screen, you may view multiple documents at one time, this can be usefull for example if you want to drag one image into another.


The Panel Dock
     
      The Panel Dock is to be found running down the right hand side of the workspace, by default we see the Layers, Adjustments and Styles panels. You may rearrange the order by clicking on the tab of a window and then dragging it to its new posistion. All of the panels may be accessed by clicking on 'Window' on the Application Bar and the simply checking the panel you require.


     There will be a Video Tutorial to follow this brief overview which will cover points in far more detail.


Rabu, 01 Februari 2012

Photoshop Beginners Shiny Button Tutorial


Video:

.


Step 1:
    Open up a new document 500 px by 500 px and fill it with Black.
  
  Step 2:
    Open up a New Layer over the Background .

    Select your Elliptical Marquee Tool from the Tool Panel.
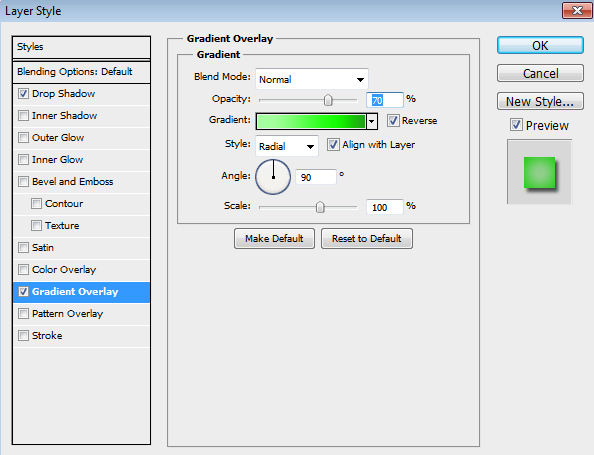
      Draw out a circle like the one below holding down Shift and Alt to get a perfect Circle, then go to the Fx icon at the bottom of your Layers Panel and add the following Gradient Overlay and Drop Shadow, copy the Gradient numbers here 24a11b   14fb02    a4ff9d


 Step 3:
    Open up another New Layer and drag this Layer underneath the Green ball, using the Elliptical Marquee Tool with Shift and Alt held down make another circle bigger than the first and fill it with the following Gradient using the Gradient Tool , copy the Gradient numbers here
ffffff    3e3e3e   878787


       Then add the following Layer Styles.

Step 4:
           Select your Elliptical Marquee Tool from the Tool Panel and draw on an Elipse on  a New Layer above the others the with White as your Foreground colour select the Gradient Tool with a Foreground to Trasparent Gradient, use the Tool across the elipse and drop the opacity on this Layer to 75 % in the Layer panel. 


   Thank you :)