propeller

Senin, 24 Desember 2012

Photoshop's Refine Edge Tool for better selections


Some selections are much more difficult than others. To make a laborious selection involving texture or around hair consider using the Refine Edge brush tool.

Start by making a rough selection with any of the selection tools.
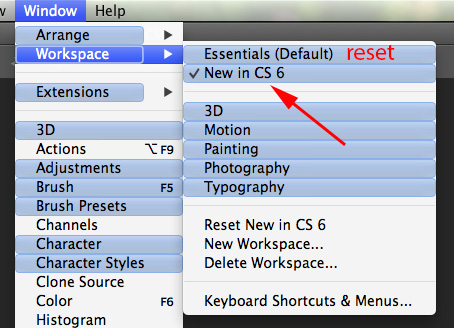
Then go to Select > Refine Edge. Here you will see the Refine Edge brush as shown on the left.
The refine edge tool will improve the quality of your selection and allow you to extract objects to make your final results look much more realistic.
Using the Refine Edge brush carefully brush around the edge of your selection keeping the tiny cross-hair in the middle of the brush off the subject. Photoshop will use this information to fine tune where the edges should be.
On my example on the left I used the lasso tool to make a selection around my subject then deleted the background. The scenic layer below shows through but the edges are harsh and the image looks obviously copied and pasted.
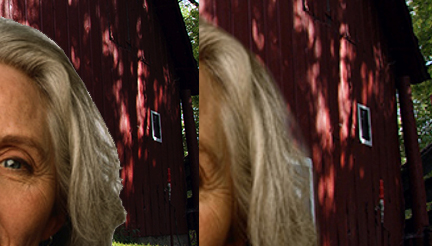
I included the Refine Edge brush on the image on the right to improve my selection before deleting the original background. I was able to brush over soft areas like the hair to make a much better selection. The results are a much more realistic looking scene.

With a little experimenting with the tool you'll get a near perfect selection.

Want to see how I did this? Take a look at the video link below.

http://screencast.com/t/0SyHXNOtXGE

Sabtu, 08 Desember 2012

Free Gift Tags and custom Christmas cards

Just in time for the Holidays!
Wanted to share a previous post that might be just what you need. Enjoy!
If you want to print out photos to include in your holiday mailings, how about adding a really festive border first?
HP Creative Studio has numerous frames that you can upload and drop a photo into. There's no need to even create an account. Just upload some photos and drag and drop them into the frame of your choice. Then, select print and print it out on some nice photo paper.What about creating your own custom greeting cards? Yup, you can do that too!HP Creative Studio allowed me to add some custom text both inside and out and allowed me to print my card directly to my printer.

How about custom gift tags? They even have a template that allows you to drop your own photo into. And the best part of course....it's all FREE.
How neat is that!?Click on the link below to enter their site.
HP Creative Studio


Happy Holidays!
Leona :-)

Senin, 03 Desember 2012

Photoshop CS6 new color adjustment layer

There's a new adjustment layer in Photoshop. It's called the color lookup adjustment.
Just go to the adjustment layer icon in the layers palette, and select the new color lookup adjustment. Like other adjustment layers, the beauty of this tool is that it doesn't harm any pixels and, you can always go back and edit, adjust, change the opacity of the effect, or delete the adjustment layer.
The color lookup adjustment layer is a combination of adjustments that remaps all of the colors into a new set of colors. These colors can give your photo a unique feel.

You'll find several special effects to choose from. In my example I'm using the the Crisp Warm look found in the 3DLUT (Look Up Table) drop-down menu.  Depending on the feel you want, try each special effect out.
If there aren't enough options here, try the Abstract and Device Link effects too.
Again, since you’re using an adjustment layer, the change you apply to the image isn't permanent, which means you can try as many lookup tables as you want, compare the results and settle on the one you like best.
In my example below, I used the Crisp Warm effect but took the opacity back to 63% to get my photo looking just right.
You'll also notice that it comes with its own mask. Try applying a special effect and mask part of the image to the original state. You'll only be limited by your imagination.

*The Mac system comes with an additional row of abstract effects not found on Windows. 

This photo I took was of my husband's farmstead in NW Kansas. Copies of this and other of my photographs can be found at http://tinyurl.com/8gzenmg
  

Selasa, 27 November 2012

Free PDF creator software

PDF files are a good way to share documents with other people. All of the document formatting, fonts, etc. will retain its original look so that you don't have to worry about how it will look or work on other computers.
Adobe Acrobat has been the industry standard for creating PDFs but there are free alternatives.
PrimoPDF will let you create a PDF from say a Word or any other kind of file.
PriomPDF installs as a printer and you can use it from any program when you click Print. Just select PrimoPDF as a "printer" after clicking Print and your file will be saved as a PDF document.
http://www.primopdf.com/

Want to quickly convert a webpage to PDF? Then check out the following site.
http://pdfcrowd.com/

Senin, 26 November 2012

When a photo is worth a 1,000 photos

If I had enough time I'd love to create a "hyperphoto".
A hyperphoto is constructed of 100's of photographs merged together into one high resolution photo.
This enormously vast image is something to admire. However, if you plan on trying this yourself you had better be retired because each photograph can take days to complete.
Below is an example of pushing Photoshop to its limits by taking 100's of photographs and merging them into one scene. Make sure you entire full screen mode before zooming in.
Click the link or image below to see what I mean.
I LOVE Photoshop but I can't image taking on a project like this.
Enjoy!
HYPERIMAGE


Senin, 19 November 2012

Photoshop CS 6 - Changing the Dark Interface

The first thing you'll notice on the new Photoshop CS 6 is the dark interface around the menu and tools. I didn't like it at first but now I'm starting to get used to it.
Photoshops reasoning is to keep the tools in the background so that you can focus on the image.
If you don't like this new color you can change it in the Preferences.
To do this go to Photoshop's preferences - Interface
Here you will see 4 shades to select from. You can select anything from a light gray to black.
But, if you're like me, you might like the new darker interface. I've decided on the black.
Want to change the canvas color? This too can be customized by simply right clicking and selecting one of Photoshop's shades or even customizing your own canvas color.


Senin, 12 November 2012

Photoshop CS 6 - Where are the artistic filters?

One of my favorite filters in Photoshop are the artistic filters. You can image my panic when opening Photoshop CS 6 and I didn't see Artistic under the Filters menu!

Photoshop hasn't gotten rid of these wonderful filters. You can still find them in the Filter Gallery.

Just go to Filter Gallery and all those wonderful filters like water color, dry brush and all the others are still there.

Photoshop has added a new filter to play with. (As if there weren't enough). This new filter is called Oil Paint. You'll find it just above the usual list of filters under the Filter menu.

Below you'll see an example of some testing I did with this new filter. The jury is still out on it becoming my new favorite yet. However, give it a try, you may love the results.
Enjoy!
Leona's photographs
http://tinyurl.com/8gzenmg


Selasa, 06 November 2012

Photoshop CS 6 Golden Spiral Cropping Tool

There are some new features in the cropping tool in Photoshop.  Photoshop had the nice "Rule of Thirds" grid for cropping in the last version that was really handy. A new addition is the Golden Spiral Cropping tool.
The Golden Spiral grid is designed to lead the eye to the center of an object or area in a photograph. Let's take a look at how it works.
In this photograph I want to draw the eye to the hat.
In the View drop down box I selected the new "Golden Spiral" grid. As I adjusted the size of the crop I moved the center of the spiral to the center of the hat.  (The spiral grid is a light gray so I've enhanced the line so you can see it easier.)
You can see my bounding box for my crop.
By the way, you now move the picture to adjust the crop and it takes a little getting used to.
I cropped out the part of the picture I wanted making sure the spiral focused on the hat. Below is my results. A new photograph that really draws the eye right to the hat on the bale.

Pretty neat Photoshop!


I was recently asked how to rotate the spiral crop. Here's how to do that.
Simply right click after making a rough selection. You'll then have a menu option to rotate the crop.
Leona's photographs
http://tinyurl.com/8gzenmg

Senin, 22 Oktober 2012

Vintage Photo Effects

Remember the good old days? I've got a box full of old Polaroid photographs that have faded and curled with time. However, this aged effect makes the photographs have even more character!

I've found a site that lets up upload your favorite photos then select from a fantastic array of special vintage photograph effects.


Here is a photograph of my sleeping kitty named Echo.
I uploaded the file and choose from several special effects including the edging. After a few mouse clicks the image looked like something right out of the 50's!
One more thing I didn't mention is that the interface is this site is FUN! You can drag a little camera around and look through the view finder as you make the changes. So, not only is the site effective, it's a lot of fun to interact with.

Enjoy!


Senin, 15 Oktober 2012

Photoshop - Create your own custom brushes

Did you know you can create your own custom brush in Photoshop? This brush could be of any shape or even a photo of something allowing you to let your creative juices flow.
How about creating a brush with your logo or signature? Then, with just a click of the mouse you could digitally sign any of your copyrighted work or even add your logo to anything you've created.
Here are the steps to do this.
  1. Open a shape or image that you want to become a brush (larger images better so that your image doesn't pixelate when increasing your brush size. You can always make your brush size smaller)
  2. Edit > Define Brush Set
  3. Give your brush a descriptive name
  4. Open your brush pallet then scroll to the bottom of the brush selections
  5. Your new custom brush will be the last option available
It's that simple!
Want to see how I made an awesome brush and signature brush? Check out my video below.
Enjoy!
http://screencast.com/t/FMB6Y7U8j3b


Senin, 08 Oktober 2012

Photoshop New Auto Save feature in CS 6

Here's another reason to love the new Photoshop CS 6.

Have you ever had your computer crash while working in Photoshop or have Photoshop lockup on you in the middle of a project?
There is a new feature in CS 6 to help save the day.

Open up the Preferences in Photoshop and take a look at "File Handling". Here you will see a new feature to automatically save and recover your work. I have mine set for every 10 minutes but you can set it for 5 minutes. I don't see a reason to have it wait to save for any longer than that.
If your computer happens to crash just reopen Photoshop. Photoshop will open a recovered file of the last saved state with the word "Recovered" in the file name. The original file doesn't get touched.
Great save Photoshop!

Senin, 01 Oktober 2012

PS CS 6 updates

If you're a Photoshop CS6 user you'll want to make sure you have the latest updates!

Simply open Photoshop and go to Help > Updates

An explanation of these updates are explained here.
http://adobe.ly/Rt7ckr

Now you'll always have the latest and greatest version of Photoshop.
Happy Photoshopping!

Senin, 24 September 2012

What's new in Photoshop CS 6?

Here's a neat trick to quickly see the new features in Adobe Photoshop CS 6.
Under Window select Workspace, then click on "New in CS 6".
Instantly every menu item that may contain a change is highlighted in blue. Some of the new features might be hidden in sub-menus but at least you'll know there is something there that has changed in some way.
When you get tired of looking at the blue highlights simply click on the "Essentials (Default)" to reset back to the original menu colors.
I'll be sharing several new features in CS 6 in my upcoming posts. You won't want to miss them.
Enjoy exploring in Photoshop CS 6!

Minggu, 23 September 2012

                                                        Basics/ Tutorial Posted 23/09/2012

                                                       Part 5 of our 'Basics' series of video tutorials sees us finishing our detailed look at the Tool Panel.
                                                       Here we explore the Vector Tools. Make sure to have your copy of Photoshop fired up ready
                                                       to follow along.

                                                Article/ Posted 21/09/2012
                                                This is a beaufully written article by Tom Giannattasio that I found over at  Smashing Magazine.                                                                                      G                                                                                            Go to Artcle                                                                     
                                                                                                                                                                       G                                                                                                                                             

Senin, 17 September 2012

Upsizing an image

Recently I had the challenge of trying to make an image larger. This is never a good idea. Here is why.
It's easy enough in Photoshop to go to Image > Image Size and put in larger numbers. However, your image editing program has to interpolate and do it's best to guess at making the image larger by filling in blanks.
If at all possible the best bet is to rescan the image at a larger resolution. Instead of scanning in at 72dpi try150dpi for example. If you can re-shoot the photo this could give you a larger file too. However, this isn't always possible and you have to work with the image you have.
Here are a couple of tricks that might make your results a little better.

In Photoshop, go to Image > Image Size. From the drop-down menu provided select "Bicubic Smoother (best for enlargement).
The next thing to do is to increase the size by small increments instead of all at once. For example try increasing the size by 10% twice than by 20% once. This seems to get better results. And of course, you'll only be able to increase the file so much before it's totally unusable.

If you don't like the results Photoshop gives you for increasing the image size there are a few other options to try.

Here is a site you can try for free called "reshade". http://reshade.com/
Try upsizing in Photoshop and if you don't like the results, it doesn't cost a thing to try reshade.

After talking with other Photoshopers/Photographers about this subject I found several people that preferred something called "Perfect Resize".
I downloaded a free trial version and upsized in Photoshop then tried upsizing again in Perfect Resize.  I was surprised and pleased at the results shown here.
There is a noticable difference in the quality of the photograph on the left done with Perfect Resize compared with the photograph on the right that I did with Photoshop.
If you decide you like the software after testing the trial version, it can be purchased for only $99.

Try these suggestions the next time you need to make a photograph larger. One of these should get you decent results.

Kamis, 13 September 2012

                                                Resource/  09/09/2012
                                               If your starting out and dont want to have to spend loads of  money try dafont.com for all your
                                                          free fonts. You can choose from serif and sans serif fonts for Photoshop. There are calligraphy                                                              and even graffiti fonts. Check out the copyrights on each one some are for  personal use only.                                                  


                                               Basics Tutorial/ 08/09/2012


                                                          Part 4 of our Basics Video Tutorial series. Here we continue our look at the Tool Panel and 
                                                          deal with our Painting and Retouching Tools.

Rabu, 12 September 2012

                                                            Resource/ Posted 08/09/2012
                                                           Download these 28 High Res brushes for you to use in you designs. There is a Read Me file
                                                           included to give you step by step instructions on installing the brushes ..Enjoy :)                                                                                                                                                          .                                     Go to Download...                     
                                                                                                                                                                         
                                                                                                                                                                                                                             
                                             Basics Tutorial/  08/09/2012


                                                        In this the third of our series of Basics Video Tutorials we start to look at the Tools Panel . We
                                                        specifically deal with the Selection Tools. Have Photoshop open ready to follow along.

Selasa, 11 September 2012

                                              Resource/  08/09/2012
                                                                                                                                                    G    Go to Download....

Senin, 10 September 2012

Instant color information

When browsing the Web or looking at photos, you may find a certain color that you like. If you only knew the color code you could duplicate that exact color in your own designs, images or website.

In the past I had to download the graphic or image and open it in Photoshop so that I could use the eyedropper tool to get the color information I wanted.

Now there is an easier way. Instant Eyedropper is a free program that will help you find that code. It works just like the eye-dropper tool in Photoshop, except it works with anything that you can see on your screen.

Just click and hold the eyedropper icon in your system tray and drag it over a color. The code will pop up and automatically copy onto your clipboard. Instant Eyedropper supports HTML, HEX, RGB and several other color formats.
With the information, I can create whatever I need with the exact color information I want.

http://instant-eyedropper.com/

Sabtu, 08 September 2012

                                                            Basics Tutorial/ Posted 07/09/2012
                                                 In this the second Video in this series dealing with the Basics of learning to use Photoshop
                                                             we look at how we can customize our workspace to suit our individual needs. It is advised that
                                                             you have your version of Photoshop running so as you can follow along.                                                                                                                                                                            Go to Video...
                                                                                 
                                                         Resource/ Posted 07/09/2012
                                                           Download and add this cool Grunge Brush set to your collection. Instructions for installation  
                                                           can be found in the attached read me file. There are 50 Brushes in total enjoy :)
                                                                                                                                                                       Go to Download....          

Jumat, 07 September 2012

                                                          Basics Tutorial/   Posted 06/09/2011

                                                          This is the first of a series of Video Tutorials to take the Photoshop Beginner step by step 
                                                           through the basics of Photoshop in this Part 1 we take a quick overview of the Workspace.                                                                                                                 .                                                                 Go to Video...                                                                                                                                                                                                                                                                                 
                                                            

Rabu, 29 Agustus 2012

                                                           Resource/ Posted 29/08/2012
                                                            Download this useful set of Explosion Brushes to add to your collection and then refer to
                                                            the Read Me file regarding installation ...
                                                                                                                                                                          Go to Download..  
                                                           Resource/ Posted 27/08/2012
                                                            I used this quite a bit in the past and was glad to see it still works in CS6. It comes in handy
                                                            for mock ups.  To use the script, copy the .JS-file into the 'Scripts'-folder of your 
                                                            Photoshop-application-directory you have full instructions with the download from Adobe.
                                                           .                                                                                                     
                                                                                                                                                                       Go to Download...
        

Selasa, 28 Agustus 2012

Movie of the month

I'm long over due for my movie of the month.
In a world full of hate and wars wouldn't it be nice if we could replace acts of violence with acts of kindness.
Perhaps we can make this a better world just one small gesture at a time. Enjoy!

Ever need to make a photograph larger? Check back Monday 9-3-12 on tips on upsizing photographs.


Selasa, 14 Agustus 2012

                                                             Tutorial/ posted 14/08/2012
                                                              In this Tutorial we will learn how to import Images into Photoshop,, then using Layer 
                                                             Adjustments we can match colors on various Layers to fit the overall effect. We will learn how
                                                             we can use Clipping Masks and Filters. This Tutorial also uses the Brush Tool to great effect .
                                                                                                                                                                                                                                                                                                                                                                         Read more...
                                                            Tutorial/ posted 23/06/2012
                                                             We get a very basic insight into using Photoshop 3d to bring this Tutorial to life . First we
                                                             will make our brand label in 2d. You can follow the Tutorial to the letter, or alternatively you
                                                             can use it as guide to design your own label. There is a lot of practice using Layer Styles.  
                                                             then you will be introduced to Photoshop 3d.

                                                                                                                                                                       Read more....

Senin, 13 Agustus 2012

                                                             Tutorial/ Posted 09/05/2012
                                                               This is a very simple exercise in photo manipulation. We will take a very ordinary picture 
                                                               and passing it through some of Photoshops Filters we are able to create this old fashioned
                                                               comic strip effect.

                                                                                                                                                                         Read more....
                                                               
                                                            Tutorial/  Posted 18/05/2012
                                                With this Tutorial you may watch the video or follow the written version, either  will take you 
                                                            step by step through the making of this Realistic Eyeball with good use of Selections and 
                                                            Blending Modes.

                                                                                                                                                                              Read more....