propeller

Senin, 26 September 2011

Photoshop - Metadata 101 and How to add Copyright to a photograph

I've heard of metadata but what is it all about?

Lets take a simple look at what metadata is and where you can find it.

EXIF data (Exchangeable Image File) is the metadata that comes from your camera and is attached to your image file. 

Where Can I See the EXIF Data?

Camera: There are a number of places to view EXIF data, starting with right on your own camera. In general, when previewing your images on your camera, pressing the “Info” button will lead to the EXIF data for the photo you are previewing. Each camera may have a slightly different method for viewing the EXIF data, so if you are having trouble the information will be available in your camera’s user manual under EXIF.

On Your Computer:
For JPEG and TIFF images, you can right click on the image icon on your hard drive, and scroll to “Properties” (PC) or “Get Info” (Mac). You may have to explore the dialog box which pops up when you select either of these options. For example, in Windows you would click on the Summary Tab, then click on the “Advanced” button.


In Photoshop
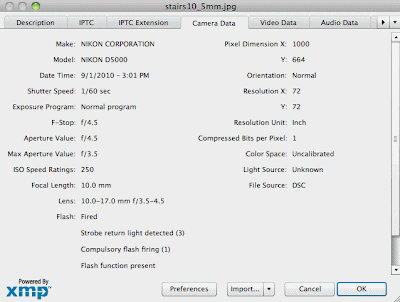
– File - Info - Camera data (shown above) note I can see what kind of camera took the photo, and even if the flash fired.
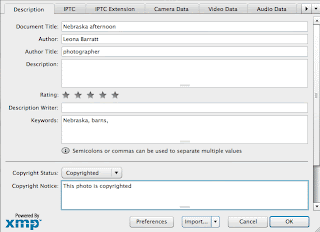

Adding your own copyright metadata
Go to File - Info - Description (see photo at left)

You can add your name, keywords and copyright information here. 

What if you decide you want to remove metadata from your photograph. Let's take a look how to do this.

Photoshop - Removing metadata
File - Save for web and devices - Metadata - none

Or, copy and paste the image into a new document window.


I hope this short tutorial makes metadata a little easy to understand. Now you'll be able to add copyright information right inside any of your photographs.

Video of the month!
I just love British humor. Take a look at this optical illusion and have a GREAT week!

Senin, 19 September 2011

Photoshop - How to control the size of your saved image

Have you ever needed to save an image at a certain file size like 122k etc?
You can't easily do that by changing the options of High, Medium, resolution when saving. You can only get close.
If you need to be more precise on the size of the image do the following:
When saving your image go to File > Save for Web and Devices
Select one of the .jpg frames, in this case with 2-Up I selected the bottom image to save as .jpg
Adjust the Quality slider anywhere from 1 to 100 and watch the size of your image in the lower left side of the screen.
When you have the size you need, click Save.
Need even more control?

You can specify a specific size for your image.
Again, go to File > Save for Web and Devices
This time click on the little drop-down menu in the upper right hand side of the window and select "Optimize to File Size". (shown below)
Type in the size the file needs to be.
Now you can type in the exact size the file needs to be.

Senin, 12 September 2011

Photoshop - Color correction using clipping points

Various lighting can cause color problems. Incandescent lights can be a real pain causing the photograph to come out really yellow.
Auto Levels can sometimes fix color issues but not always. Let's take a look at a trick to fix color problems within in Levels area.
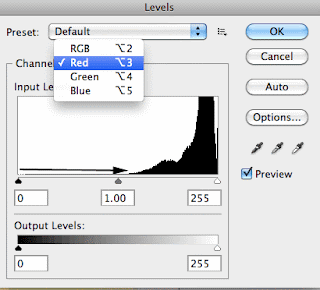
When you select Image > Adjustments > Levels note the drop down menu under RGB. Here you can adjust all 3 of the color channels.
Note that in my example I need to move the left slider over to the left side of the histogram to start bringing in the Reds. The right slider is OK but if needed, I would have slide the right triangle to the left where color data actually exists. These are called "clipping points". 
Do this for the Green and the Blue channels. Check your photograph with color problems after doing this. You'll be surprised at  how much better your photograph looks!
Click HERE to watch my movie on how I did this.

Senin, 05 September 2011

Photoshop - Default Layer Style

When adding text to Photoshop, I have a favorite shadow style that I almost always use. However, I don't always remember exactly what my settings are each time I use that style.
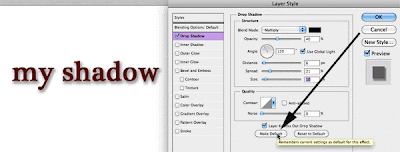
Here is a way to consistently get the same look with styles. Edit the style (it could be shadow, bevel, etc.) then click the "Make Default" button in the Layer Styles Menu box.
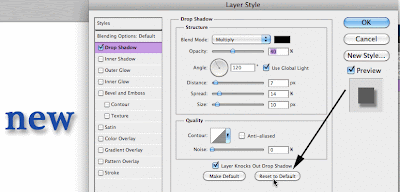
The next time you decide to use that style and want to match what you've saved, just click on the "Rest to Default" button. Photoshop remembers where all the sliders and adjustments should be for that particular style.
Now, I don't have to try to remember or guess how I get my favorite drop shadow.
The best part is, you can set a default style for any of the styles!