I recently started using a great site to store and share my photographs. It's Dropbox.com. It's a little different than the other sharing sites.
So many times I want to transfer a file from my home computer to work, from my Macintosh to my Windows computer, or even from my iPad to my office computer.
I end up using my USB Flash drive or even emailing the file to myself.
I now have a simple solution at dropbox.com
I created a free account on their site then download their software to my Macintosh, Windows computer, iPad and my Droid.
On my Macintosh, my Dropbox sits at the top of my screen. On my Windows computer, I find it down in the system tray.
Now, I can just drag and drop my files to my Dropbox space. I can access my file(s) from any of my devices.
To create an account go to http://dropbox.com. You'll get up to 2 GB of Free storage space. Additional storage space can be purchased if needed. If I keep my files up to date and cleaned out, I have plenty of room using my free account.
You can even create and choose folders to share your photos or any documents with others.
My life just got a little easier!
propeller
Senin, 27 Juni 2011
Senin, 20 Juni 2011
Photoshop - The Magic of Vibrance
In the past, I would add more color to a photograph by using the Saturation Tool.
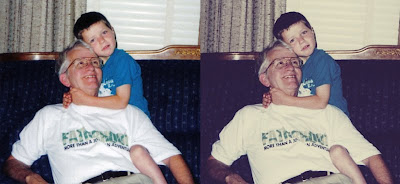
Here is an old photo of my brother, dad, grandfather and great grandfather taken around 50 years ago.
The photo is a little faded and has dulled over the years.
Vibrance is a newer feature in Photoshop since CS4 that I've fallen in love with so that now, I hardly ever use the Saturation tool. Virbrance is a huge improvement over Saturation!
Take a look at my experiment below.
To get to the Vibrance tool go to Image > Adjustments > Vibrance.
Here you will see a slider by to adjust both the Vibrance and the Saturation. (note: Saturation adjustments can also be found under Image > Adjustments > Hue/Saturation.)
Saturation used to be a helpful tool but it has one major flaw. It destroys skin tone!
Vibrance is a great tool especially if people are in the photo.
Notice that in the photo on the right, the sky, blue overalls, and the yellow flowers on the ground pop with color and the skins tones are still good.
And of course, using an adjustment layer to make these changes is always the best solution keeping the original photo untouched.
The next time you want to add more color, try using Vibrance.
Selasa, 14 Juni 2011
Photoshop - Placing more than one photo on an image
Sometime you might want to have two photographs side by side and be just one image instead of two like my example of this Retro look I created.
It's not that hard to do in Photoshop.
The first thing you need to do is check the size of the image you want to add to an existing photo. To do this go to Image > Image Size and check the width of the photo if you plan on adding it to the side like in my example.
Next Select All > Edit > Copy this image.
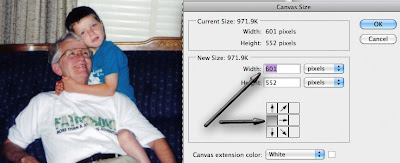
Open the first image and go to Image > Canvas Size.
Anchor your photo either on the right or left then add the additional pixels in width to your canvas size.
In this case the size was the same so I changed 601 to 1200 anchoring the original image on the left.
Click OK and you'll have enough room to now paste your 2nd image (assuming it is about the same height). If needed you can resize the 2nd photograph to fit the space you just created and move it to the blank area you created on the right side in this case.
Selasa, 07 Juni 2011
Adobe Configurator for Photoshop
Adobe has a wonderful and FREE tool called Adobe Configurator.
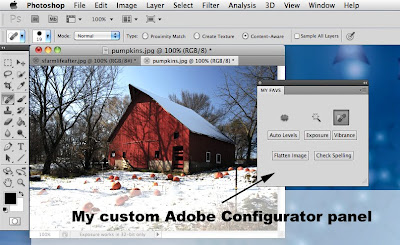
It allows you to create your own custom panel in Photoshop with any of your favorite tools, Actions, or commands.
I have a few tools that I use all the time in Photoshop. Wouldn't it be nice if just the things you used was in one handy panel?
Here is an example of a panel I created with just my favorite Photoshop goodies. The best news is that it isn't hard at all.
Here is all you need to do.
Download the free software at:
http://labs.adobe.com/downloads/configurator.html
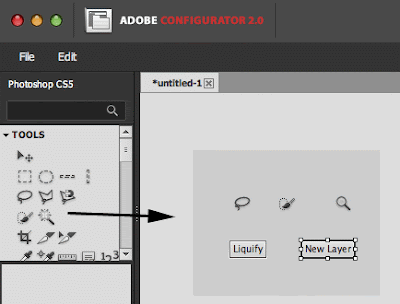
After installing the software create a new panel and drag and drop the features you want to be on your panel. When done click "File - Export". The panel is automatically saved in Photoshop's Panels folder for you.
Restart Photoshop and go to "Window - Extensions". Whatever you named your panel will be listed here. Click on it and your customized panel will appear with all your favorite Photoshop features. How handy is that?
Enjoy!
Want to watch my movie on how I did this?
Leona's basic Configurator demo
Langganan:
Postingan (Atom)