propeller

Senin, 30 Mei 2011

Create a collage for FREE!

It's not too difficult to create a collage in Photoshop. However, when you can do it much easier and get it done for FREE what's the point?!
Here is a fun site that lets you pick from various collage designs. I made this one using photographs of my son.
Of course all of the designs aren't available unless you create an account. However there are still several to pick from without having to do anything or needing to register, like the one I made.
Just go to the following site http://www.photovisi.com/ pick a layout, and upload up to 31 of your favorite photographs.
A window will open asking if you want to share it on Facebook etc. that you can just close to get to the finished result.
How easy is that?
Enjoy!

Now for my video of the month.
Words are powerful. They can destroy, comfort or even change the world. Choose your words carefully and maybe, we can make this a better world one sentence at a time.
Selasa, 24 Mei 2011

Neat trick with the Lasso Tool in Photoshop

Here is something to try the next time you are using the polygonal selection tool in Photoshop.
While making your straight line selections hold down your alt or opt key to quickly switch to your free form lasso tool.
Let go of the alt or opt key to go back to the straight edge lasso.
What a neat way to quickly switch and customize your selection!

Unable to display content. Adobe Flash is required.

Selasa, 17 Mei 2011

Photoshop - Healing Brush tutorial

Let's take a look at a neat way to get rid of fly-away hairs among other problems.
The Healing Brush tool works like magic on removing power lines, fly away hairs or a long "line" of something that you'd like to get rid of.
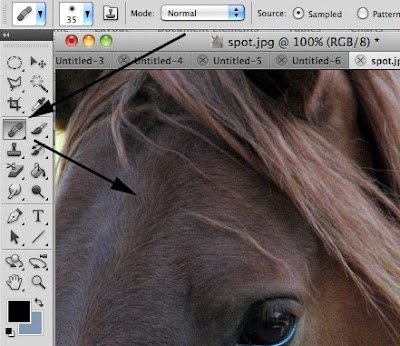
The healing brush is hidden under the Spot Healing Brush (good for removing spots)
Select the Healing Brush and in the Options bar make sure you have a soft edged brush and the size should be just slightly larger than the "line" you want to remove.
Select your sample point (where PS will copy from) close to the problem area by holding down the alt/opt key and mouse button both at the same time. (You'll see a little bulls-eye appear when doing this)
Next, start painting the problem area. Photoshop carefully adjusts all the pixels so that the textures and lighting still match and all the surrounding pixels blend in like magic.
Resample and paint as needed until the entire problem is gone.
The healing brush also works great on power lines, scars, wrinkles, or any long area of trouble.
You'll wonder how you ever lived without it!
Want to watch how I fixed this fly-away hair problem?

Click here to watch the video

Senin, 09 Mei 2011

Photoshop - Neat Lens Flare Trick

Want to master the Lens Flare tool in Photoshop?
Here is all you need to do.
Go to Filter > Render > Select Lens Flare.
Now, before you click OK, in the preview window you can move exactly where the lens flare should be.
Then click OK.

Want to take it to the next level?
For those who understand a little about Blending Modes take a look at how you can later edit where your lens flare appears on your photograph.
Watch my video on how it's done.
Cheers!

Sabtu, 07 Mei 2011

Video of the Month

I've gotten behind in posting my video of the month so I wanted to make it up to you.
I LOVE animals, dogs, cats....anything with fur....
Enjoy your weekend my friends!
http://youtu.be/nGeKSiCQkPw

Senin, 02 Mei 2011

Photoshop - Drag and Drop from photo to photo

Here is a neat trick to quickly drag and drop an open photograph into a new layer on a photo you already have open.
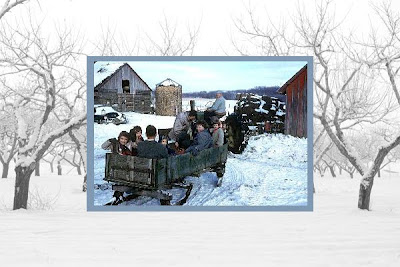
In this example I wanted the sledding photograph inside the winter photograph.
Here is what I did.
With the sledding photo open I selected the Move tool.
I then held the move tool over my photo then dragged this image to the tab that had my winter scene.
The winter photo opened when I moused over the tab then I released the mouse button to drop it on the winter snow photo and creating a new layer for my sledding photo on the winter photo.
How fun is that?
Watch how I did it here.