propeller

Senin, 25 April 2011

Photoshop - Fast Easy Border

Want to create a nice photo in just a couple of steps?
Here is all you need to do.
  • Select a background color that you want your border to be.
  • Select the crop tool and select the entire photograph.
  • Next, drag the edges of the crop OUTSIDE the selected area.
  • Then, confirm your crop.
Borders were never so easy!
Watch my movie on how I did this.

P.S. That's me in the middle having fun on the family farm in Nebraska a LONG time ago. ;-)
Don't forget to have some fun today.

Selasa, 19 April 2011

Street Photography Posts Roundup


Another post to organize past posts...
Street photography is my favorite by far. Here is a roundup of some of my street photography posts:
  • In April 2009, I did an intro on street photography for that month's theme.
  • When you are just starting out, the hardest thing about street photography is getting up the nerve to take photos of strangers. My first tip is to take photos of people who don't mind the attention and my second tip is to try taking photos at public events like demonstrations.
  • When I was in New Orleans, I conducted an experiment in street portraiture. My goal was to ask 10 random strangers if I could take their portrait. Guess what? People are pretty nice.
  • Also in New Orleans, I tried some street photography at night.
  • In Paris, there is never a shortage of public events. The 2009 Techno Parade became the subject of several posts. Earlier in the day, a bus stop told quite a story. By the end of the day, things got a little more dangerous. My "10 seconds at the Paris Techno Parade" captured an adrenaline-filled experience. At the end of 2010, I decided to do a full write-up for JPG magazine and the essay was featured as story of the week for the first week in 2011. I think that essay best captures what I felt in the moment.

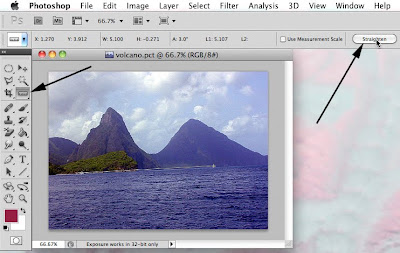
Photoshop - Best way to straighten a crooked photo

I'll admit that I rarely hold the camera straight when taking a photograph. It's especially true when I'm in a hurry. Our anniversary trip to St. Lucia shows my crooked photograph problem clearly.
I used to select the photograph then use Edit > Transform > Rotate and try to rotate by eye to get my image straight with the horizon. However, it was mostly a guessing game.
Here is a much better and faster way.
Select the ruler tool hidden under the eyedropper.
In the Options bar select "Straighten".
That's it. Photoshop magically straightens and crops the photo for me. No more crooked photographs!
Click here to watch my video on how I did this.
Cheers!

Jumat, 15 April 2011

Video of the month

I haven't posted my video of the month for several months so I thought I had better get with it!
Take a look at this prank and remember, you're never too old to have fun!
http://youtu.be/0CN_HrkBlRs

Senin, 11 April 2011

Photoshop - Great shortcuts to know


I love to use Photoshop's shortcut keys. I can't believe how much time I end up saving and now I use them without even thinking about it.

Some of Photoshop's shortcuts display in the toolbar. For example. If I want to quickly go to the brush tool, I would click B on the keyboard and I'm ready to brush.

To switch to the Lasso tools click L, click T for the text tool and so on.

Just open up the tools you like you use the most and see what the shortcut key is to quickly access this tool.

There are more shortcuts that aren't that obvious so today I'd like to share some of my favorites with you. Some you may already know and others I'm betting, will become your favorite shortcuts too.

Give these a try!

Caps Lock switches your cursor to Plus sign for precision, while working with painting or editing tools.

Holding Spacebar will change you current tool to Hand Tool, temporarily.

Alt + Mouse Scroll changes the zoom level

Pressing Tab will hide toolbar and panels, while Shift + Tab will only hide panels. This is one the most used trick in Photoshop.

Open a file and press F button, it switches among the 3 different screen modes so you can easily choose the best workspace or view your current image without the clutter

Ctrl + D to deselect everything, and Ctrl+Shift+D to reselect what you deselected.

Double clicking the Hand Tool will provide you the largest full image preview possible.

Double clicking the Zoom Tool sets the zoom level to 100%.

CTRL + AND – TO ZOOM IN AND OUT

Pressing D will resets the foreground and background colors to default (mostly Black and White)

Pressing X will swap the foreground and background colors.

Want a printout of Photoshop's shortcuts? Check this post for instructions how.
Selasa, 05 April 2011

Broken photo effects


Want to create some special effects of a broken photo?

It's not too hard to create effects like these. Let's take a look at how easy it is.


  • First create a blank white layer below your photograph.
  • Next create a layer mask on the photo layer.
  • Fill the layer mask with black.
  • Select any interesting brush and add Scattering and Shape Dynamics in the brushes palette.
  • Paint on the layer mask with white.
  • With the layer mask selected add a drop shadow for even more effects!
Want to watch how it's done? Click here for a video tutorial.
Enjoy!