propeller

Senin, 30 Agustus 2010

Creating awesome Black and White photographs

Black and white photographs can be stunning and are more popular now than ever.
Photoshop has a couple ways to doing this and I'll show you the right and wrong ways.

The wrong way to make black and white photographs

The first option has been around for years in Photoshop.
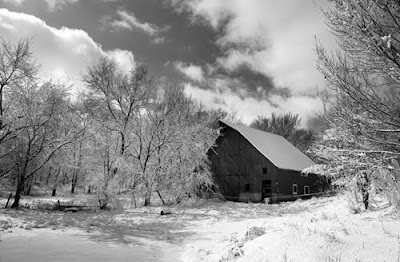
To remove color you can go to Image - Adjustment - Desaturate
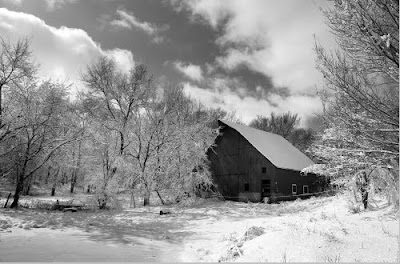
What you get is a black and white photograph that may or may not look the way you want it to (photo 1).
You have no control of the gray tones in the photo.
Notice how dark the barn is and the sky doesn't stand out like I want it to.


The right way to make black and white photographs
The next time you want to work with black and white do it this way.
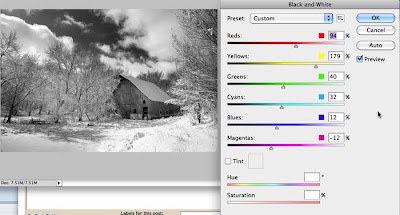
Go to Image - Adjustments - Black and White
I was able to fiddle with the intensity of what was previously red and blue in the photo by making the red areas lighter and the blue areas darker! (photo 2)
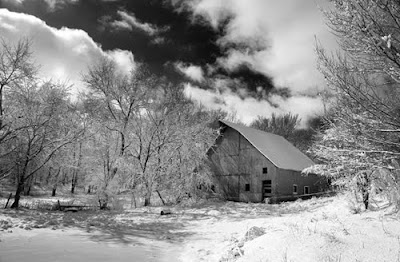
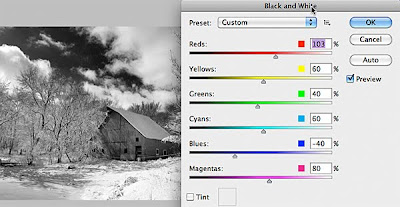
When you select Black and White you'll get a color slider palette. Here you can adjust the intensity of various parts of the photograph.
Notice how the details of the reds in the barn can now be seen and how increasing the intensity of the blues made the sky stand out. How awesome is that?!

The next time you want to experiment with black and white conversion make sure you select the right tool in Photoshop.

Image - Adjustments - Black and White

Like the old fashioned effect of sepia tone?
Try checking the Tint button in the lower left corner of the Black and White adjustment palette. Here you can even change the color and saturation of your sepia tone effect.

You'll be amazing your friends with your black and white photograph using the right tool in Photoshop.
Enjoy!


OK, now for my video of the month. Enjoy!
Senin, 23 Agustus 2010

Fixing lens distortion in Photoshop

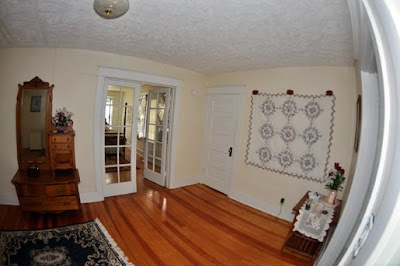
Images taken with wide-angle cameras tend to have severe distortions which pull points towards the optical center. This causes the visual appearance of an object to vary drastically with its location in the field of view.
Photoshop's lens correction tool can remove this distortion for you. Depending on the camera you used Photoshop can read the exif data (EXIF (Exchange image file format). This is a standard that allows information stored with the digital photograph) and automatically make the corrections for you.
If not, you can select your camera make and lens to remove this distortion.
To find this filter in CS5 go to Filter - Lens Correction. (In previous versions of Photoshop it was hidden under Filter - Distort - Lens Correction) Never have issues with "bent walls" again.
Here is a video of Lens Correction in action!

Senin, 16 Agustus 2010

Using Adjustment Layers in Photoshop

I like to adjust most of my photographs a little using some of Photoshop's tools. In particular I like to check Levels and often use Contrast.
However, what happens if I've added too much contrast and have saved my file? There's no going back unless I have the original image somewhere to undo what I've done. And, by then I've usually deleted the original file off my camera. DOH!

This is why you want to always use Adjustment Layers to do your editing. Adjustment Layers allow you to go back to your change and tweak your settings or, remove it completely.

Here is one way to start.
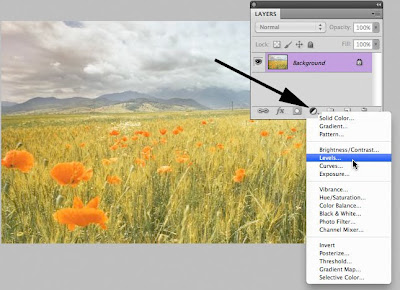
Open your Layers palette and click on the black and white Adjustment layer icon. All of the awesome editing tools display in a list. Select the tool you want to use and a new Adjustment layer appears in your layer palette. Make the changes you want and even add another Adjustment layer if desired.
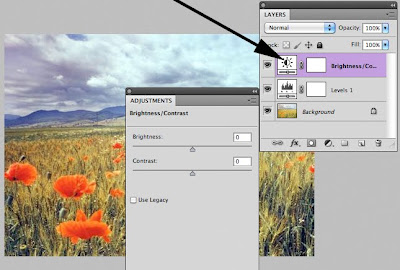
Each new adjustment now displays as a seperate layer in your layer palette.

To make changes to your adjustments just click on the Adjustment layer icon to view your previous change and modify your settings (photo 2).

The best part about using Adjustment layers is that no damage is done to your photo. If you save this file in a native .psd format you can always go back to remove, tweak or add new Adjustment layers without permanent alternations to the original photo.

If you've never used them, Adjustment layers will be your new best friend in Photoshop.
Never damage a pixel again!

Jumat, 13 Agustus 2010

Hidden features in Photoshop

When working with an image in Photoshop, sometimes what is surrounding your photograph can affect what you are seeing. First an foremost, just the clutter alone can be distracting.
Also, what the human eye and brain “perceives” can be effected by the color surrounding your image. If you have a darker color around your main image, your main image will lighten up, and if you have a lighter color around your main image, your image will appear darker.
This is the reason we have the “F” key function. Hitting the "F" key will not only remove all the color but allow you to see your photograph "in a new light" as they say with a light gray or black background. Hit the "F" key again to get all of your toolbars (and clutter) back.
Below is an example starring my kitty Echo.
The next time you're in Photoshop, give it a try!

Senin, 09 Agustus 2010

Black and white vs desaturate

Black and white photographs can be stunning. There are a couple of ways to work with the Black and White settings in Photoshop.
The first way used to be the only option available when changing a photograph from color to black and white. You can do this by going to Image - Adjustments - Desaturate and the color information is removed like in the second photo displayed here.
This is fast but you have absolutely no control on the overall tones of the now black and white photo.

Here is the best way to make a black and white photo in Photoshop.
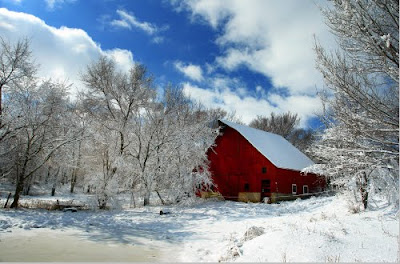
Go to Image - Adjustments - Black and White. Here you get slider bars to influence the effect of certain colors in the image. For example, notice how dark the barn is when I let Photoshop change the photo to black and white by using desaturate in the 2nd photo. The barn is too dark and the sky doesn't pop like it does in the color photograph.
In the third photo you can see how I adjusted the reds and blues so that the barn is much lighter and the previous blue areas of the sky become more prominent. With these slides I can bring focus to areas of the photograph that I want the focus to be on! This is great for flowers, sky, and in this case the barn.

There are also tools here if I want to create a neat sepia tone effect by selecting the Tint button and adjusting the hue and saturation of the tint. This can be really nice for the old time photo effects.
Now you can make stunning black and white photography using the KEWL Black and White tool in Photoshop too!

Jumat, 06 Agustus 2010

Photoshop - Dry Brush Filter

I wouldn't be able to draw even a stick figure if I had to. However, Photoshop has some filters that can create AMAZING faux painting effects.
Today we'll take a look at my favorite filter to create amazing "paintings" from photographs!
Enjoy!

Selasa, 03 Agustus 2010

Formatting Text in Photoshop

You might need to add an entire paragraph of text in your Photoshop document. However, what about editing the line and word spacing of the paragraph like you can in a text editor?
Here is all you need to do.
Select your text then open the character palette (File menu - Window - Character). You'll see numerous text formatting tools available including leading and tracking. You can either type in a number into these fields or, use the little slider arrows to watch your spacing change as you move the arrows.
Other features on the bottom of the palette include faux Bold (very helpful when Bold is not an option for your font) subscripts, underline and superscripts.

Photoshop will never be an efficient text editor but when you need to make adjustments it can be done with the Character palette.

Enjoy hiking? Perhaps not like this video of the month.