 What if you want to print out a 5 x 7 photograph and need it to be exactly that size? Here is all you need to do.
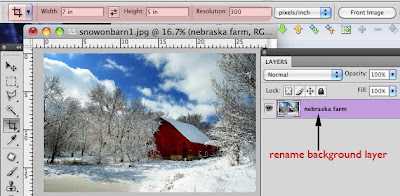
First, if it is a background layer, rename it. Remember, background layers are locked which limits what you can do to it. Renaming the background layer unlocks it.
Next, select the crop tool.
Type in 7 in and 5 in. (If you get them backward just click the double arrows to reverse them)
Select the resolution of your printer.
Next you will be able to drag a perfect 7x5 (or 3x5, 8x10 etc.) selection across you image and control as you drag to get the area that you want.

That's it. You have a picture that will fit your frame perfectly!
Note: You'll want to remove these numbers in the option bar the next time you use the crop tool or you'll wonder why the crop tool is acting weird. Either select and delete the numbers you entered or use the clear button in the option palette for the crop tool.
Now just when you thought life couldn't get any better take a look at this.
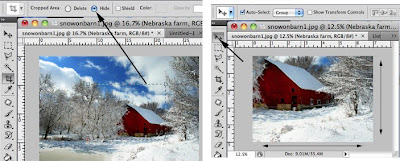
After making your selection change from the Delete button in the option panel to the Hide button. Instead of removing the excess image when you crop it will only hide it.
This way as shown below, then allows me to select the move tool after cropping and drag my 5x7 image around to position my photo exactly where I want it. In my 5x7 photo below, I decided the barn would look better in the upper right. I was able to use the move tool to reposition it.
I bet you didn't know the crop tool could be so KEWL!

Tidak ada komentar:
Posting Komentar