Here is all you need to do.
Start a new document by going to File > New
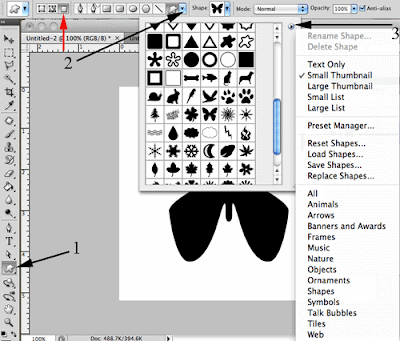
Use the custom shape tool

 and draw any shape.
  Make sure you have "fill Pixels" selected (red arrow).
Don't see a shape you like? Click the flyout menu (3) and load a palette full from over a dozen different options.
I selected the "Nature" palette and then selected the Append option to add these shapes to what I already had open. I then selected the butterfly shape.
Drag and draw your shape onto your canvas.
Use the magic wand too to select your shape. (This will be easy to do if you selected the "fill Pixels" as suggested above.)
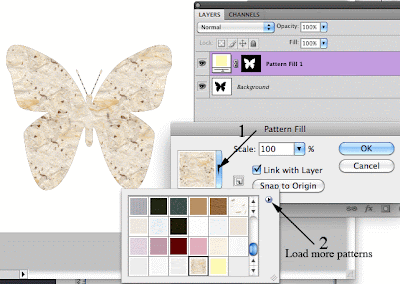
Now go to Layer > New Fill Layer > Pat
 tern and click OK.
Click the default pattern (1).You'll have several options to select from for a pattern. The default patterns are nice but just when you thought life was good it gets better.
Click on the flyout arrow (2) and you get even more pattern styles to select from.
There are artists surfaces, rock patterns, nature, paper, and more patterns to select from. Select the group of patterns you want and select "Append" to add them to the list of available patterns.
I selected the "Papers" patterns then choose "White with wood fibers" for my butterfly.
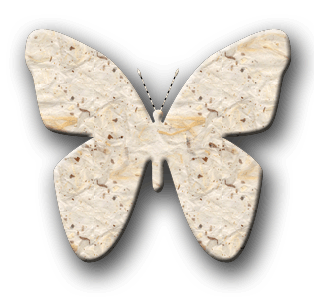
To finish off my work of art, I selected my new Pattern Fill layer and then applied a Layer Style to it.
Under Layers > Layer Style I selected "Bevel and Emboss".
I then added a soft "Drop Shadow" to my layer style for the finishing touch.

The possibilities are endless.
What a great way to be creative with the help of Photoshop.
Enjoy!
Tidak ada komentar:
Posting Komentar