propeller

Senin, 24 Mei 2010

A better and Free screenshot program

In Windows, you can take a shot of your entire screen. Just hit the Print Screen button. But it's awkward and doesn't give you any control and what you capture.

That’s where Greenshot comes in. It puts a variety of screenshot tools at your fingertips and runs in the background. It adds keyboard shortcuts for different screenshot types like grabbing only the open window. Or you can click and drag to capture a region. You can save the shot or modify it with the built-in image editor. And of course the best part is that it's free.

http://greenshot.sourceforge.net/

Now for my YouTube video pick. It's been around but didn't want you to miss it.

Have you ever been to a water theme park? It can be a lot of fun.
This kitty has fun and creates his own water theme park. Enjoy!

This explains their high water bill too.

Selasa, 18 Mei 2010

Getting Started with Patterns in Photoshop

Using pattern fills is a fun new trend in artwork. Photoshop comes with a lot of built in shapes and filling them with a pattern allows you to create great individual artwork.
Here is all you need to do.
Start a new document by going to File > New
Use the custom shape tool and draw any shape. Make sure you have "fill Pixels" selected (red arrow).
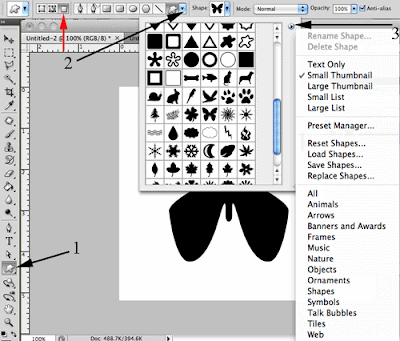
Don't see a shape you like? Click the flyout menu (3) and load a palette full from over a dozen different options.
I selected the "Nature" palette and then selected the Append option to add these shapes to what I already had open. I then selected the butterfly shape.
Drag and draw your shape onto your canvas.
Use the magic wand too to select your shape. (This will be easy to do if you selected the "fill Pixels" as suggested above.)
Now go to Layer > New Fill Layer > Pattern and click OK.


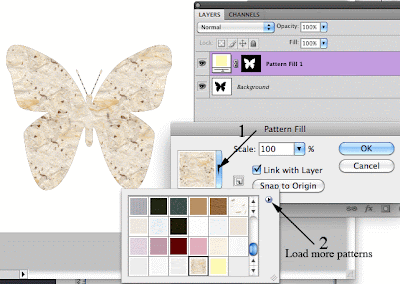
Click the default pattern (1).You'll have several options to select from for a pattern. The default patterns are nice but just when you thought life was good it gets better.

Click on the flyout arrow (2) and you get even more pattern styles to select from.
There are artists surfaces, rock patterns, nature, paper, and more patterns to select from. Select the group of patterns you want and select "Append" to add them to the list of available patterns.
I selected the "Papers" patterns then choose "White with wood fibers" for my butterfly.

To finish off my work of art, I selected my new Pattern Fill layer and then applied a Layer Style to it.
Under Layers > Layer Style I selected "Bevel and Emboss".
I then added a soft "Drop Shadow" to my layer style for the finishing touch.
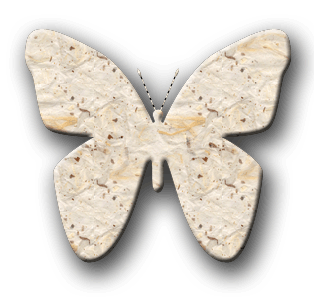
The possibilities are endless.
What a great way to be creative with the help of Photoshop.
Enjoy!

Senin, 10 Mei 2010

TypoHound - A great eBay tool

Practically everything is available on eBay. I've bought a lot of items on eBay. But the vast number of buyers can drive up prices.
Want less competition when bidding? Here's the trick.
Like me, a lot of people are bad spellers. These products don't show up when searching on eBay.
That's where TypoHound comes in. Just type in a word (spelled correctly) and TypoHound takes you to eBay to all the found misspellings.
I typed in Droid and found all kinds of accessories for my phone that weren't being overbid on.
Enjoy!
http://www.typohound.com/

Selasa, 04 Mei 2010

The Crop Tool - Tips and Tricks

Perhaps you think you know all you need to know about the Crop tool. I'd like to share a couple of tips that I think you will find very useful.What if you want to print out a 5 x 7 photograph and need it to be exactly that size? Here is all you need to do.

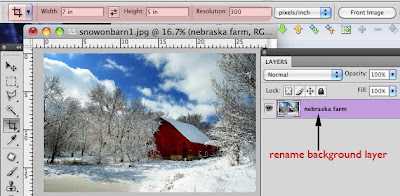
First, if it is a background layer, rename it. Remember, background layers are locked which limits what you can do to it. Renaming the background layer unlocks it.

Next, select the crop tool.
Type in 7 in and 5 in. (If you get them backward just click the double arrows to reverse them)
Select the resolution of your printer.
Next you will be able to drag a perfect 7x5 (or 3x5, 8x10 etc.) selection across you image and control as you drag to get the area that you want.

That's it. You have a picture that will fit your frame perfectly!
Note: You'll want to remove these numbers in the option bar the next time you use the crop tool or you'll wonder why the crop tool is acting weird. Either select and delete the numbers you entered or use the clear button in the option palette for the crop tool.
Now just when you thought life couldn't get any better take a look at this.
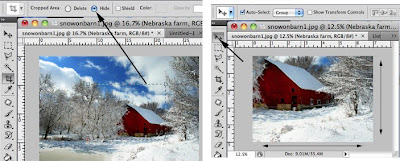
After making your selection change from the Delete button in the option panel to the Hide button. Instead of removing the excess image when you crop it will only hide it.
This way as shown below, then allows me to select the move tool after cropping and drag my 5x7 image around to position my photo exactly where I want it. In my 5x7 photo below, I decided the barn would look better in the upper right. I was able to use the move tool to reposition it.
I bet you didn't know the crop tool could be so KEWL!