propeller
Jumat, 27 November 2009
Free flight status check
Here's a simple and free site to check their flight status.
http://flightaware.com/live/
Selasa, 24 November 2009
Black Friday Preview
Before you head out for great deals on Friday you can get a sneak peak of what's going to be on sale at the following sites.
It's nice when you can be way ahead of the game.
Enjoy!
Photoshop - Best way to whiten teeth
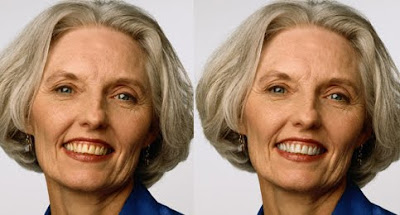
I found a much better way to whiten teeth and the teeth look great and natural.
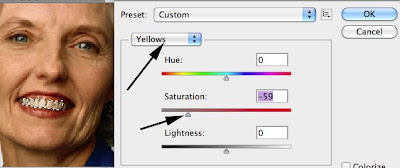
My trick? Just remove the yellow.
In my example I selected just the teeth. Then, under Hue and Saturation I took the yellow almost completely out of the photo.
 Here are my results below. No more fake looking smiles for me!
Sabtu, 21 November 2009
Photoshop - Instant slimming trick
Here's all you need to do.
Copy your image to a new layer.
Under Edit select Free Transform
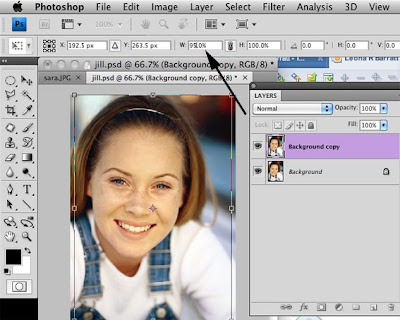 Change the width just a little to say 95% as I did in my example. (any more and it gets obvious and distorted)
When you're happy with the results click Return.
You may need to do a little cropping and then you're ready to save your finished results. Here are the results side by side below. The left is before and the right after.
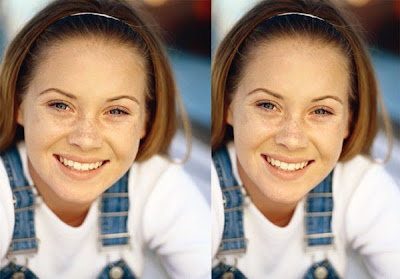 It's simple, discrete and the best part, it's easy.
Kamis, 19 November 2009
Photoshop - sharpening tools tutorial
- sharpen
- sharpen edges
- sharpen more
- smart sharpen
- unsharp mask
Let's focus on the one I use almost exclusively.
My favortie is unsharp mask. It seems to be the most useful sharpening tool.The Unsharp Mask searches through your image looking for where colors change, and sharpens those areas. The Unsharp Mask is superior to any other sharpening because it makes decisions based on adjacent pixels, not random color changes, so it usually can find and sharpen just the true edges of color areas
It is the it creates a halo around high contrast area to emphasize edges.
Let's take a look at what the radius setting does.
In my example you can see that the more I increase the Radius the more it adds both a white edge and black edge to areas of contrast.
The amount changes the amount of contrast between pixels. The more the amount the more you will notice a change in the picture. If you set this too high then the halos around edges will be too noticeable and the picture will look terrible. The amount that you need is determined by the subject matter and the resolution of the image. If the subject matter contains something like trees or people then I’ve noticed that a lower amount is fine. For buildings and objects with sharp edges, a higher amount works. For high resolution images you’ll need to increase the amount more. You’ll need to experiment with it.
The Radius is the size of the halo around the edges. One side of the edge will have a lighter color and the other side of the edge will have a darker color. The number that you are changing is the number of pixels surrounding the high contrasting areas. High resolution images will need a higher radius. Low resolution images will need a lower radius. Also I’ve noticed that the radius and amount can be inversely proportional, meaning that higher radius can have a lower amount and a lower amount can have a higher radius. Once again, you’ll have to experiment.
Finally, the Threshold determines what exactly you want an edge to be. Photoshop thinks that colors that are touching and are very different from each other are edges. If your threshold is set to 0 then everything will get sharpened (including noise). This option allows you to choose what should get sharpened. A threshold of over zero will only sharpen areas with high contrast and won’t touch areas with low contrast. This is helpful because you don’t want stuff like noise getting sharpened along with real edges. The higher the setting the less areas the sharpening will be applied to.
| Images can easily be over-sharpened. When you take it too far, a "ghosting" begins to appear around the edges, detracting from the overall appearance. Be careful not to over sharpen your images. In no time at all, you'll be sharpening images perfectly. |
Senin, 16 November 2009
Fixing digital camera shutter lag
Shutter lag is that annoying delay between the time you press the button and the time the camera actually takes the picture. While it seldom takes much longer than a second, it can mean the difference between a great, crisp image and a blurry picture of something I didn't even want in the picture.
The easiest fix for reducing shutter lag in a digital camera is to use the prefocus feature.
Most cameras allow you to press the button down halfway in preparation for a shot. This causes the camera to set the focus and lighting sensors before you actually take the shot. When you do press the button, the shot will be taken almost instantaneously because the camera has already gone through many of the processes required to take a photo. Give this a try next time and you won't miss that perfect shot.
Now for a tip on car repairs.
You probably know how much you should pay to get your oil changed. But, when it comes to repairs, things aren’t so easy.
That’s where RepairPal can help. It will provide you with estimates for car maintenance and repairs. You’ll know if a mechanic is giving you a good price!
I was able to see common problems with my year and make, and also how much I should pay for the parts and labor on my car in my area. In my example, I checked what brake pads would cost.
This is so much easier than calling around to multiple places. Enjoy!
Kamis, 12 November 2009
FREE color designer
I'm going to share with you a really neat site that will generate colors for you. This Palette Generator will allow you to design colors on a website by looking at a favorite photograph.
It even includes a downloadable Adobe Swatch file (ASE) for Photoshop.
Besides web design, you could also use it for scrapbooking or find complementary colors to paint a room around your favorite sofa!
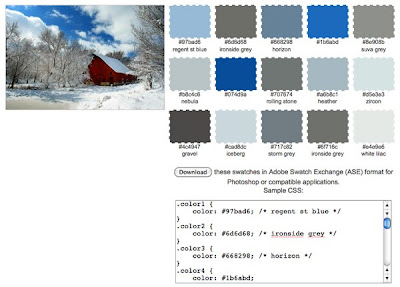
In my example I uploaded a photo of the farm I was raised on. If I was into scrapbooking I'd know exactly what colors what go perfectly with my photo.
Here is the link http://bighugelabs.com/colors.php
Enjoy!
Sabtu, 07 November 2009
Photoshop Layer Selection with a click
Senin, 02 November 2009
Free easy image resizing software
Try ImageSizer. After installing it all you need to do is to drag an image, or in my example above, a folder full images into the work area (#1)
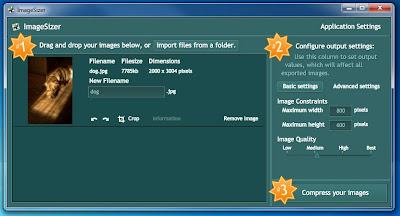
Then select the size (make sure all your photos are portrait or landscape so you don't distort them) and compression settings you want. (#2)
Then click compress (#3)
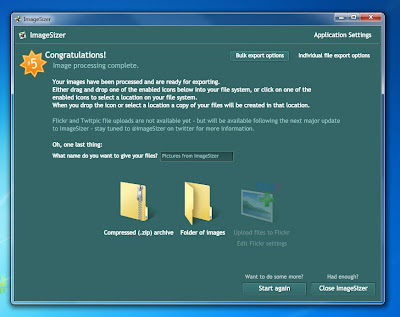 All you need to do after that is to drag your finished folder onto your desktop. You can even choose the option of a .zip file or to upload your images directly to Flickr!
This simple drag and drop application rocks! It's a great alternative if you don't have Photoshop.
Check it out at http://www.dataproductservices.com/isa
How neat is that? And of course the best part, IT'S FREE!
Enjoy!


