propeller

Jumat, 30 Oktober 2009

Fabulous Photoshop Tip in less than 1 minute

Draw a zoom area
I found a neat trick to control my zoom when using the magnifying glass for zooming.
Instead of just clicking on the zoom tool enough times to get into the area of the photo you want to work on, here is a neat trick.
Use the magnifying glass to drag and select the area you want to zoom into.
In the example below I drug a box shape around the hat on the straw. Next, I'm instantly zoomed right into that specific area.
How neat is that?!

Kamis, 29 Oktober 2009

Send text messages for Free

My son loves getting text messages. I'm not really into it and don't want to pay for it either.
My solution is to send him text messages for free.
WataCrackaz. It is an add-on for Firefox. Once you install it, you'll get an extra toolbar as shown below and you can send text messages directly from Firefox!
I send him text messages right from my roomy keyboard using Firefox.
I don’t need to mess with your phone’s cramped keyboard. And I can send messages to anyone without paying a dime. Of course, the recipient may be subject to charges for incoming texts.


https://addons.mozilla.org/en-US/firefox/addon/1709

Selasa, 27 Oktober 2009

Really cool Photoshop Motion Blur effects

Want to create Really cool starburst diffusion effects?


Let's take a look at how I did this using motion blur. Follow the steps as follows:


Open an image that has a lot of high lights or sunlight.

(In this image I adjusted levels.)

Create 2 copies of the image in the layers palette. (Drag the layer down to the blank layer icon in the layer palette 2 times.)

Select top layer - Filter blur motion blur 45 distance maximum

Select 2nd layer – Filter blur motion blur -45 distance maximum.

At this point you'll have something that looks like the middle photo.

Select top layer. In the Blend Mode select Screen

Merge top layer down (Layer - merge down)

Select top and again change Blend Mode to Screen.


Final touch

Image adjustment Exposure - change the gamma settings to get the overall lighting. I made mine darker since Screen Mode tends to over lighten.

Try this procedure on any photo that has some nice highlights or sunshine in it. You'll be surprised what professional looking star burst effects you can get.

Enjoy!


Sabtu, 24 Oktober 2009

Is your computer ready for Windows 7?

The Windows 7 Compatibility Center helps you easily check the compatibility of thousands of
devices and software programs for 32-bit or 64-bit versions of Windows 7. Usually, you won’t
need to do anything to ensure compatibility. If you do, the site goes beyond just telling you
what will or will not work. It also provides links to drivers and software updates to help get
your PC running with the latest software.

The Windows 7 Upgrade Advisor scans your PC to see if it’s ready for Windows 7. It checks to see if your PC meets the system requirements, lets you know if your processor is capable of running 64-bit versions of Windows 7 and gives guidance on your upgrade options. It also tells you about any known compatibility issues with the most commonly installed software programs and devices connected to your PC. If an issue can be resolved, it suggests next steps for you to take before installing Windows 7.

If you'd like to download it and test your computer click here to go to Microsoft's Upgrade Advisor site.

Rabu, 21 Oktober 2009

Photoshop Art History Brush Tutorial

I've used the Artistic filters in Photoshop to create painting effects. However, the Art History Brush allows me to control what part of the painting I want to restore and allows for almost unlimited special effects.
The art history brush tool lets you paint with stylized strokes, using the source data from a specified history state or snapshot. By experimenting with different paint style, size, and tolerance options, you can simulate the texture of painting with different colors and artistic styles.

Like the history brush, the art history brush uses a specified history state as the source data. The history brush, however, paints by recreating the specified source data, while the art history brush uses that data along with the options you set to create different colors and artistic styles.

Open the photo that you want to make look like a painting

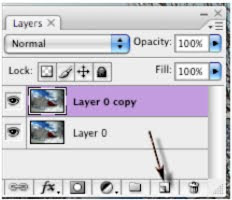
Duplicate the background layer by dragging the layer to the new layer icon (always work on a copy of an image)

Change foreground color to White

Edit – Fill – Normal – Foreground color (Fills the new layer with white)

Select the Art History Brush (has a curl around brush) and try various brush styles and sizes.

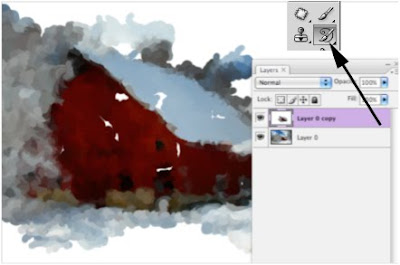
Depending on the resolution of your image here is my results when using the option palette setting “Tight Short” with a solid brush size of 9.


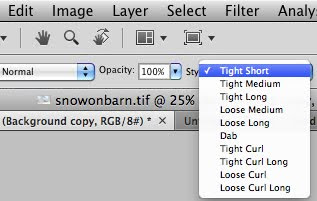
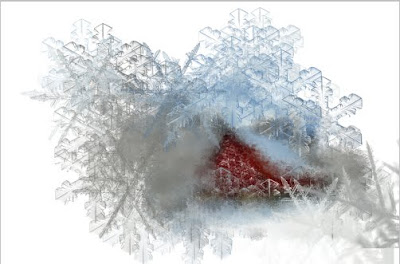
Want some real fun? Try various brush shapes when using the Art History Brush. Here I used a snowflake shaped brush and changed the size of the brush as I painted back in time.
Now there's an afternoon of fun with Photoshop. Enjoy!


Sabtu, 17 Oktober 2009

Fabulous Photoshop Tip in less than 1 minute

Selection Shortcuts
Want to select everything in Photoshop on the fly?
Try CTRL A to select all
CTRL D to deselect everything.

Rabu, 14 Oktober 2009

Fabulous Photoshop Tip in less than 1 minute

Common shortcuts
Did you know that Photoshop uses some of the same shortcuts you use in Word?
Try CTRL X to cut a selected item
CTRL C to copy a selection
CTRL V to paste a selection
You'll find yourself zipping around Photoshop like a Pro!

Minggu, 11 Oktober 2009

Fabulous Photoshop Tip in less than 1 minute

Access to favorite tools fast
I use levels on 90% of my photos. Want to learn a short cut to my favorite Photoshop tools?
Try "CTRL L" to access Levels.
"CTRL U" = Saturation
"CTRL B" = Color Balance

Jumat, 09 Oktober 2009

Photoshop's History Brush

The History Brush is one of the most versatile retouching tools in Photoshop. It can be used to restore a modified, retouched photo to an earlier state. Not only can you brush your picture back to the last saved state of the photo but you can brush your image back to any history state listed in your History Palette. The History Brush can make past and present mingle beautifully.
Here is a photograph of a thermometer that I've used the liquefy filter on. It did a good job of "melting" the thermometer but unfortunately, it also distorted the background.
The picture on the right shows where I painted back the wall around the thermometer with the history brush to restore the wall to its original state. I changed the size of the history brush to get into the smaller areas as I was working.

In order not to accidentally paint the thermometer back you could select the thermometer as I did with the magnetic lasso tool, then select Inverse. Now with only the background selected I won't accidentally brush back the changes I made to the thermometer.

If you want to get really tricky, you'll notice
that the second state in the History palette shows that I did Levels to correct the contrast. In order not to paint back in time too far, you should click on the Levels state of the History palette to select it. Then, use the History Brush to paint from that point forward. That way I don't undo the correction to contrast too when painting back in time with the History Brush.
Want to try something really neat? Take a photograph, convert it to Black and
White. Then paint part of it back to color.

(Tip: Use a soft edged brush and change the size of the brush as needed)
Coming up soon. The Art History Brush. We'll take a look at how you can make beautiful art by painting back in time!

Selasa, 06 Oktober 2009

Fabulous Photoshop Tip in less than 1 minute

Change the brush size on the fly
Want to change the size of your brush with out having to go up to the Option Palette? Just use the right and left bracket keys to quickly change the size of your brush.
The bracket keys also work on the pencil, eraser tools, clone stamp and a few others.
Want to change the softness of your brush? Hold down the shift and left bracket to soften the edges.
Bonus tip: Always use a soft edged brush when working in Photoshop to get better results.

Jumat, 02 Oktober 2009

Fabulous Photoshop Tip in less than 1 minute

Hide all toolbars and panels with one mouse click
With all the panels and toolbars in Photoshop sometimes it's hard to find enough space to see my image.
Use the "tab" key to quickly hide all toolbars. Now your image floats all by itself without all the clutter!
Hit "tab" again to bring them all back.
Shift tab hides the panels on the right side only. The next time you're in Photoshop, give it a try!