Sometimes you have problems with the color in a photograph. Photoshop has a nice tool called "Auto Color". You can find this tool under Image > Auto Color
Sometimes it works great and sometimes it doesn't. What do you do if Auto Color doesn't do the trick?
It seems like Photoshop always has more than one way to fix a problem. I'll show you just a couple of ways including my favorite way.
First you could go to Image > Adjustments > Color Balance
Here you can fiddle with opposites. Too much magenta? Then slide toward the opposite which is green.
The problem with this method is, if you didn't duplicate your image to a new layer, you've done permanent "damage" to your open image.
This is where we're going to use an adjustment layer. (What is, and how do I make an adjustment layer?)

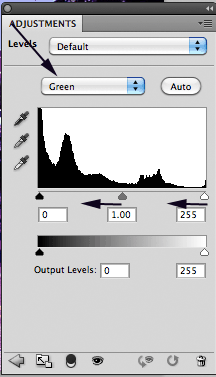
Open the layers panel and add a "Levels" adjustment layer. With the Levels panel open use the pull-down menu to adjust the histogram of your Red, Green and Blue channels so that the histogram looks even.
In my example, I'm working on the Green channel. I can see that I need to adjust the white and mid-tone points by dragging the triangles to the left.
I did this for all the color channels. I also keep an eye on my open image while I'm doing my adjusting.
Remember to always save a native .psd document of your image. If you want to go back and make adjustments to your colors or revert back to the original image you'll need the .psd document in order to edit the layers you've created.
Want to see how I did this? Check the video below.
Tidak ada komentar:
Posting Komentar