propeller

Selasa, 22 Februari 2011

Share LARGE files with ease!

Have you ever tried to email a large file to someone only to get the message back with errors caused by the file being too big? It can be very annoying.
I used to use a neat site called drop.io. However, they are no longer offering this free service. The site I use and love now is called wikisend.
I love it because it is Easy, Free, and no need to even create an account. Just go to the site, upload your file and then send the link it provides to whomever you want.
The link is good for 7 days and it provides you with a Big "Download file" button to make it a snap for your receiver to find and download you file.
How KEWL is that?

http://wikisend.com/

Bonus tip
Google has done it again with the Google Art Project. You can navigate through various museums similar to Google's street view. The paintings have been captured in amazing high-resolution enabling you to zoom in to see the finest details on selected paintings.
Enjoy a trip to a famous art gallery without leaving your chair. Enjoy!
http://www.googleartproject.com/
Jumat, 18 Februari 2011

Artist's new plans

We never know for sure where life leads us. Sometimes we find that everything we need is within a hugs reach.
Have a great weekend.

"Family Man" from Trevor Little on Vimeo.

Selasa, 15 Februari 2011

Photoshop - Better color editing tip

COLOR PROBLEMS
Sometimes you have problems with the color in a photograph. Photoshop has a nice tool called "Auto Color". You can find this tool under Image > Auto Color
Sometimes it works great and sometimes it doesn't. What do you do if Auto Color doesn't do the trick?

It seems like Photoshop always has more than one way to fix a problem. I'll show you just a couple of ways including my favorite way.

First you could go to Image > Adjustments > Color Balance
Here you can fiddle with opposites. Too much magenta? Then slide toward the opposite which is green.

The problem with this method is, if you didn't duplicate your image to a new layer, you've done permanent "damage" to your open image.

This is where we're going to use an adjustment layer. (What is, and how do I make an adjustment layer?)

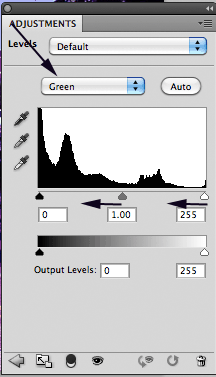
Open the layers panel and add a "Levels" adjustment layer. With the Levels panel open use the pull-down menu to adjust the histogram of your Red, Green and Blue channels so that the histogram looks even.
In my example, I'm working on the Green channel. I can see that I need to adjust the white and mid-tone points by dragging the triangles to the left.
I did this for all the color channels. I also keep an eye on my open image while I'm doing my adjusting.

Remember to always save a native .psd document of your image. If you want to go back and make adjustments to your colors or revert back to the original image you'll need the .psd document in order to edit the layers you've created.

Want to see how I did this? Check the video below.
Unable to display content. Adobe Flash is required.

Senin, 07 Februari 2011

Simple and FREE Image editing

I do a lot with Photoshop however, the learning curve and expense keeps people like my mom from even considering using it. That's where Easy Image Modifer comes in.
You can resize, rename, and change the format in just a few simple mouse clicks. It's easy and of course the best part....it's FREE.
Now life is a little bit easier for my friends and family that want to keep things simple!
Take a look at it below or check our their website at http://www.inspire-soft.net/?nav=soft_easyimagemodifier

Selasa, 01 Februari 2011

Photoshop - Putting text on a curve or path

*This tutorial is best for the more advanced Photoshop user.

Have you ever wanted to have your text follow a curve or path?
It's really quite easy to do in Photoshop and I'm going to show you how.
There are a couple of ways to have your text follow a path.
One way is to create a path with Photoshop's Pen tool as seen in this photo. Select the pen tool from the Photoshop menu and click anchor points along the curve you want to post your text on. When you've finished creating your curve select the Text tool.

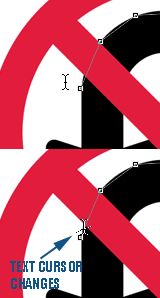
With the Text tool selected you'll notice that the cursor changes from a straight line to a curved line. Move your cursor to the beginning of your curve until the cursor changes to this curved line as shown in the animation. This is critical or your text won't stick to the curve.
Start typing your text and it will follow the curve you just created with the Pen tool. If your text runs off the curve because the curve is too short or the text font is too large you can edit the font size and color as desired until it fits your curve perfectly. If you want to perfect your curved text even more, open the Character panel from the Windows menu. Here you can edit the spacing of your words and letters by adjusting the kerning and tracking until your curved text is perfect!
Photoshop comes with numerous shapes that work just as well as a custom path you create too. Select the custom shape tool from the menu. Here you can select any shape you want or even select from the additional shapes loaded in the Custom Menu shapes. After you've added your shape you can use the text tool to follow the curves of the shape you just added.