propeller

Rabu, 30 Desember 2009

Photoshop - Removing Blue Eye

Photoshop has a great tool for removing red eye. Red eye occurs when the light of the flash reflects from the retina. The more open the eye, the more red eye effect. Just select the red eye tool and click on the red part of the eye and presto! The red eye is gone and replaced with a natural dark color.
When you take photos of animals, the red eye effect can be quite different. Animals have a reflective layer in the back of their eyes behind the retina called the tapetum. This layer enhances their night vision. The color of the tapetum gives you blue, green, yellow, or white eye effect. The red eye tool does not work with blue eye.
Removing blue eye takes some additional work.
Thanks to Shari, I have a good example of blue eye.
Here these adorable little dogs, Fritz & Schatzi, have that blue eye reflection going on. Attempting to use the red eye tool just does weird things like darkening the doggies fur on its head.
Here is what we need to do.
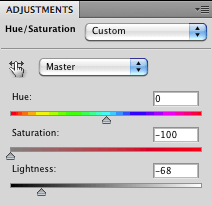
  • Zoom way in and select the blue part of the eye. Make sure you have all of the blue selected in both eyes.
  • Add a new adjustment layer of Hue/Saturation by selected the adjustment layer icon in the bottom of the layers palette.
  • Slide the Saturation left to remove all color.
  • Slide the lightness back to add a nice dark pupil.
And there you have it. No more blue eyes.
I did the same for both dogs since the dog on the right had a little bit of blue showing too.
The final touch was to adjust the levels, add a little more saturation to the entire photograph along with a little more contrast just to make the image "pop".
These sweet little dogs no longer have blue eyes and the results are the following image.
Looks the the perfect presents to find under the tree to me!


Have a problem photo? Send it to me at lbarratt1@unl.edu and you might see it on an upcoming blog.

Minggu, 27 Desember 2009

PCMAGS Top FREE Apps for your phone

I just got a DROID and really love it so far. It took some getting used to before I was comfortable with interacting and navigation. But now that I've gotten better at that, I'm looking for some fun features to add to my new phone.

You may be getting a new phone for the holidays too. If so, you'll want the best Free applications out there.

Fortunately PC Magazine has done the footwork already for us. They've gone through thousands of applications to find the best Free applications. They've even sorted the list for each phone.
Make sure to scroll to the bottom of the page for these lists.
http://www.pcmag.com/article2/0,2817,2356415,00.asp
Enjoy!

Rabu, 23 Desember 2009

Holiday Cheer

I love a good prank. As long as nobody get's offended and it's done in good taste.
Here is a good example.
Everyone has seen the Salvation Army bell ringers. Most of the time they get ignored. But they don't get ignored this day.
These helpful pranksters do their part to help a bell ringer get noticed!

Happy Holidays!

Minggu, 20 Desember 2009

Photoshop - Retouching eyes

Editing eyes are the hardest and most important part of editing a photograph. You don't want to over do and make the eyes look fake. You do want to take out some redness and make the eyes the focal part of a photograph.
The photo below shows you what I did in a few simple steps to make the eyes stand out without making them look touched up.

Here are the steps I did to enhance the eye in the photograph.
Remember to always copy your original photo to a new layer by dragging and dropping the background layer onto the new layer icon. You always want to have the original document to go back to if needed.
  • First I cloned out a few of the larger red spots in the white area of the eye but not all of them.
  • I selected the white part of the eye with the magic wand tool and under Hue/Saturation I removed some of the red. I don't want to remove all of it or it starts to look fake.
  • Under Brightness and Contrast I added just a little more brightness.
  • Here's a great eyelash tip! I took the burn tool, set the option to Shadows, selected a very small (size of an eyelash) soft edged brush and lightly went over all the eyelashes.
  • I also used the same settings and dodge tool to go around the outside iris to give it a little more definition.
  • The last thing I did was to select a blue foreground color similar to the natural eye color.
  • I selected a small soft edged brush and changed the option for the brush to Normal with Opacity set to about 9%. This gave the eye just a little more color.
These subtle edits can make all the difference in the world to a portrait. People will wonder what you did to make it look so good without having to give away your secrets.
Give it a try! :-)

Selasa, 15 Desember 2009

Keep It or Toss It?

How long can that bottle of ketchup stay in your fridge before it goes bad?
I don't really know but if you want an expert opinion on this and any other foods you have at home here is a great site.
http://www.stilltasty.com/

Rabu, 09 Desember 2009

Free Holiday Brushes for Photoshop

Want to decorate that favorite photo and really make it your own?
Here is a site offering dozens of free winter and holiday brushes that you can load into your Photoshop.
There are snowflakes, sparkles, ornaments, frost and dozens more available.
I only tried a couple of them to get the following results.Not enough brushes for you? Here is a site where there are 1,000's more free brushes you can try.
Need to know how to load these brushes into Photoshop? Check a previous blog post on loading brushes into Photoshop.
Happy Photoshopping!

Rabu, 02 Desember 2009

Just plain fun

Here's something I haven't been able to duplicate in Photoshop very well. It's called drizzle art.

Jackson Pollock was one of the most important artists of the 20th century. You won't recognize the name but I bet you've seen his amazing drip paintings.

I wasn't really a fan until I could try it myself. This site gives you that opportunity and the best part is, it's without all the mess!

You can try creating a work of art in Pollock’s style. You start with a blank canvas. Use your mouse to drip paint on the canvas. Change color by clicking the mouse and use the spacebar to clear and start over.

Go to the site below and click on the LARGE black and white enter graphic.

Once in a while you need a break like this for just plain fun. Enjoy!
http://jacksonpollock.org/

Selasa, 01 Desember 2009

Photoshop - How to quickly copy layer styles

Ever want to duplicate a neat layer style to another layer? Well, you don't have to write down all the steps you did and then repeat them on another layer.
In this example, I wanted to special effect I did to the word "fancy" to be duplicated on the layer containing the word "text". I have 3 layer styles that I edited to my liking.Do one of the following:
  • In the Layers palette, Alt-drag (Windows) or Option-drag (Mac OS) a single layer effect from one layer to another to duplicate the layer effect, or drag the Effects bar from one layer to another to duplicate the layer style.

  • Drag one or more layer effects from the Layers palette to the image to apply the resulting layer style to the highest layer in the Layers palette that contains pixels at the drop point.

Perfect!

My movie of the month