I found a tool in Photoshop to make really fancy text that I didn't even know existed.
Of course I've tried fancy fonts and have downloaded fonts that were fancy. But I like fonts that have the first letter as big and almost gaudy as possible. It reminds me of my old story books where the O in Once upon a time is big and beautiful!
Here is what you need to do.
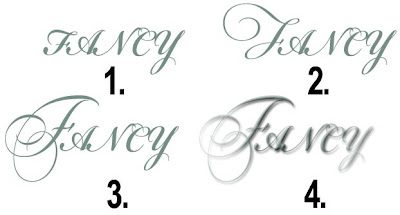
First let me tell you that not all fonts work for this. I'm using "Bickham Script" in my example. You'll have to see what other fonts will work if you decide to try something else. In each example, I selected and edited the F in Fancy.
In my example #1 I just used the font as it was.
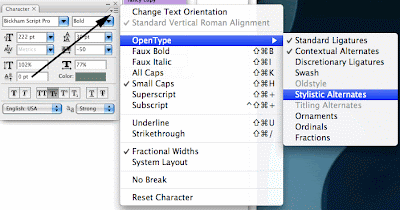
In example #2 I opened the Character panel and selected the flyout menu. I clicked on OpenType and selected "Stylistic Alternates" and I got exactly the look I was hoping for!
In example #3 I removed "Stylistic Alternates" and tried "Swash".
And finally, in example #4 I turned off "Swash" went back to "Stylish Alternates" then added a drop shadow and bevel from the Layers - Layer Style menu.
I topped it off with a layer mask using the Filter - Render - Clouds to soften the effect. What a nice way to make an invitation look professional.
Finally, the font I've always dreamed of isn't just a dream any more!
propeller
Jumat, 31 Juli 2009
Free Photoshop Brushes
Greetings fellow fun hunters!
I always love it when I have something really special to share with my Photoshop friends. Not only is it really cool, but it's completely free!
Here is a collection of some spectacular Splatter Photoshop brushes. There are more than 20 sets of splatter brushes which contain more than 300 brushes.
The collection contains almost every kind of splatter brush you will need, containing brushes like Blood splatter, line splatter, coffee stains , watercolor splattering, dirt splattering, ink splatter and more. Who knew making a mess could be so much fun!
After downloading the file here is how to load the brushes:I have absolutely no artistic talent yet I found I could create interesting art by splattering color on a new blank canvas in Photoshop with these brushes. Enjoy this collection of the brushes and start creating your own art.
With this much fun, there goes the afternoon!
http://www.smashapps.org/2009/07/photoshop-splatter-brushes.html
Selasa, 28 Juli 2009
Photoshop Selections shortcuts
Want to quickly add or subtract from a selection?
You could go up to the option bar and select the "add" or "subtract" options.
Try this, hold down the shift key to add to any selection tool. Hold down the alt/option key to subtract from any selection. You'll be saving so much time you'll be able to enjoy that 2nd cup of coffee!
You could go up to the option bar and select the "add" or "subtract" options.
Try this, hold down the shift key to add to any selection tool. Hold down the alt/option key to subtract from any selection. You'll be saving so much time you'll be able to enjoy that 2nd cup of coffee!
Selasa, 21 Juli 2009
New - Google City Tours!
Thinking of going on vacation? I've put a lot of work into searching for sites to see, printing out maps and trying to manage our time for site seeing. It can take a lot of work.
I've just discovered Google City Tours!
Give it a try!
http://citytours.googlelabs.com/
I've just discovered Google City Tours!
All you need do is enter your destination city. In my example, I entered my home city of Lincoln, Nebraska.
Along with a itinerary, I got a map showing me where to go and even how long the walk was from each attraction.
City Tour itinerary is easily edited. So, you can add or remove attractions as you like. So, you can even personalize your tour however you want.
Give it a try!
http://citytours.googlelabs.com/
Create your own Posters for FREE
I found a fun free program called Poster Forge that I downloaded and tested. It lets you create your own custom posters. You can print them out in full poster size because it will split the image up into separate pages that you can glue together to make one large poster. The image below shows how my poster will print into 4 pages for me.
You simply upload a photo, then add your own titles and text.
Poster Forge has three poster templates: Motivational, Movie and Wanted. Each template has it’s own customization fields. Just upload any image or photo on your computer.
Turn you and your friends into movie stars or put them on WANTED posters. If you like motivational posters, you'll be able to create your own!
Here is a link to their screen shots.
The only catch is small watermark on the bottom of the poster. If you want it without you have to pay for the full version. It’s a small logo and I think for a free program, it’s well worth the small logo.
Enjoy!
http://www.ronyasoft.com/products/poster-forge/
Jumat, 17 Juli 2009
Three fantastic Photoshop Tips
Here are 3 shortcuts you will want to remember.
- Want to get the clutter of all the panels on your screen? Hit Tab to hide all of your palettes. Hit Tab again to bring them back.
- Use Shift+Tab to hide all the pallets except your toolbar
- Want to quickly return to the default Black foreground and White background? Hit the “D” key to reset your color pallet.
Selasa, 07 Juli 2009
Video pick of the month
We have 2 cats. When I suggested a 3rd my husband thought I was crazy.
I need to send him the following video.
*There are reasons for limits. I'm just glad they all look healthy.
I need to send him the following video.
*There are reasons for limits. I'm just glad they all look healthy.
Photoshop - Hiding selections
I've had a lot of times when working on a photograph that the selection gets in the way. Usually it's when I'm zoomed way in and trying to look at something the moving selection line can be very distracting.
There's a simple solution to temporarily hide the moving selection without actually deleting it. To do this use Ctrl + H / Cmd + H. The selection line will be not be seen on the screen but it still works as a selection. To make the line visible use Ctrl + H / Cmd + H again.
This works great when you are trying to apply a slight color change and wanting to make sure the edges are changing cleanly.
In this example, hiding the edge would allow me to make sure a color change was working properly all the way to the edge of the shirt without the moving line getting in the way.
If you do hide the selection and get busy doing other things, it can be easy to forget there is still an active selection. You might start using another tool, and things won't work because you have a hidden selection. Just use the Ctrl + H / Cmd + H again to show your selection.
Hopefully you'll realize something has been selected before spending too much time scratching your head wondering why things aren't working at usual.
Langganan:
Postingan (Atom)