propeller
Jumat, 27 Maret 2009
Access your Bookmarks/Favorites from anywhere FREE
How may times have you been on another computer and wished you had a saved bookmark? It's happened to me so many times that I'm using a FREE online bookmark storage.
You might be at a friend's computer, on vacation, at work, at home, or even just down the hall and can’t access your bookmarks.
Check out del.icio.us.
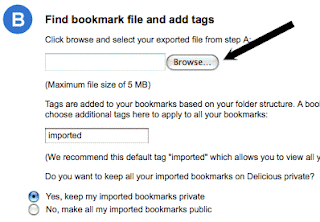
del.icio.us will store your bookmarks online. Just sign in and access your bookmarks from anywhere. I was able to easily export my bookmarks and then import all of them into del.icio.us.
But del.icio.us isn’t just about saving bookmarks. It also shows you what sites other people have saved. If you’re looking for something in particular, you can search for it by keyword.
Note: Bookmarks are set to be private by default. I was able to check this when I uploaded my bookmarks.
Here is the screen shot where I found my bookmarks file and was able to make sure I had my bookmarks set to be private.
To me, having all of my bookmarks in one place is very delicious!
Have a great Friday and make it a great weekend!
Senin, 23 Maret 2009
Create a tiny URL web address with TinyURL
Have you ever emailed a really long URL to someone only to have it break when sent causing the recipient to have to cut and paste it back together? I can't count the times I've sent a really long web page address to my parents only to have them call me because it didn't work.
Here is one of my favorite tools for creating sweet tiny URLs that direct people to the place you want.
TinyURL.com is a place you'll want to bookmark.
You'll copy the long URL then go to this site and paste it in the text field as shown below. This URL was so long only part of it showed in the box provided.
You'll get back a URL that looks like the following picture and takes you directly to the same spot as the long URL without the grief of it breaking.
How sweet is that?
Just when you think life couldn't get any better...how about a plug-in for Firefox's browser like shown below? And guess what. I've created a tiny to get the Firefox plugin. http://tinyurl.com/2pb7f8
Now you can create a tiny URL that will not break in email postings and never expires. If this isn't neat enough, it's FREE! You can try it on their website at http://tinyurl.com or in the box I provided at the bottom of my blog.
I had meant to send you all something special on February 17th - Random Acts of Kindness day. What could be better than doing something for someone else in this world with an act of kindness. Enjoy TinyURL and make it a wonderful day for yourself, and someone else. :-)
Kamis, 19 Maret 2009
Photoshop Smart Objects – Smart Filters
In Photoshop, a Smart object is an embedded copy of the original object in your document. It writes the image into the layer and stores it at the original resolution. You can scale it without losing resolution. It's kind of like a file hidden within a file.
Editing a Smart Object
To edit a smart object right click on any smart object layer and select Edit Contents.
The embedded smart object file opens. Make any changes you want to the smart object. Click OK and Save.
In my example I want to change the hue to blue.
If you decide you don’t want a smart object to change with all the other instances, do the following. Below I've created a 5th Smart Object layer (middle flower). Here is how it is not like the rest.
In previous versions of Photoshop, the user would have to convert the Background layer to a standard layer manually or duplicate the background layer in order to apply a filter.
For those of you who have used adjustment layers, you know how valuable it is to be able to go back and adjust some photo editing you’ve done.
Let me say this about Smart Objects. A resounding ‘FINALLY’!
For those of you who have used adjustment layers, you know how valuable it is to be able to go back and adjust some photo editing you’ve done.
Let me say this about Smart Objects. A resounding ‘FINALLY’!
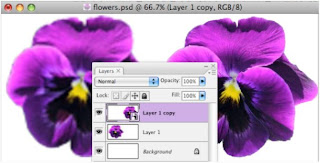
The flower on the left was sized down then sized back up losing its original quality. Photoshop doesn’t keep track of the pixels it’s throwing away when resizing down and has to guess how to add pixels back! The flower on the right was turned into a smart object, resized down then resized back non-destructively.
To create a smart object
1. Click on the layer you want to convert to a Smart Object
2. Right click on that layer and select “Convert to Smart Object”.
Or, in the File menu select Layer – Smart Objects – Convert to Smart Object.
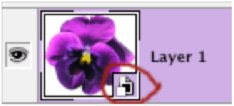
Because Smart Objects link to an internal file, editing a smart object will edit all instances of the object. Once you’ve created a Smart Object, you’ll see a small icon in the Layers Palette indicating this item is a Smart Object.
Benefits-if it is scaled down and later you decide to scale up, the full resolution information is still available. How cool is that?!
Of course, you don’t want to scale it larger than its original size or you’ll loose quality.
Editing a Smart Object
To edit a smart object right click on any smart object layer and select Edit Contents.
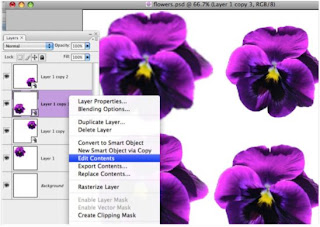
The embedded smart object file opens. Make any changes you want to the smart object. Click OK and Save.
In my example I want to change the hue to blue.
You can see in the Layers that 3 flowers are Smart Objects (icons in lower right) and the flower in the upper left is not a Smart Object indicated by the smart icons in the layers.
All instances of the smart object are updated when I edit the Contents of the Smart Object.
Below I had changed all 3 smart flowers to blue. What if I don't want all flowers to change?
All instances of the smart object are updated when I edit the Contents of the Smart Object.
Below I had changed all 3 smart flowers to blue. What if I don't want all flowers to change?
If you decide you don’t want a smart object to change with all the other instances, do the following. Below I've created a 5th Smart Object layer (middle flower). Here is how it is not like the rest.
Go to Layer – Smart Object – New Smart Object via Copy
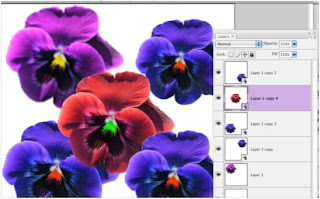
Now when I right click this red flower layer and select Edit Contents, only this layer changes and is not connected to the original smart object.
Here you can see that the red flower is still a smart object but can be edited without changing the other flowers. I now have 2 Smart objects embedded in this Photoshop file. I can change all 3 blue flowers at once or just the red flower when I Edit Contents.
Smart Filters
If you’ve assigned an object to be a Smart Object you can use Smart Filters.
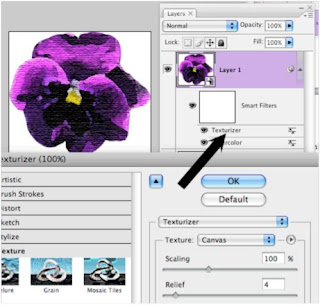
Just apply any filter to a Smart Object layer. The editable filter adjustments now appear in the layer with the Smart Object!
Click the filter name in the layer menu to edit that filter as shown.
If you’ve assigned an object to be a Smart Object you can use Smart Filters.
Just apply any filter to a Smart Object layer. The editable filter adjustments now appear in the layer with the Smart Object!
Click the filter name in the layer menu to edit that filter as shown.
After applying a Smart Filter, you can now go back to tweak them as you could an adjustment layer without permanent damage to your image. Remember to always save your document as a .psd so that you can always edit your layers and Smart Objects.
I can say this for Adobe.....What a Smart feature to have!!
Here is a good video that further explains Smart Objects.
Senin, 16 Maret 2009
Photoshop's History Panel
My favorite Photoshop panel
If you’ve never used the History panel, it’s time you started.
The Undo command acts as a toggle for Undo and Redo, but you can only Undo the last action taken. And the Revert command takes you all the way back to the state of your image when it was last saved. It seems like when I’m editing an image I’d like to go back 7 or 8 adjustments.
That's where the History panel comes in.
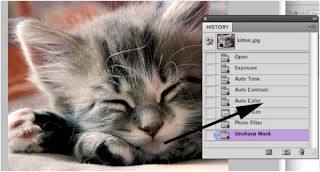
Let's look at the History panel now. At the top of the panel is a small thumbnail icon with the file name of your image. Whenever you open an image, Photoshop creates an initial "snapshot" of the image and lists it in the history panel. A quick way to revert your image is to click this initial snapshot “Open”.
Below the snapshots there is a dividing line, and a list of all the recent changes you have made to the image. You can undo any of these recent changes just by clicking the last change you want to revert to, or by dragging the tiny blue arrow slider that appears next to each state. The slider is useful if you're not sure how far back you need to go because it allows you to preview the changes as you move it up or down.
If I wanted to go back to editing before I resized my image, I would click on the “Auto Color” state as shown above.
By default, Photoshop only lists the last 20 actions you have performed on an image and anything older is purged from the list to allow more memory for Photoshop. This could be a problem if your image was perfect 22 edits ago. If you’d like more than 20 actions states, go to Preferences, Performance and increase your History States.
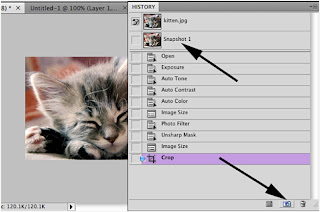
At any time I can decide that my photo is perfect. At this point, I can create a snapshot.
By clicking the small camera icon in the bottom of the History panel, I’ve saved my adjusted image and can go back to this snapshot at any time.
To create a snapshot, just click the camera icon. I can then continue editing as desired knowing that I can always return to this state that I've just saved.
The Panel icons
A. Create a new document from the current state
B. Create a new snapshot
C. Delete the current/selected state
IMPORTANT THINGS TO KNOW ABOUT THE HISTORY PANEL
- History and snapshots are not saved with an image. Closing and reopening an image will clear all history states and snapshots.
- Reverting to a previous state and then editing your image eliminates all history states that had come after it.
- Deleting a state deletes everything after it, unless the non-linear option is selected.
Jumat, 13 Maret 2009
Building a world for someone you love.
If you could build a world for someone you love....what would it look like?
I think I found what love really means when I adopted my son from Romania.
Here's a video that shows true love. Watch it all the way through and you'll see what I mean.
http://vimeo.com/3365942
Have a great weekend and share the love.
Kamis, 12 Maret 2009
Great Browser shortcuts
All browsers have shortcuts but you may not know what they are. Once you've used them, you'll wonder how you every lived without them.
Here are a few shortcuts for Internet Explorer and Firefox:
Internet Explorer
Firefox shortcuts
Safari shortcuts
Here are a few shortcuts for Internet Explorer and Firefox:
- Home - Takes you to the top of the page
- End - Takes you to the bottom of the page
- Ctrl F - Searches within the page
- Ctrl P - Prints the page
- Ctrl D - Adds the current page to Favorites/Bookmarks
- Ctrl N - Open a new window
- Ctrl I - Show your Favorites
- Ctrl + Increase text size
- Ctrl - Decrease text size
- Ctrl B Show your Bookmarks
Internet Explorer
Firefox shortcuts
Safari shortcuts
Senin, 09 Maret 2009
Free email backup software
Most of your email is probably for fun and from family. However, sometimes important information is stored in your email.
My parents computer is on its last leg and are concerned about getting some of their email messages copied over to their new computer. The right software can make this easy. And when that software is FREE, it's even better.Take a look at MailStore can backup numerous email software including Outlook, Outlook Express, Thunderbird, and Webmail such as Gmail and Yahoo. Backups can be saved to CD or USB and then restored with a click of the mouse.
Check it out at http://www.mailstore.com/en/mailstore-home.aspx
Jumat, 06 Maret 2009
Senin, 02 Maret 2009
Put your photo on a magazine cover for FREE
Just when you thought life couldn't get any better, a website like this comes along.
Putting your picture on a magazine cover can be done with programs like Photoshop. However, it could take hours and a lot of layer work to make it look right.
Here's a site that does it all for you. It's called MagMyPic. Pick a personal photo and select from dozens of different magazine covers for your photo. It only takes a minute and a couple of mouse clicks to get results like the following. And yes, it's my cat and my son.
And there goes the afternoon.....;-)
Langganan:
Postingan (Atom)