propeller

Minggu, 26 Juli 2015

Family Tree Photoshop Tutorial and Free Template

A family tree I did for one of my parents (with some info removed here for privacy) The "frames" are from a vintage photo.

If you Google "Family Tree Template," here's a screenshot of what you'll get:

I don't want to disrespect any of those drawings of trees, but they're a bit too juvenile for a grown-up person's wall. 

Martha Stewart, on the other hand, has done some stunning family trees, but nothing with both photos and names/dates. She has a really cool diamond-shaped arrangement with photos, for example, but it's more about décor than information.

When I made a family tree for one of my parents as a gift, I opted for a style that was suited to the vintage of the photos and the style of the home where it would be hanging. Some of the info has been removed from the screenshot for the sake of privacy, but you get the idea. Sadly, I was also faced with the problem of not having photos for everyone (we lost almost everything in a warehouse fire when I was little and living outside the country), so when lacking a photo, I opted to put the name/date in the frames. I made a 16x20 inch print, so that's the size of the template (but you can resize it). To help remedy the sad state of the internet's family tree photo templates, I am sharing this one with you for free along with a tutorial. The file for the template is large (about 163mb it is a Photoshop .psd file), so be patient when downloading. (a zipped file is still 64mb. Do the regular one if it gives you problems) The template will look like this:


a closer detail...

(Did you notice I left out that decorative thing around the name? sorry, but I left it out in the template because it's from a digital stamp set I bought ages ago.)

And a view of what your Layers palette will look like (tons of folders! one per person)


It looks daunting, but once you know how to do one folder, you know how to do them all. Almost. The "child" folder (where the person whose genealogy you're depicting goes) is slightly different. Here's a look inside that folder
:

 Click on the folder and you will see four layers. The bottom layer is the type layer. Double click the "T" (not the words next to it, but the "T" itself) and you will see the "Type name here" text get highlighted. You can now type a name in its place.


In the type menu bar, you can change whatever you like (color, size, font). If you hold the cursor anywhere but directly over the type, you can drag the text to recenter it. 

One layer up from the text layer is the frame layer, which you will leave as is, but feel free to toggle the eye on and off to see what it is.


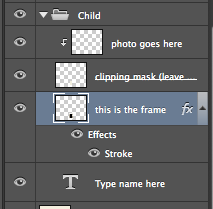
The next layer up is also going to be left as is (see, that's not so bad!). This is the clipping mask layer. You can learn more about clipping masks in my wedding template tutorial, but otherwise, just keep reading.

The top layer in this folder is "photo goes here." Sounds self explanatory, but your photo will not magically resize to fit the window, so here is what you do:

1. Open the photo you want to use (I suggest keeping all the photos black and white or sepia for better continuity)...


2. Select it (command-a for Mac, ctrl-a for PC) and copy it (command-c or ctrl-c)


3. Now move back into the window of the template and make sure that the appropriate "photo goes here" layer is active (just click once on it). See how that layer is highlighted? That means it's active. I know this sounds super basic, but I sometimes get rushed and forget to select the layer, so if you're like me, a reminder is in order.


4. With the "photo goes here" layer active, paste (Mac: command-v or PC: ctrl-v) the photo you just copied onto that layer. 

And don't freak out if it looks like this....


Or if you can't even see it (provided you can see it in the highlighted layer). Your photo is hovering back there, masked by everything else. You will only see whatever is in that rectangle of the frame. A quick way to find your photo (and you will have to do this anyway so...) is to hit "transform" (command-t or ctrl-t). You can see by the outlines of the transform box that the photo is way bigger than what I need:

To transform your photo without distorting it...
hold down "shift", grab one of the corners, and and pull in to resize. You can click anywhere within the outline of your photo and drag around to see how you're doing. See, it's getting closer...


continue the shift corner dragging and moving around until you like how it appears in the window (note: but make sure it's not smaller than the space of the inside frame.) This seems about right:


Now hit return and accept the transformation.
It's magical!

Now you will be more or less repeating those steps for each folder (each folder is labeled with the person it represents). If it makes you feel better to keep things tidy, click the little arrow next to the folder you just completed to hide its contents.

Now work your way up to the next folder...


You will follow the exact same steps as above, but now you have two text layers (a date layer and a name layer).

Note that the frame sizes get slightly smaller with each generation. It was just a matter of fitting things in a way that looked right.

This isn't a super fast process, but trust me, it's a lot faster than building it from scratch. Just a couple more things and we're done:

What about those layers without photos?
Chances are, you won't be missing the exact same photos that I was (unless you're my sister). So what if you want to change something? For example, look at those top two folders (a photo one: maternal grandmother's mother and a date-only one: maternal grandmother's father). 


Let's say you're lucky enough to have photos for both. You will want to get rid of the date-only one and replace it with a photo one. Start by turning off the visibility (the eye) of the layer you're replacing so you can see a blank spot to fill:


Now duplicate the entire maternal grandmother's mother folder (make sure the folder is active and hit command-j for a Mac or ctrl-j for PC). This gives a copy. With your newly copied folder active, you can use the move tool (v) to drag it into the blank spot:


Now you have two "grandmother's mother" layers, one of which you may want to rename to avoid confusion. You can trash the folder you don't need or just leave it invisible.

Final touches...

Maybe you don't like that beige color (too peachy? too band-aid like? Hey, it worked with my parents' color scheme.) You can change it by using the paint bucket tool to pour a new color into the "background color" layer:


Make sure you're happy with how all the text is aligned. Save a layered copy in case you want to change something later. The size is set to 16x20 (at 320 dpi, which is what Costco uses), so it will work great for 8x10, but you may have to do some adjustments to the canvas size (sorry, but I can't bear to continue a tutorial on that right now) and then crop in order to get different aspect ratios.

Maybe at some point I'll do a version that goes back even more, or something really modern, but for now, I hope this will make the world of family tree charts look a little less like it belongs on Dora the Explorer. 

Good luck! Let me know if you try it.

note: This is free, so please do not try to sell or get profit by redistributing the template.

Rabu, 01 Juli 2015

5 useful photoshop tips and tricks for photo retouching

 5 useful - photoshop - tips and tricks - for photo retouching

Photoshop is very often the tool of choice for photo retouching and it is a multi-use program that can help a lot to develop our creative work. 
However, it is easy for beginners to start making certain errors or time-consuming methodology through using the tools incorrectly. 
Thanks. 


Selasa, 30 Juni 2015

10 must know introductory photoshop skills for beginner photographer


Hay guys, In this tutorial you'll get 10 must know introductory Photoshop skills for beginner photographer. 
Photoshop is very often the tool of choice for photo retouching and it is a multi-use program that can help a lot to develop our creative work. 
However, it is easy for beginners to start making certain errors or time-consuming methodology through using the tools incorrectly. 
Thanks. 


Rabu, 27 Mei 2015

Photography Tips For Capturing Impressive Small Scale Jewelry Images

jewelry photography
Jewelry Photography Setup


Earrings are difficult to portray exactly as you would like in a photograph. They are small, requiring the camera to be rock steady as the photos are made, and a shot with a camera that is not capable of macro photography is usually a waste of time because there won't be enough detail.

Planning a shot for earring photography must be based on what a client wants to see. Photographers and retailers often want the jewelry hanging from the ear lobe of a model to give the relevance of size. This presents challenges to the photographer if a live model is used.

The slight movement of a person's head will render a photograph useless, even if you plan to alter the final picture using editing software. Even if you can achieve correct lighting, exposure, and the earrings in perfect position for the shot, movement will usually necessitate more shots to be made than are generally required.

A head bust is often used to give the approximate size of the earring, and there is no attempt made to make the bust appear real. This is mostly for a distant shot, and the main detailed photo is an inset. The two shot procedure usually saves time in the photography session.

Photographing earrings was once done by laying them on a soft background and shooting down on them. Although some photographers still attempt this, it is very hard to get proper lighting and produce the best results using this method. If the jewelry is the hanging type, better photos are made if they can be suspended in some way.

A small gauge of fishing line is one of the best friends for the photographer of inanimate objects. It is barely noticeable even in a macro shot, and it can be removed completely via editing software. The trick comes when trying to get dangling jewelry to remain still for the photo.

One way to have the jewelry turned the exact way you want is by using a clean sheet of glass to back it. When the earrings are hung in the position desired, a vertical pane of glass is clamped strategically in place just touching the backside of the jewelry and keeping it from turning and twisting.

A backdrop of colored cloth can be suspended a foot or so behind the glass to allow color. This has your proposed shot in physical position for the photograph, but you will need to get your lighting adjusted properly before pushing the shutter. The glass behind the jewelry will make it very important to have light coming directly from the sides to prevent a reflection.

The usual front light might not work for this shot, so you will need to experiment to see if it can be repositioned lower and not cause a glare. It will not be possible to use flash on this picture, but if you have taken many jewelry shots, you already know how to control aperture for this kind of photo.


When you have finished your shoot, you will feel pleased with what you have accomplished for your earrings photography if you follow the basic lighting and exposure guidelines for this type of jewelry photo.

Senin, 18 Mei 2015


Good Photo Editing - Exciting Improvements You Can Do With Your Photos

photo editing
Background Remove and Retouch

Good pictures are indeed essential in many things nowadays. If you want to enhance your pictures, make them more dramatic and glamorous or airbrush some distractions in the picture, you can always find some good photo editing to help you with it. With today's age of new technologies, you can actually make your pictures perfect even if you have a little background on the basics of photography.
Having good pictures in your websites, in your magazines, your scrapbooks, or even in your social networking profile page can indeed add more appeal to it. You can even find good photo editing opportunities that will help you make money - editing wedding pictures for instance is a great business.
Of course, you can find a lot of software that allow you to edit your pictures to make it more professional looking. Adobe Photoshop for example is a popular photo editing software that gives you a lot of possibilities in manipulating and enhancing a photo. If you are worried over some badly taken photos of very important events in your life, don't fret, photo editing is easy nowadays.
If you decide to try your hands on photo editing, here are some exciting things you can try with your photos.
Cloning
Yes, you can easily clone part of your photos to retouch the entire picture. In Photoshop, a cloning brush has a variety of uses. If you want to eliminate dark spots or blemishes on your almost-perfect portrait, the cloning tool is useful. If, for example, you want to eliminate something that disrupts your perfect photo like a person who made faces in the background, you can always get rid of him by cloning a part of the background and get him off the picture. If you want to add more animals in your farm photo, you can also do it through the cloning tool.
Adjusting brightness and contrast of your photo
Probably one of the essentials of good photo editing is adjusting the brightness and contrast of a photo. If you are worried about some gloomy pictures or some overexposed photos, you can bring more life to it by adjusting the brightness and contrast through photo editing tools. In Photoshop, you can also make use of auto level menu or manually adjust the level to obtain the right lightness or darkness of the picture.
Sharpening and blurring photos
Another very common and powerful technique in a good photo editing is sharpening the subject of your photo or blurring some parts of it to make your subject pop. If you are envious of how professional photographers take their photos in a manner that the subject is clear while the background is blurry, you don't have to buy that top-of-the-line digital camera. You can actually make it possible with the sharpen and blur tool in photo editing software. These tools also allow you to make your pictures look like those in magazines.
These are just the basics. A good photo editing software can actually give you so many possibilities in retouching or manipulating your photos. You can change the background of your picture to Eiffel Tower, you can restore your old childhood photos, you can change the color of your dress, you can make your face look like the glamorous beauties in a magazine, and you can even get rid of those extra pounds in your picture. Indeed, it is fun and exciting to be able to make artistic changes to your pictures with just a click of the mouse.
Carolyn Anderson loves photo editing as a hobby and expresses her being artistic through photo manipulation and enhancement. For an easy guide to learn Photoshop fast, check out Photoshop Fast Track For Newbies. Also check out Photography Posing Secrets, a guide to help you photograph people
.

Photo Editing Tips For Digital Photography

              
photo editing
Digital Photography
Digital photography has a lot of advantages over film photography in many areas, but one of the most useful is the final output of the image itself. With film cameras you had to rely on the processing lab to make any general adjustments needed to your photos to make them appear their best, but with digital photos you as the photographer have all the tools you need to enhance and edit your own photos right at home.
Of course, how much editing you do to your photos before printing is entirely up to you and there are all kinds of preferences on photo editing from those that do almost no editing at all, to those who like to make major adjustments to almost every photo that they take. And there is plenty of middle ground in between those two extremes as well.
Quite often, many basic editing tasks can be done in the camera itself after the picture is taken including some simple cropping, removing red eye from flash photos, and rotation from landscape to portrait and vice versa. For many people, this is about all that they require anyway before printing out their snapshots, and this keeps things very easy and simple.
But to start to realize the potential that digital photography puts in the hands of the average person, a photo editing software program will be needed where you upload your photos from the camera to your computer and then open them in the program. You can then begin to perform all kinds of editing tasks including more advanced cropping, change the file size or format, adjust color saturation, contrast and brightness, and apply special effects.
There are several good free digital photo editing software programs available for download that can fit the bill for most common photo editing needs. All you have to do is perform a search for "free photo editing software" and you should have plenty of results to choose from.
But there are two programs for sale that seem to meet the needs of most average photographers whether novices or even serious hobbyists, and they are Adobe Photoshop Elements and Corel Paint Shop Pro 9. Both of these programs are very highly rated in most independent and consumer reviews as being very easy to learn and use, while also handling most any editing task that the average photographer could need.
For even more high end photo editing the full Adobe PhotoShop program will provide enough editing power to meet the needs and expectations of even the most discriminating photographers, but expect to pay quite a bit more for the added power and capability.
It should be clear then that regardless of the amount and scope of photo editing that you intend to do, there is a program that will let you do exactly what you want.

Advanced Photo Editing - Taking Photo Editing to the Next Level

The first thing that you need to learn about advanced photo editing, whether it is for portraits or non-portraits, is that you will never leave the basics behind. Instead you will need to balance these by adding on some intermediate editing techniques that will make your photo editing come up with better results. So instead of just adjusting the basic contrast and brightness of your photo, you could heighten this editing up a notch by putting in the exact amount of shadow and highlight details. The midtones should also be given attention as well so that your photo will have a balanced exposure that will increase its quality when it comes to its appearance.
Advanced photo editing could also include fixing the balance of your photo's colors. This involves shifting the temperature of the color, which could range from a cool tone that will give off a bluish tint or the warm tone that is seen with a yellow tint. You could also make use of tint slider for shifting the magenta and green colors in scenic photographs.
Using Background Removal
If you want to be serious about doing advanced photo editing, then you should also venture into other editing techniques like the background removal. If you are using Adobe Photoshop, there are many tools provided by this software that could help a lot in pulling out and changing the background of your photo. With the help of such tools as the background eraser, the magnetic lasso, the pen, and the channel mask, you can already pull out a non-presentable background and replace it with either a solid color or another background of your choosing. There are a great number of tutorials online that could help you get some advanced techniques in photo editing using Photoshop.
Doing Some Photo Manipulation
One of the oldest advanced photo editing techniques being used by photographers and even by those just dabbling in photography is photo manipulation. A partnership between graphic design and photography that is constantly evolving, photo manipulation is when photo-editing strategies are done to photos so that enhancements or corrections could be made or so that an illusion can come out as a result. If you are the kind of person who would like to come up with some photo art, then photo manipulation is the best photo editing technique that you must master. With this, you could do more complex editing that is not limited to changing the color or the background.