propeller

Senin, 29 April 2013

Photoshop - More tricks with the Color Lookup adjustment layer

Last week I showed you how to create a warm golden glow to a photograph.
Last weeks post.
This week we're going to take it one step further.
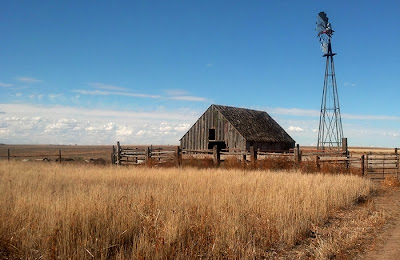
I wanted to create a unique feeling to this barn photograph. I wanted a warm golden glow that you would get from the evening sun but I didn't want that effect applied to the sky.
When you add a Color Lookup adjustment layer Photoshop gives you a mask. (What is a mask?)
This mask allows you to paint out the part of the photo that you want to remove that effect from.
In my example below I first applied an adjustment layer to add the Color Lookup adjustment layer with the "Crisp Warm" effect. I didn't want to loose the blues in the sky so I painted that effect out of the sky area.
Then, I took it one step further. I added another adjustment layer with the "Color Lookup" but this time used the "Crisp Winter" effect. This added some wonderful blues to the photograph. Again, I didn't want to have this effect on the foreground and only the sky so I painted out the barn and ground leaving the blues to take over the sky area.
My results are below. A warm golden field of wheat with a cool crisp blue sky.

Senin, 15 April 2013

Photoshop - Creating a mood with the Color Lookup adjustment layer

I love adjustment layers. If you've never used an adjustment layer you need to start. Adjustment layers allow you to edit a photograph without damaging any of the original image. Also, you can easily go back at any time to change the opacity/effect of that adjustment or remove it completely.
For more on adjustment layers see my previous post here.
I've recently discovered a new adjustment layer that I've never used before. It's the "Color Lookup" adjustment layer.
The color lookup adjustment layer allows you to quickly create a new feel to your photo by remapping the colors in the image.
On a recent trip to NW Kansas we stopped by the farmstead where my husband was raised. Without my Nikon I grabbed a quick photo with my cell phone of the barn he played in as a child.
We weren't able to wait for the "golden hour" (just before sunset) to get the warm glowing effects from the late day sun. However, I was able to create that effect using the color lookup adjustment layer.
I opened the photo and added a new adjustment layer selecting the color lookup option. There are several options to select from in the drop-down menus provided.  In my example I selected the "Crisp Warm" look. Instantly I got the look I wanted shown below.

The best part of being an adjustment layer is that I can change the opacity of this effect right on the layer until it looks just right. Again, since it's an adjustment layer, no pixels are harmed!
You'll find a lot of other great effects like "Crip Cool" for winter scenes and many more.
What a nice feature to quickly change the mood of a photograph. Enjoy!


Selasa, 09 April 2013

Photoshop - Creating perfect skin

I've been asked many a time on how to make skin look flawless. So, back by popular demand is my tutorial on creating perfect skin in Photoshop.
Here is the link to my instructions on how to do this.
Cheers!
perfect skin in Photoshop

Senin, 01 April 2013

Free online photo tools

Away from your computer and just want to do some quick editing?
Quick Picture Tools is the answer.
There are a dozen different options available allowing you to add text, borders, special effects, and more.
The best part I like about this site is the fact that you don't need to create an account to access the tools.
Simply upload then save your picture as I did on the left.
Enjoy!
http://www.quickpicturetools.com/en/