propeller

Senin, 28 November 2011

Photoshop - Great selection shortcuts

Have you ever been working on an image trying to adjust the color or brightness and nothing is happening?!
This problem could be caused by a couple of things.
  1. You might be on the wrong layer
  2. You might have a small selection somewhere that you didn't notice
Here is a picture of my kitty Echo. I wanted to add a little more contrast but it seemed nothing was happening when I moved the sliders.
Note the selection around the paw. Photoshop was trying to add contrast to just this selection.
A quick shortcut to get rid of a selection is CTRL/CMD D. This quickly deselects any area or object that you might have had selected.

Here is another great trick with selections.
The marking ants indicating a selection is made but it is distracting and making it hard to see the edges as you adjust you can use the CTRL/CMD H to hide the "ants" allowing you to see the entire selection change (including the detail in the edges) without the extra animation you get with making selections. Hitting CTRL/CMD H again brings the selection outline back.
Of course, I've forgotten at times that I've hid the selection making the first trick of deselecting everything very useful!
Enjoy!

My video of the month - Boosting your Wifi signal with a beer can

Senin, 21 November 2011

Photoshop - Adjustment layer trick

Here is a neat trick when working with Adjustment Layers in Photoshop.
The next time you create an adjustment layer to fix something like brightness and contrast, if the adjustment doesn't do enough just double the effect.
Here is how you do that.
Just drag the adjustment layer down to the new layer icon in the bottom of the layers palette. This doubles the effect of the adjustment layer.
If the effect is too much you can adjust the opacity of the duplicated layer to get just the effect you need.

Selasa, 15 November 2011

Photoshop Beginners Water Droplet Tutorial


Video:

Step 1
       Right-click on the Leaf Image at the bottom of this Tutorial and save it to your desktop then open it up in Photoshop.


Step 2:
    Double-click on the Background Layer in the Layers Panel and change it to Layer 0

 Step 3:
     Click on the 'Create a New Layer' icon to open a New Layer above your Leaf.


 Step 4:
    Select your Brush Tool and with a hard edge Brush paint some spots of various sizes across your New Layer, using Black as your colour.


  Step 5:
     Click on the 'Add a Layer Style' icon.


       Apply the following ↓↓↓


     You may carry on painting water droplets onto this layer with your Brush until you are satisfied with the result.

Resources 
http://www.wallpapers247.com/wallpaper/Green-Leaf-01/
 

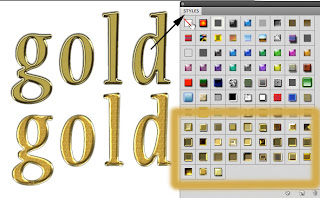
Photoshop - Creating GOLD!

What's better than GOLD nowadays? Gold seems to be more popular than ever before.
So today, I'm going to show you how to create your own gold (at least the look of gold) for FREE!
Photoshop comes with a lot of nice Styles that can be added to a layer with text, or objects that give you really nice effects.
If you are new to Styles check my previous blog on how to use them, where to find some free Styles, and how to add them to your Photoshop Styles pallet by clicking here.
Creating the look of gold can be time consuming. You'd have to apply numerous filters to get the look you want. Or, how about a free download of 30 Free various gold Styles that you can choose from? Today I'm including a link to these gold Styles. Just load them into your Styles pallete and get ready to impress your friends with the look of gold.
Free Gold Styles
Enjoy!

Movie of the Month!
I thought a basketball playing dog was just done with Hollywood movie magic until I saw this.

Selasa, 08 November 2011

Photoshop Beginners Soda Can Tutorial


Video :
 
Step 1:
    First download and install the necessary files from above then open a new document 900 px by 750 px  and using your Gradient Tool fill your Background with this Gradient, you can copy the numbers here   ff6e02   ffff00 .

 Step 2:
    Select your Text Tool and type the first letter 'k' At 170 pt as shown below the second at 210 pt and the third at 240 pt, drop back down to 170 pt  for 'RA+N' back up to 240 pt for 'G' and drop to 210 for the exclamation marks. Some of these letters need seperate layers so they can be moved over the top of each other 'kKK ' goes over ''ran' 'G' goes over all of them slip the exclamation marks in behind 'G'. All of these Layers need to be Rasterized by going to Layer/Rasterize/Type. Then go to the Layers Panel and holding down Shift click on each of the text Layers when all the Text Layers are highlighted go to Layer/Merge Layers.


Holding down Control click on the icon for this Layer in the Layers Panel to Select the Text and then again holding down Control hit 'T' on your keyboard to bring up the Free Transform tool and posistion your Text to the left as seen below.

Step 3:
    Press Control and 'J' to duplicate this Layer then on the underlying Layer add the first of our Layer Styles.
 
Then select your Free Transform Tool again and widen this Image.Now go to the Layer above and apply the second Layer Style.

Again Select your Free Transform Tooland widen the Image.
Step 4:
   Import your Image of an Orange between the two Text Images make two copys and using your Free Transform tool posistion two above and one below our Text .

  Step 5:
   Select your Text Tool again and with the settings below type 'ENERGY DRINK' and add the drop shadow  from our Layer Styles .


 Use your Free Transform Tool to posistion the Text.


  Step 6:
    Import the Skater Boy image over the other Layers the go to Filter/Artistic/Cutout and apply the following settings.


Then go to the Fx button at the bottom of the Layers Panel and add the following Gradient overlay, you can copy the numbers here   c83202  d39d00  .

    
Press Control and 'J' with the Skater Layer selected to make a duplicate Layer hold down Control And click on the Layer icon to Select it the making sure you have Black as your Foreground colour  (press 'D' on your keyboard) go to Edit/Fill then Edit/Transform/Flip Vertical , this will be the Skater's shadow, use the Free Transform Tool to reduce the size and go to the Layers Panel and take the Opacity down to 50%


Select the Background Layer with the Orange to Yellow Gradient and go to Filter/Render/Lens Flare and use the settings and posistion below.

Step 7:
    Import the 'Tidy Man' and barcode Images and using the Free Transform Tool align them along the Right-hand side . Then you need to Select the Shape Tool.


The Shape Tool has a Menu to load Shapes, the I mage below shows you how to navigate to the Shape you need .

You can then add your badge Select the Text tool and type whatever you like using the following settings.
Next we need to go to File/Scripts/XSHOCK/GenerateDummyText this will open up your new Text Generator    
Highlight the Text and select copy Select your Text Tool with the following settings and drag out a Text box . You can copy the Text colour here  e16916 .


Use the Free Transform Tool again to turn the Text so that it faces East towards your Layer panel.

Your Document should now be looking like this.


Step 8:
    Go to Layer/Merge Visible then 3D/New Shape from Layer/Soda Can . Then click on the Cap Material this will open a New Window into which you are going to drag or Paste the last of our Images the Radial-Stainless-Steel.


 You may Rotate your Image round using the following controls if you need to,


Add whatever lighting effects you need then you must Render your Image by clicking on Ray Trace Final this is all done in the dialog box you see below which is brought up by clicking on the icon on the Layers Panel.


 Step 9:
     Open up a new Layer below the Soda Can for whatever Background you create this one is just a simple Gradient.

 Add the  Gradient with the Gradient Tool to your new Background Layer, Gradient colours are ffffff    to    565656


Step 10:
     Make a duplicate Layer of the Soda Can (Control and 'J') Fill the underlying Layer  with Black .


Resize the Shadow Layer with the Free Transform Tool using Skew and Distort.


Then go to Filter/Blur/Gaussian Blur 10 px and drop the Opacity to 30%.


Step 11:
     Select your Brush Tool with a hard round Brush, go to Window/Brush to bring up the dialog box and use these settings.


On a New Layer over the top with Black as your colour paint on your water droplets adding the last layer style.


I have had trouble loading this style if it does not look right the settings are below.