There's nothing nicer than a new computer. However, anymore they come with a lot of trial software and Ads.
One of the reasons I buy a new computer because it's clean and fast.
Here is a free tool to remove the stuff you didn't ask for or want on your new computer.
It's called "SlimComputer". When you run this software it takes a look for these "optional" programs, makes a list and then YOU can decide what you want to keep on your new computer.
Who said you couldn't find someone to clean for FREE?
http://www.slimcomputer.com/index.php
And now for my video of the month.
We're all different. But that's what makes us beautiful. What a boring world it would be if we were all the same. What a wonderful world it would be if we could look past our differences and learn to enjoy each other for who we are.
These two friends couldn't be more different. And yet, they were able to connect to each other and find true friendship.
propeller
Selasa, 25 Januari 2011
Selasa, 18 Januari 2011
Photoshop - How to create perfect skin
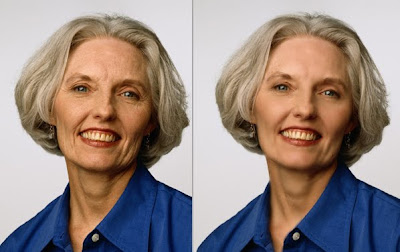
How can you smooth skin to make it beautiful and yet look realistic? The secret of creating perfect skin isn't too difficult. It helps if you've used Photoshop layers and masks.
Let me take you through the steps to get the results like the above example.
Open your photo and duplicate the background layer by dragging it to the new page icon in the bottom of the layers panel. Do this twice.
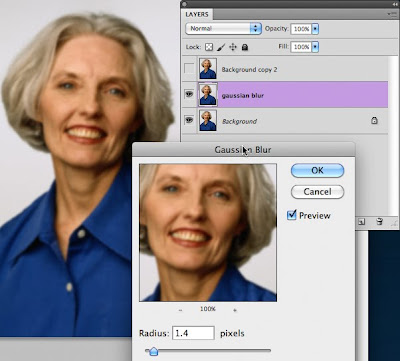
We are going to select the middle layer and apply a nice soft blur. To do this select the middle layer then Filter - Blur - Gaussian Blur. Only blur enough where the skin blemishes disappear yet you still see the natural contours of the face. Keep you eye on the skin and don't worry about the facial features at this point. The eyes, nose and mouth will be in sharp focus for our final photo because we are going to use a layer mask to "peek" through our top layer down to just the skin in this middle layer.
In my example I used a 1.4 Radius then clicked OK.
Now that you're down applying a nice blur to the middle layer (you could try the surface blur instead of Gaussian blur too) select the top layer.
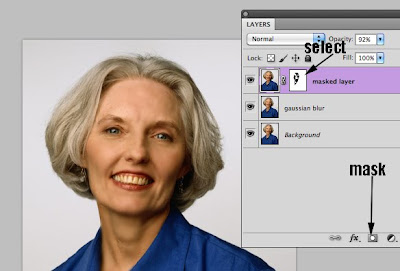
With the top layer selected the photo looks exactly as it did before. You can't see the blurred layer below at this point. This is where the layer mask comes in. To create a layer mask, select the top layer then click on the mask icon in the bottom of the layers palette. You'll then see a new white mask to paint on. Click on this mask on your top layer.
Think of a layer mask like this. You can paint "holes" in a mask to see the layer below. Now we will paint with black to see the soft skin on the blurred layer below.
Make sure to use a soft edged brush and stay away from the eyes, nose, mouth etc. You only want to see the soft skin below.
What's nice about a layer mask is that if you make a mistake and paint over the eye (then you see a blurry eye) you can paint the layer mask area back with white to cover the layer below.
Now, you know the secret of making perfect skin using Photoshop. You'll be the most popular photographer in the family!
Enjoy!
Senin, 17 Januari 2011
Photoshop - Resetting tools to fix problems
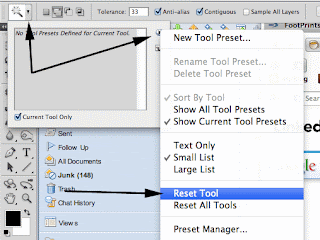
Here is something to try the next time a tool is acting weird in Photoshop. Try resetting the tool.
This changes the tools setting back to its default setting.
- To do this click on the tool that is acting weird.
- Click on the icon of the tool in the Option panel
- Select the fly-out menu arrow
- Select Reset Tool
If both these options don't take care of the weirdness in Photoshop you can reset Photoshop preferences.
If all else fails resetting the preferences to the original settings should get rid of weird things happening in Photoshop.
See my instructions on how to do this on a
previous blog.
Selasa, 11 Januari 2011
Keep your information safe with GOOD passwords
I forget too many things and would like to keep my life as simple as possible. However, a simple password can be dangerous and a good one can be hard to remember!
Did you know that the worst password you could use is 123456 or abc123. You'd be surprised how often people choose passwords like this.
If you want a password that you can remember but would be hard to break try something like a phrase or song lyric and do something like this.
Harold and I were married in 1979 = haiwmi79 (using just the first letters and a number)
For more information on creating good passwords check this link.
Here is a link to an article about the most commonly used passwords. Hopefully none of these are something that you use.
Top 50 Gawker Passwords
Too many passwords to remember? Try this free software that keeps track of your passwords and you need to only remember one password to get in.
Selasa, 04 Januari 2011
Photoshop - Great Colored Pencil Effect
Want to create a great colored pencil effect?
Photoshop has a lot of very fine filters that are hours of pure entertainment.
However, sometimes they just don't do what you want no matter what adjustments you can make with them.
I wanted a colored pencil effect.
Take a look at my example.
The first photograph is just a nice picture of a field of sunflowers that I want to apply the colored pencil look to.
When I experimented with Photoshop's colored filter (Filter>Artistic>Colored Pencil) I didn't get the results I wanted as shown in the 2nd photo.
It looks OK but it isn't what I wanted.
I could spend a couple of hours fiddling with various filters and effects and never get the look I want.
That's where an Action comes in handy. Actions are a series of Photoshop steps played in sequence with the click of a button. Actions are found under the "Window" menu in Photoshop.
There are thousands of free Actions out on the web. Some are good some well....not so good.
A search for free Photoshop Actions can give you thousands to select from.
Or, here is a link to a colored pencil action you might like.
Need to know how to find and load an Action into Photoshop and, how to Actions work?
Check my previous blog on using Actions.
Enjoy!
Langganan:
Postingan (Atom)