propeller

Selasa, 30 November 2010

More Free Photoshop Actions!

An Action is a series of Photoshop commands used to automate a task thus saving you time.
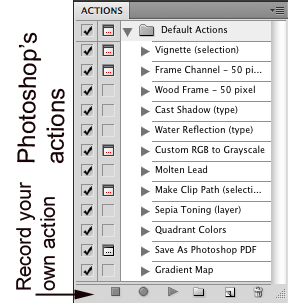
To see the Actions Photoshop has to offer, go to Window – Actions to open the Actions palette.
If you want to try one open a photograph, open the Actions Window then click on "Wood Frame". Photoshop goes through numerous steps to create a neat looking frame around your photo.
These are nice but did you know that there are great Photoshop actions available for Free?

It's a simple procedure to download and load them into Photoshop.
To load an Action just go to the fly-out menu and select "Load Action".
You can do some amazing things with Actions.
Here are a couple of trusted sites with Free Photoshop actions.

http://www.thelightsrightstudio.com/photoshop-tools.htm

http://www.tripwiremagazine.com/2009/12/200-very-useful-free-photoshop-actions-enhancement-colouring-effects-filters-etc.html

Selasa, 23 November 2010

Photoshop - Amazing Sparkle Effects

It's that time of year when we can start expecting snow. Snow is beautiful by itself, but today I'm going to show you how to make some amazing winter photos sparkle!
Note: This tutorial is best for those familiar with layers and masks.
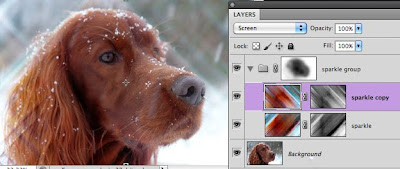
  • Open your photograph and duplicate the layer. I called the layer sparkle
  • Add a layer mask to this new layer.
  • Select the layer masker then Image>Apply Image - leave the defaults and click OK. The layer mask will have a copy of the image inside it.
  • Change the Blending Mode of this layer to Screen (top of the layer menu)
  • Duplicate this new layer
  • Click the folder icon in the bottom of the Layers palette to create a new group and call it sparkle group
  • Drop these 2 layers in your group folder
  • Select either one of the sparkle layers
  • Filter > Blur > Motion Blur - Angle 45 degrees.
  • Depending on the resolution of your image adjust the streaks until you get nice long thin lines
  • Select the other sparkle layer
  • Filter > Blur > Motion Blur but now select the opposite direction for streaks - Angle -45 degrees
  • Again, adjust the streaks until you get long thin streaks like you did in the other layer
  • Now to make the streaks more prominent go to Filter > Sharpen > Unsharp Mask
  • Adjust these settings to make the streaks more visible
  • Select the other sparkle layer and repeat Filter > Sharpen > Unsharp Mask
One of the last steps we need to do now is to remove the streaks from the subject. To do this, we'll add a layer mask to the Sparkle Group folder layer. Do the following:
  • Select the Group Layer and add a Layer Mask by clicking on the mask icon in the bottom of the layer palette
  • Select a soft edged brush, set the opacity to 50% and start painting with black on the layer mask to take the streaks off the main subject
This last step is optional. I wanted to add a little more of a dramatic effect to the sparkles we've created so here is what I did.
  • I selected one of my sparkle layers then Image > Adjustments > Vibrance (versions before CS5 use Hue/Saturation)
  • I moved the Vibrance of the image way up to make the colors pop
  • I repeated this step on the other sparkle layer
Keep in mind that this effect also looks great on a romantic beach, wedding photos, etc. to give your photograph a wonderful "dreamy" effect.
Enjoy!

Senin, 15 November 2010

Photoshop - Create ice effects with text

CREATING

With Photoshop

Want to create some amazing custom text that looks frozen? This is the perfect time of year to start thinking about holiday cards, newsletters and colder weather so here are the steps to create your own amazing frozen text.

Below are the steps for my intermediate users who are comfortable with selecting backgrounds and the using basic Photoshop tools.

I've also included a movie tutorial for those more comfortable watching the entire process at the bottom of this blog.
  • Start with a new blank canvas and add some large text with a nice bold font that fills about half your canvas area.
  • Layer > Flatten Image
  • Filter > Pixelate > Crystallize (try settings between 5-10)
  • Select the background then Select > Similar (to get all of the background between letters)
  • Select > Inverse to select just the text
  • Filter > Noise > Add Noise (I use between 50-70)
  • Filter > Blur > Gaussian blur (2-4)
  • Select > All
  • Image > Adjust > Invert
  • Image > Rotate > 90 degrees CW
  • Filter > Stylize > Wind (Blast-direction-Right)
  • Image > Rotate > 90 degrees CCW
  • Select background
  • Select > Similar > delete (background should be deleted to your background color white)
  • Select > Inverse (selects just the text now)
  • Image > Adjustment > Color Balance (add blue and cyan as desired)

Jumat, 05 November 2010

Photoshop - Amazing effects using Textures on Photographs

Here is a simple trick to create AMAZING effects on a photo without a lot of steps.
Find or better yet, take a photograph of an interesting texture. It could be gravel, tree bark, wood grain, or anything your imagination comes up with.
Or, here is a free site that contains hundreds of free high resolution textures. http://amazingtextures.com/textures/
This is the texture I decided to use. It has a lot of character!
Open any photograph you want to add a special effect to. I decided this texture might look good on a barn.
When you have your texture and photograph here are the steps you need to follow:
Open your texture, Select > All, Edit > Copy.
Open your photograph.
Edit > Paste
This will paste your texture in a layer above your photograph.
Now we're going to play with something called "Blending Modes". Don't worry if you've never used a Blending mode before. I'll walk you through it.
Make sure your Layers palette is open. If not Window > Layers
Select the top layer (layer with the texture)
Change the blending mode to Overlay.
Instantly you'll see the amazing effects of your texture applied to your photo.
You can even adjust these effects. To get less of a texture change the opacity of the texture layer down below 100%.
What a great way to create "faux" paintings for yourself or friends.
Enjoy!

Selasa, 02 November 2010

Create a decorative frame border

Greetings Fellow Fun Seekers!
Want to add a decorative frame border around your photograph?
Let's see how you can go from thisTo this with just a couple clicks of the mouse.
There is a "Wooden Frame" Action built right into Photoshop. An Action is basically a bunch of recorded steps in Photoshop ready to play in sequence for you. Here is all you need to do.
  1. From the Photoshop Window menu select "Actions"
  2. Click on the Wood Frame Action
  3. Select the Play button at the bottom of the panel
  4. A message will come up telling you that your image needs to be at least 100 pixels wide. Click Continue.
That's it. You have a wonderful frame around your photo like shown above.

Take it to the next level
Want to customize the color of your frame? It involves editing the Action but I know you can do this.
In the Wood Frame Action, click the box next to "Fill". This will STOP the Action at this point so that YOU can choose a color for your frame.

Open an image and select the Wooden Frame Action. Click the Play button again. This time the action will stop allowing you to pick any color you want. Open the "Foreground Color" dialog to select a color. I chose a red hue. Then click "OK".
The action will finish playing with your customized color!How kewl is that?

Take it yet to the next level
You can pick a color that resides inside your photograph for frame. When the stopped action comes up asking for a color selection, move your mouse over your photo. An eyedropper appears and you can click on any color in your photograph to be your frame color. Then click OK.
Talk about a perfect matching frame!
Enjoy!