The worst way to edit the contrast in an image is to use the dodge and burn tools on the original image.
You can decide which areas you want brighter or darker. This is the worst way since you are altering the original pixels making it difficult to impossible to go back in time unless you revert before saving or have enough history states to undo what you've done.
You could use an adjustment layer which is nondestructive to edit the brightn
ess and contrast which can be changed without damaging the original document. However, a brightness and contrast adjustment layer changes the lighting for the entire image giving you no control on what gets brightened and what gets darkened.
This is where using a new layer with an Overlay Blend Mode comes to the rescue. I've seen the Blend Modes in the Layers palette but never found a good use for them until now.
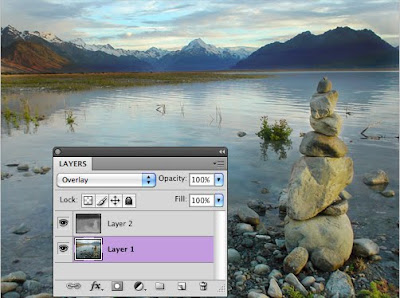
Create a new layer by alt/opt clicking the new layer icon in the bottom of the layer palette. You'll get the options as shown on the left.
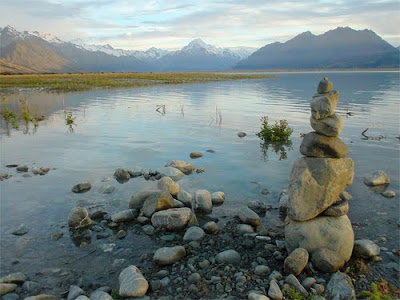
Select Overlay for the Blend mode when the option palette opens when doing this. Select Fill with Overlay-neutral color 50% gray. Overlay will completely ignore anything that is 50% gray thus the layer will be transparent to the photo below. Next, we'll change the 50% gray layer to darker gray where we want it darker, and lighter gray where we want to lighten the image. In this image I wanted to highlight/lighten the stacked rock formation. It's a little too dark. I used the white paint brush at 20% opacity to paint the rocks lighter on the gray Overlay layer.
The background was way too light. I used the black paintbrush at 30% opacity to darker the gray around the mountains. The gray that was darker, darkened the areas I wanted and gray on the Overlay layer that was lightened, made the rocks and foreground lighter.
This way I was able to customize the darkness and lightness exactly how I wanted and could go back with either lighter or darker painting of the gray layer to fine tune my adjustments. This method of using Overlay with 50% gray fill (the neutral/ignored color) allowed me to do non destructive editing with much more control.
Now there's a handy feature using the Blend Modes that I really like! I'll be showing you some more Blend Mode tricks in upcoming blogs and we can learn them together.
Enjoy!
Could you pass the drivers exam if you took it today? Check your score at the following site:
http://www.autoinsurance.org/driving_test/
 ches of shapes. If you don't see the shape you want, select the flyout menu and select from dozens more as shown in this first image.
 You may need to adjust the font size so that all of your text fits nicely inside your shape. To make it look even nicer, I centered my text too.


