propeller

Minggu, 28 Februari 2010

Layer Sets Basics

Layers in Photoshop can quickly get out of control. If you have too many layers it becomes hard to find the Layer you need to edit.
The first thing you should do is to give descriptive names to your layers. To do this, just double click on any default Layer name (Layer 1 ex.) and give it a name that will make sense to you.
In my example, I have different seasonal shapes that I use for my logo depending on the time of year. I've named each shape layer and only have the leaf layer visible for my fall logo.
Instead of having to scroll through numerous layers the best way to manage all these layers is to group similar items into folders.
To create a folder set/group, just click on the folder icon in the bottom of the layers palette. Give the folder a descriptive name then drag the layers you want grouped together into this folder.
As you can see I don't have to scroll to find a layer since I've placed all my seasonal shapes into one handy folder.
To access and open these layers, simply click on the small arrow to the left of the folder.
What a nice way to organize a list of layers in Photoshop!

Rabu, 24 Februari 2010

Fixing the Locked Layer Error

When editing a photo in Photoshop, have you ever gotten an annoying message like this?
It's not just because Photoshop is having a bad day and is grumpy. This is because by default, an open image in Photoshop is assigned to be a Background layer. The Background layer is a special type of Layer. When I say "special", I don't mean it's better somehow than normal Layers. It has strict limitations put on it which the normal layers don't have. It has all the responsibility of looking after and protecting that original photo while you're working on it.
You can unlock it so that you can work on it and make any changes you want. Simply double click the name of the layer (Background) and give it a new name like in my example below.

Too much work?
Alt/Opt click that layer and it changes from a Background Layer to Layer 0 and you can make any changes you want.
BEST IDEA
Drag the background layer to the new layer icon in the bottom of the Layer's palette. You'll always have your original image to go back to any never permanently harm pixels again!
The next time you get that annoying message, it will remind you to duplicate your Background Layer and do your editing on the duplicated Layer. No more grumpy Photoshop and no more harming original photos!

Jumat, 19 Februari 2010

New Version of Firefox available

Tired of Internet Explorer? There is a free alternative. Firefox is my favorite web browser.

I like it because

  1. It's not Microsoft
  2. It's faster
  3. More secure
  4. What a cute icon!

The latest version of 3.6 is now available. If you already have Firefox, this new version includes critical patches.

Update to Firefox 3.6 today!

Sabtu, 13 Februari 2010

Free webpage to .pdf creator

PDF (Portable Document Format) files are great and have become the standard. Virtually everyone can open a .pdf file and .pdf files do a wonderful job of keeping Word documents or any other document in the format as they should appear.
Now, have you ever tried to print a webpage? Sometimes only one frame prints or perhaps the right side is chopped off. It can be frustrating.
Here is a wonderful free solution for printing webpages to a .pdf format.
PDFmyURL is a web-based tool that converts any page to PDF format, on any operating system, and with hardly any trouble.
Just go to the following site, type in the web address and download the nicely formatted .pdf file.
Enjoy!

http://pdfmyurl.com/

Rabu, 10 Februari 2010

Happy Birthday Photoshop!


Photoshop turns 20 February 10th!

It's hard to believe but I remember when Photoshop looked like this! It was March 4th, 1989.
I'm trying to think of life before Photoshop but that's almost like thinking about life before the Internet.
All I can say is Thank You Photoshop! I can't wait to see what you do next!
Want to see more screen shots of the original Photoshop? You can see what we used to work with here and here.
Want to see the Photoshop timeline? Check it out here.
Happy Birthday Photoshop!

Minggu, 07 Februari 2010

Customizing keyboard shortcuts in Photoshop

I learned very quickly to use the keyboard shortcuts available inPhotoshop. They save me tons of time and trouble.

However, some of the things I use most often don’t have a shortcut.

One of my favorite tools inPhotoshopis Exposure.
When I go to Image, Adjustments then Exposure, I can see in the menu that there’s not a provided shortcut I can use. (shortcuts are displayed in File Menus to the right of a menu item)

Why is there no shortcut for the thing I use the most? Well there’s a fix for that. You can edit and create your own keyboard shortcuts inPhotoshop. Here’s how.

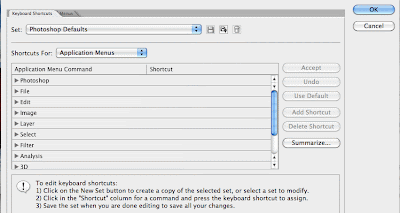
Go to Edit, Keyboard Shortcuts and you’ll see the following menu.

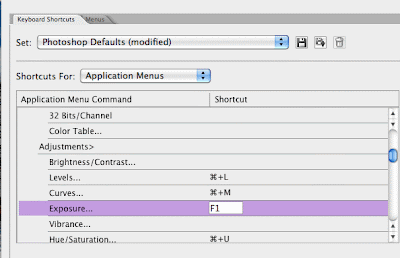
Photoshop gives us three different types, or categories, of keyboard shortcuts that we can create. All of the menu items will be found here. I’ll find Exposure under the Application Menus, under Image Adjustment.Scroll down until you see the feature you want to create a shortcut to.

I can simply type in the keyboard shortcut I want to use to access it. Now, one of the problems you'll undoubtedly run into when customizing your own shortcuts in Photoshop is that Adobe has already used up many of the key combinations you'll want to use.

For example, F1 is currently being used for undo. (Photoshop gives me a warning when I use the F1 key here) I’m used to using command/control Z to undo so F1 would be a good spot for my exposure command.

I'm quite willing to reassign F1 to the Exposure tool which I use all the time, so I'll simply click theAcceptbutton on the top right of the scroll window to accept this change.

I can now see in the original window that opened thatPhotoshophas created a new keyboard shortcut file calledPhotoshopDefaults (modified).If I want, I can change the name to something like "My Shortcuts" and click the Save button. This is really handy if more than 1 person is using the computer!