propeller

Jumat, 25 Januari 2008

Free audio recording software


FREE recording software
Do you want to do some recording or share a sound file?
Audacity is a FREE Cross-Platform sound editor that I really enjoy. It can record your voice or edit audio you already have. Just when you thought life couldn’t get any better, it’s available for both Mac OS X, Windows and Linux.

Some of the features include:
  • Recording from microphone or line input
  • Import numerous sound formats like WAV, AIFF, AU, MPEG, MP3 and more
  • Edit with Cut, Copy and Paste ease
  • Special effects like volume fades, filters to remove static, echo and more
  • Quality option control (16-bit, 32-bit, up to 96 Khz)

To download Audacity visit their website at http://audacity.sourceforge.net/
If being free isn’t enough, Audacity also provides free tutorials.

Senin, 14 Januari 2008

Free anti-spyware software

Protect your computer!
Some people have nothing better to do than to cause problems and create programs referred to Spyware and Adware. These programs get installed unknowingly on your computer and can be at the least annoying and sometimes downright dangerous.

Adware: Installed by stealth on computers, Adware is software that causes disruptive and unwanted advertising to appear in various programs.
Spyware: Spyware is software that is installed by stealth on computers and used to track the user's downloads, web surfing habits and individual keystrokes. This information is then secretly relayed via a backdoor to an external third-party.

SpyBot and Ad-Aware to the rescue!
SpyBot is a FREE product that can locate and destroy many of these spyware and adware programs hidden on your computer
Unlike anti-virus programs, you can and should have more than one software to protect you from spyware. That’s why I also installed Ad-Aware on my personal computer. If one program doesn’t find these naughty files, the other one does!
I run both of these programs weekly on my computer to search for spyware and adware.
However, beware of sound alike software! There are numerous programs out there claming to be programs that fight spyware that actually ARE spyware programs!
So, I’m including links to 2 of my favorite programs you can trust to fight these problems. The best part, is they are FREE!

SpyBot
http://www.safer-networking.org/en/download/index.html
Ad-Aware
http://www.lavasoftusa.com/single/trialpay.php

Kamis, 10 Januari 2008

Photoshop - How to create panoramas

Perfect Panoramas

Hidden inside of Photoshop CS3 and Photoshop Elements is the perfect tool you need to create flawless panoramas. Making panoramas has been possible in earlier version of Photoshop but it didn’t do a tremendous job of blending images, had problems with different exposure and leaving visible seams. Photoshop’s Photomerge comes to the rescue.
Our first step is taking the photos.

Taking the photos

If you have a tripod, use it. A tripod will give you the best results. It’s difficult to hold the camera at the exact same level each time you take a photo. However, don’t worry if you don’t have a tripod. Photoshop will still give you good results if you just hand hold your camera while taking the photos. Just try to keep the camera level.
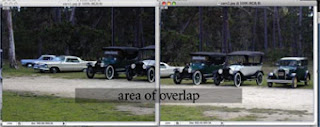
It’s critical that you have an overlap from one photo to the next. Photoshop looks for matching shapes and blends the images together. Start on the left side of the scene when taking the first photo. The next shot you take should include some of the subject matter that was in the first photo. I like to have about 1/3 of the following photo overlap the area of the first photo. In the example below, I have almost ½ of an image overlap. Don't zoom in or out during this process, keep the camera as level as possible, and stay in the same spot.
Continue photographing to the right overlapping each photo until you reach the end of the scene. You can have 2, 3 4 or more photos for your panorama.
When you've got your series of images, it's time to fire up Photoshop CS3 (or Photoshop Elements) and make your panorama.

Making the Panorama

Why Adobe decided to put the panorama tool in different locations for Photoshop CS3 and Photoshop Elements beats me. So, here is where you find the panorama tool.

Photoshop CS3 – File – Automate - Photomerge
Photoshop Elements - File – New – Photomerge Panorama. I don’t know why Adobe needed to put this in a different spot for Elements, especially when there is an Automation Tools link under the File menu. Strangely, this link is grayed out. I guess I should be happy to have found it in Elements.

After you find and click on Photomerge, the process is the same for both.
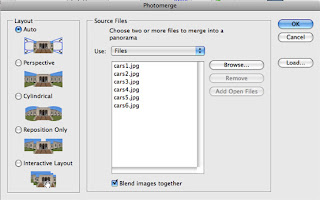
Click on the Browse button to open your photographs
You’ll have several options for Layout. I use Auto because it takes care of everything. Feel free to try the others. I’ve needed to use the Interactive Layout to manually move images when Photoshop didn’t place images properly. Make sure Blend images together is checked.

Click OK and Photoshop will create your panorama. Photoshop creates seamless blending by placing each photo on a separate layer and using a layer mask to hide the seams. What an improvement from the last version of Photoshop!

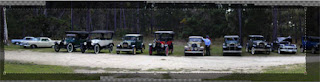
You’ll probably notice some spaces at the top or bottom of the photograph if you hand held the camera. This can be remedied by using the crop tool .


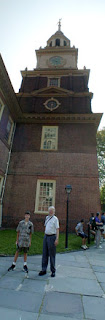
Keep in mind that your panoramas are not limited to horizontal images. I took this photo of Independence Hall with the same methods mentioned above. I just needed to rotate the image 90 degrees counter clockwise after it finished stitching. (Edit - Transform - Rotate) I also needed to crop the image to remove some empty places like before.

Jumat, 04 Januari 2008

Zoomify in Photoshop

Zoomify

Have you ever wanted to put a high-resolution photo on the web so that users could see the little details?
Browsers now resize images to fit in the browser window. This eliminates the scrolling we used to do, but trying to zoom in and navigate around to see what you want can be a challenge. Also, very large images may take some time to display.

Photoshop CS3 to the rescue!
Photoshop comes with a new feature called Zoomify allowing you to use high-quality photos with the ability to zoom and pan interactively in a flash based environment. This technology is also useful if you don’t want people to download a high quality version of your photograph.

How does Zoomify work?
Zoomify slices up your image into small sections or tiles and places them in a folder named TileGroup. What’s neat about this is that you won’t have to wait for the entire image to download. These tiles download separately.
Zoomify also creates a HTML file that contains all the code needed, XML file, Flash file, and a folder containing your tiled images.You need to keep these files together as they were placed in the folder that was created. The folder created for me used the file name of my image to create a folder named map_img. My map.html file is located just outside this folder

Click here to see my example I created.When I exported my image I selected to use the optional navigation box, which displays in the upper left corner.

To zoom you just click on the image or use the navigation tools provided at the bottom of the image. Your picture could display a moment at a low resolution then redraw at the final high quality resolution showing all of the details of the image.

What a great way to share high resolution photographs on the web!

For instructions on using Zoomify, click here.

Rabu, 02 Januari 2008

Free online photo sharing and storage

Share your holiday photos online!

If you have a digital camera, it’s very likely that you took a lot of photos during the holidays. How can you easily share your favorite photos?
How about a free online photo storage and sharing site?
If it’s free, what’s the catch? Usually it’s nothing more than limits on file size, having to put up with advertisements, or having your account removed if it isn’t used within a certain amount of time.
There are several sites that offer online photo sharing. All you need to do is to create an account for yourself.
Here’s a list of “free sites” along with the their “catch”.

Flickr
http://www.flickr.com/
“catch” - account deleted after 90 days of inactivity

Shutterfly
http://www.shutterfly.com
“catch” - ads encouraging you to buy calendars, prints and other products

Snapfish
http://snapfish.com
“catch” - need to make one online purchase a year or account is deleted

Kodak Gallery
http://www.kodakgallery.com/Welcome.jsp
“catch” - need to make one online purchase a year or account is deleted